Table of Contents
In one of our earlier tutorials, we covered using the vCluster CLI to create and manage virtual Kubernetes clusters. A virtual Kubernetes cluster runs within a namespace on a host cluster, but it appears to the user as if it’s a full-blown, standalone cluster.
The vCluster CLI is excellent for interactively provisioning virtual clusters, but if you want to create virtual clusters using automation, vCluster’s Helm install is probably a better option for you.
#vCluster Series
- Introduction to Virtual Clusters in Kubernetes
- Kubernetes Namespaces vs. Virtual Clusters
- vcluster Hands-on Tutorial
- High Availability with vcluster
- Virtual Clusters For Kubernetes - Benefits & Use Cases
- Development Environments with vcluster
- How Virtual Kubernetes Clusters Can Speed Up Your Local Development
- Using Virtual Clusters for Development and CI/CD Workflows
- Kubernetes: Virtual Clusters For CI/CD & Testing
- How Codefresh Uses vcluster to Provide Hosted Argo CD
In this hands-on tutorial, we’ll look at how to provision virtual clusters using Helm and how to change vCluster’s behavior using a Helm values file.
If you’re new to vCluster, we recommend going through the introductory tutorial first.
#Prerequsites
For this tutorial, you will need:
- A Kubernetes cluster to use as the host cluster and a kube context that points at it. vCluster works both with local and remote Kubernetes clusters.
- The Helm Command Line Interface (CLI). You can find installation instructions here.
- The vCluster CLI. If you use a Mac with Homebrew, you can install it with this command:
brew install vcluster. For other platforms, see the installation docs.
#1. Provision a vCluster with Helm
If you have previously used the vCluster CLI to create a virtual cluster, you may have noticed that the vcluster create command uses Helm. Here’s some example output:
info   Creating namespace vcluster-my-vcluster
info   failed to find IPv6 service CIDR: couldn't find host cluster Service CIDR ("Service "test-service-kltbh" is invalid: spec.clusterIPs[0]: Invalid value: []string{"2001:DB8::1"}: IPv6 is not configured on this cluster")
info   Detected local kubernetes cluster docker-desktop. Will deploy vcluster with a NodePort & sync real nodes
info   Create vcluster my-vcluster...
info   execute command: helm upgrade my-vcluster /var/folders/gy/d3_c4t1x731_hl8qtrfkhr_h0000gn/T/vcluster-0.15.5.tgz-3388530343 --kubeconfig /var/folders/gy/d3_c4t1x731_hl8qtrfkhr_h0000gn/T/1101813885 --namespace vcluster-my-vcluster --install --repository-config='' --values /var/folders/gy/d3_c4t1x731_hl8qtrfkhr_h0000gn/T/2950643978
done √ Successfully created virtual cluster my-vcluster in namespace vcluster-my-vcluster
info   Waiting for vcluster to come up...
done √ Switched active kube context to vcluster_my-vcluster_vcluster-my-vcluster_docker-desktop
- Use `vcluster disconnect` to return to your previous kube context
- Use `kubectl get namespaces` to access the vcluster
Notice the line that begins with info execute command: helm upgrade.
But instead of using the vCluster CLI, in this tutorial, we’ll run the Helm command directly.
First, let’s create a namespace for the virtual cluster. The default pattern is to name it vcluster- followed by the name of the virtual cluster.
kubectl create namespace vcluster-my-vcluster
Then run the helm upgrade command:
helm upgrade --install my-vcluster vcluster \
  --repo https://charts.loft.sh \
  --namespace vcluster-my-vcluster \
  --repository-config=''
You should see output like this:
Release "my-vcluster" does not exist. Installing it now.
NAME: my-vcluster
LAST DEPLOYED: Tue Aug 22 13:46:13 2023
NAMESPACE: vcluster-my-vcluster
STATUS: deployed
REVISION: 1
TEST SUITE: None
NOTES:
Thank you for installing vcluster.

Your vcluster is named my-vcluster in namespace vcluster-my-vcluster.

To connect to the vcluster, use vcluster CLI (https://www.vcluster.com/docs/getting-started/setup):
  $ vcluster connect my-vcluster -n vcluster-my-vcluster
  $ vcluster connect my-vcluster -n vcluster-my-vcluster -- kubectl get ns


For more information, please take a look at the vcluster docs at https://www.vcluster.com/docs
You can verify the virtual cluster was created correctly using the vcluster list command.
vcluster list
Here’s my example output:
 NAME          NAMESPACE              STATUS    CONNECTED   CREATED                         AGE     CONTEXT
 my-vcluster   vcluster-my-vcluster   Running               2023-08-22 13:46:13 -0700 PDT   4m14s   docker-desktop
To interact with the virtual cluster, we use the connect command.
vcluster connect my-vcluster
The output will look like:
done √ Switched active kube context to vcluster_my-vcluster_vcluster-my-vcluster_docker-desktop
warn   Since you are using port-forwarding to connect, you will need to leave this terminal open
- Use CTRL+C to return to your previous kube context
- Use `kubectl get namespaces` in another terminal to access the vcluster
Forwarding from 127.0.0.1:12168 -> 8443
Forwarding from [::1]:12168 -> 8443
At this point, the virtual cluster is up and running, and we can interact with it just like any other Kubernetes cluster.
Hit CTRL+C as the output instructed to disconnect the port forwarding. Then delete the virtual cluster using Helm.
helm delete my-vcluster -n vcluster-my-vcluster --repository-config=''
You should see:
release "my-vcluster" uninstalled
#2. Create a vCluster using a Helm values file
One of the big differences between creating a virtual cluster with the vCluster CLI and creating one with Helm is that with the CLI we can pass command line flags to control vCluster’s behavior. That’s not the case with Helm. To make those modifications when we install with Helm we use a values file.
Create a file called vcluster.yaml in your current directory with these contents:
vcluster:
  image: rancher/k3s:v1.27.4-k3s1
By placing this entry in the file, we’ll pin the version of Kubernetes that runs in the virtual cluster to this specific version (1.27.4).
Now let’s create a vCluster with that file.
helm upgrade --install my-vcluster vcluster \
  --values vcluster.yaml \
  --repo https://charts.loft.sh \
  --namespace vcluster-my-vcluster \
  --repository-config=''
Then run vcluster list. Your output should look something like this:
NAME          NAMESPACE              STATUS    CONNECTED   CREATED                         AGE   CONTEXT
 my-vcluster   vcluster-my-vcluster   Running               2023-08-23 10:44:54 -0700 PDT   29s   docker-desktop
Next, let’s check that we got the version of Kubernetes that we wanted. We can run the vcluster connect command and pass in a kubectl command directly instead of port forwarding.
vcluster connect my-vcluster -n vcluster-my-vcluster -- kubectl version
You should get output like:
Client Version: v1.28.0
Kustomize Version: v5.0.4-0.20230601165947-6ce0bf390ce3
Server Version: v1.27.4+k3s1
That’s the server version we specified in the values file, 1.27.4.
Run these commands to clean up:
helm delete my-vcluster -n vcluster-my-vcluster --repository-config=''
kubectl delete namespace vcluster-my-vcluster
#3. Examine the default Helm values on GitHub
We can see the complete list of values that can be modified and their default settings by looking in the GitHub repo for vCluster. Inside the vCluster repo is a subdirectory called charts, and inside of that is a subdirectory for each vCluster distro.
If you’re not familiar with what a vCluster distro is, the distro is the distribution of Kubernetes that runs inside of the virtual cluster. The default is k3s, and the other supported distros are k0s, eks, and k8s (a larger Kubernetes install that uses etcd).
We’ve used the default distro for this tutorial, k3s. To view its default values, we’d want to examine the file vcluster/charts/k3s/values.yaml.
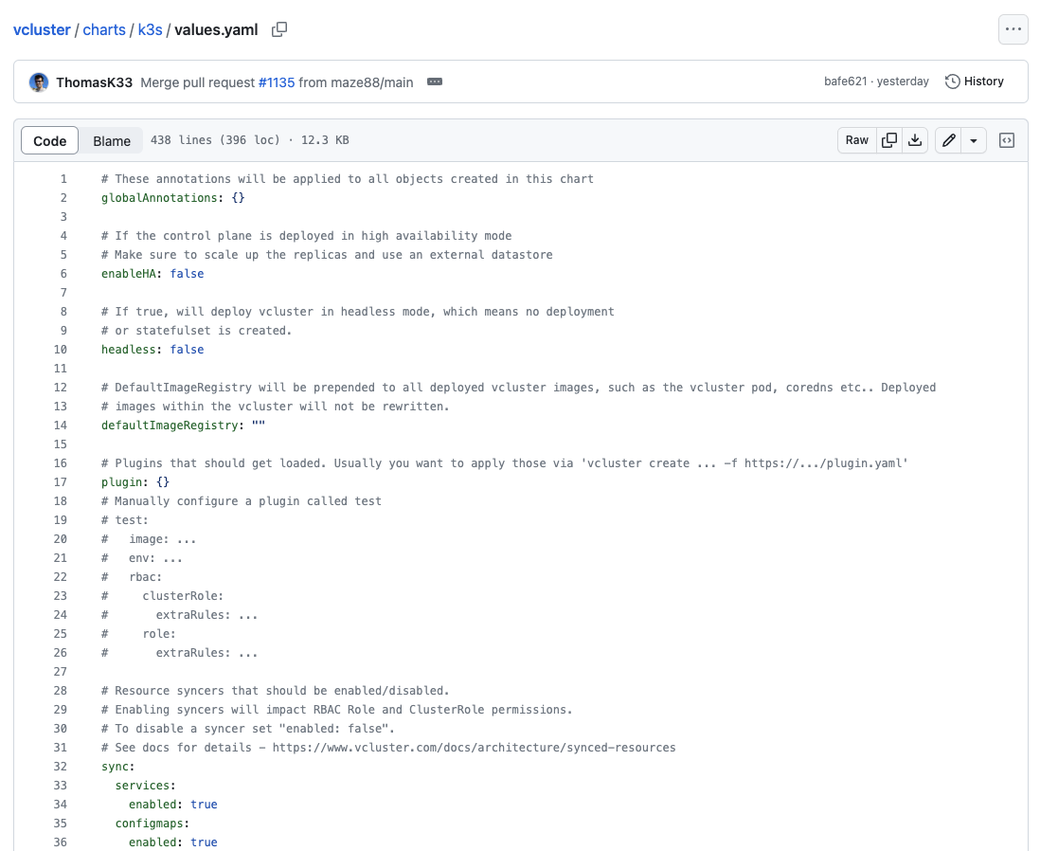
You can view the entire file here.
You’ll see the list of all the values supported for that distro and their defaults. To override those default values, put the option and the new value in your vcluster.yaml file that you use for the Helm install, as we did in the previous step.
#To learn more
In this tutorial, you’ve learned how to create and delete vClusters with Helm and how to modify the behavior of the virtual clusters using Helm values. Here are some resources if you’d like to learn more about creating vClusters with Helm.
- The vCluster documentation
- More on vCluster distros
- Helm’s documentation on values files
In addition, we have a Loft Labs Community Slack with a #vcluster channel, where the maintainers and many other users can help if you have questions. Join the Slack here.