

Table of Contents
Are you planning to deploy a database in the Kubernetes cluster? If so, then you’ve come to the right place. Kubernetes is a container orchestration tool that uses many controllers to run applications as containers (Pods). One of these controllers is called StatefulSet, which is used to run stateful applications.
Deploying stateful applications in the Kubernetes cluster can be a tedious task. This is because the stateful application expects primary-replica architecture and a fixed Pod name. The StatefulSets controller addresses this problem while deploying the stateful application in the Kubernetes cluster.
In this article, you will learn more about what StatefulSets in the Kubernetes cluster are and when to use them, as well as how to deploy the stateful application using the StatefulSets controller in a step-by-step example that includes all the manifest (YAML) files. Furthermore, the StatefulSets concept will be demonstrated using the MySQL database, which covers how to create a fixed Pod name for each MySQL replication and how to access the replicated Pods using the Services object.
#What Are Stateful Applications?
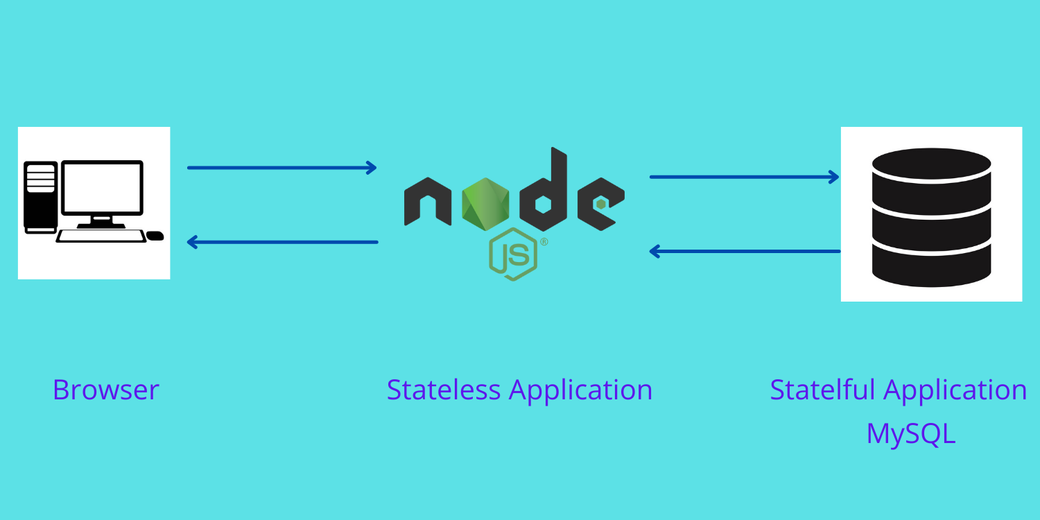
Stateful applications are applications that store data and keep tracking it. All databases, such as MySQL, Oracle, and PostgreSQL, are examples of stateful applications. Stateless applications, on the other hand, do not keep the data. Node.js and Nginx are examples of stateless applications. For each request, the stateless application will receive new data and process it.
In a modern web application, the stateless application connects with stateful applications to serve the user’s request. A Node.js application is a stateless application that receives new data on each request from the user. This application is then connected with a stateful application, such as a MySQL database, to process the data. MySQL stores data and keeps updating the data based on the user’s request.
Read on to learn more about StatefulSets in the Kubernetes cluster—what they are, when to use them, how to create them, and what the best practices are.
#What Are StatefulSets?
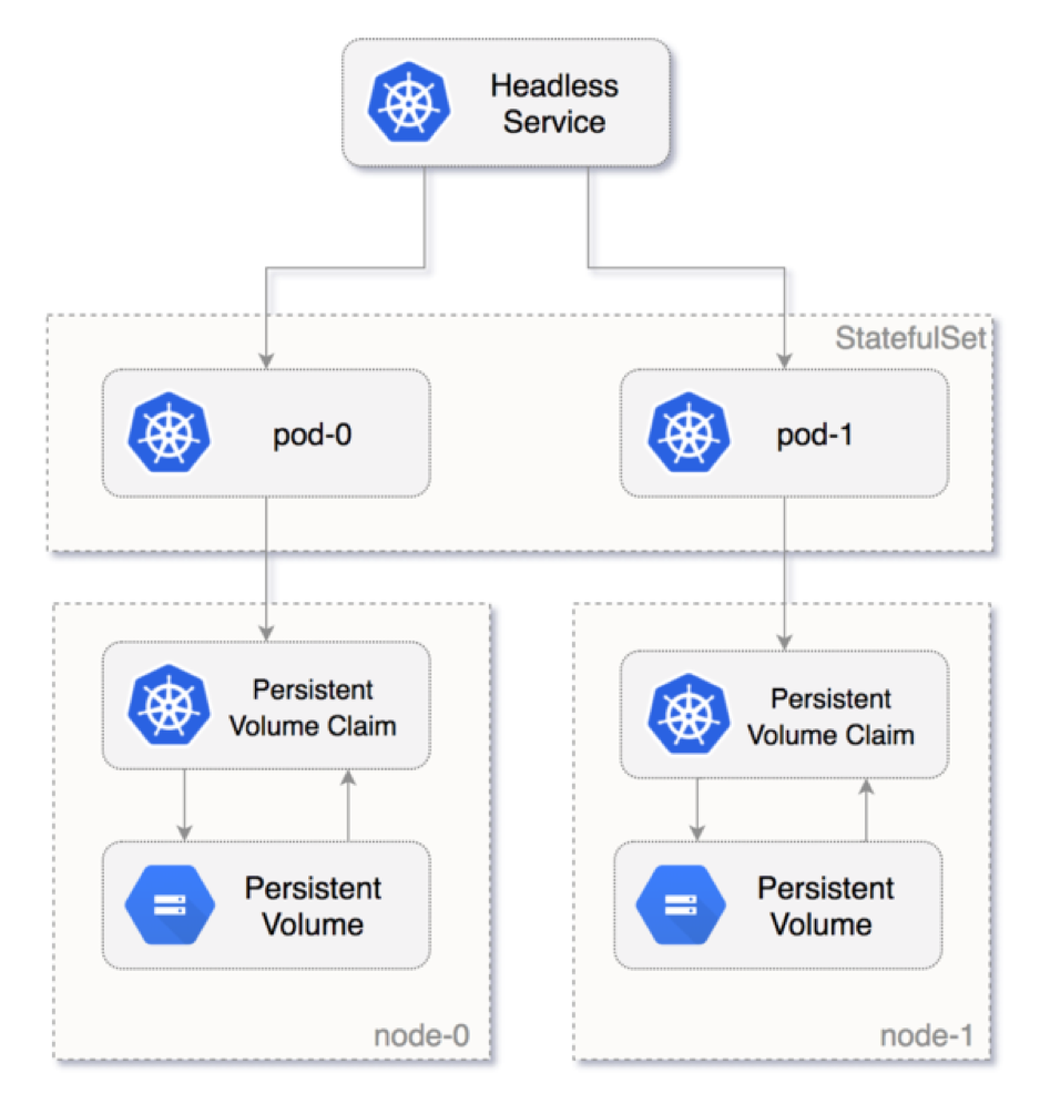
A StatefulSet is the Kubernetes controller used to run the stateful application as containers (Pods) in the Kubernetes cluster. StatefulSets assign a sticky identity—an ordinal number starting from zero—to each Pod instead of assigning random IDs for each replica Pod. A new Pod is created by cloning the previous Pod’s data. If the previous Pod is in the pending state, then the new Pod will not be created. If you delete a Pod, it will delete the Pod in reverse order, not in random order. For example, if you had four replicas and you scaled down to three, it will delete the Pod numbered 3.
The diagram below shows how the Pod is numbered from zero and how Kubernetes persistent volume is attached to the Pod in the StatefulSets.
#When to Use StatefulSets
There are several reasons to consider using StatefulSets. Here are two examples:
- Assume you deployed a MySQL database in the Kubernetes cluster and scaled this to three replicas, and a frontend application wants to access the MySQL cluster to read and write data. The read request will be forwarded to three Pods. However, the write request will only be forwarded to the first (primary) Pod, and the data will be synced with the other Pods. You can achieve this by using StatefulSets.
- Deleting or scaling down a StatefulSet will not delete the volumes associated with the stateful application. This gives you your data safety. If you delete the MySQL Pod or if the MySQL Pod restarts, you can have access to the data in the same volume.
#Deployment vs. StatefulSets
You can also create Pods (containers) using the Deployment object in the Kubernetes cluster. This allows you to easily replicate Pods and attach a storage volume to the Pods. The same thing can be done by using StatefulSets. What then is the advantage of using StatefulSets?
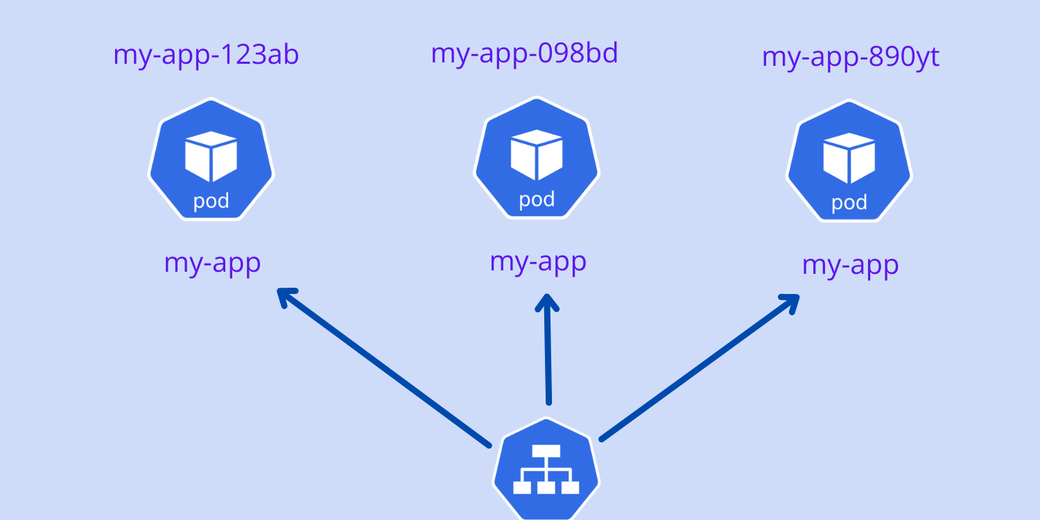
Well, the Pods created using the Deployment object are assigned random IDs. For example, you are creating a Pod named “my-app”, and you are scaling it to three replicas. The names of the Pods are created like this:
my-app-123ab
my-app-098bd
my-app-890yt
After the name “my-app”, random IDs are added. If the Pod restarts or you scale it down, then again, the Kubernetes Deployment object will assign different random IDs for each Pod. After restarting, the names of all Pods appear like this:
my-app-jk879
my-app-kl097
my-app-76hf7
All these Pods are associated with one load balancer service. So in a stateless application, changes in the Pod name are easily identified, and the service object easily handles the random IDs of Pods and distributes the load. This type of deployment is very suitable for stateless applications.
However, stateful applications cannot be deployed like this. The stateful application needs a sticky identity for each Pod because replica Pods are not identical Pods.
Take a look at the MySQL database deployment. Assume you are creating Pods for the MySQL database using the Kubernetes Deployment object and scaling the Pods. If you are writing data on one MySQL Pod, do not replicate the same data on another MySQL Pod if the Pod is restarted. This is the first problem with the Kubernetes Deployment object for the stateful application.
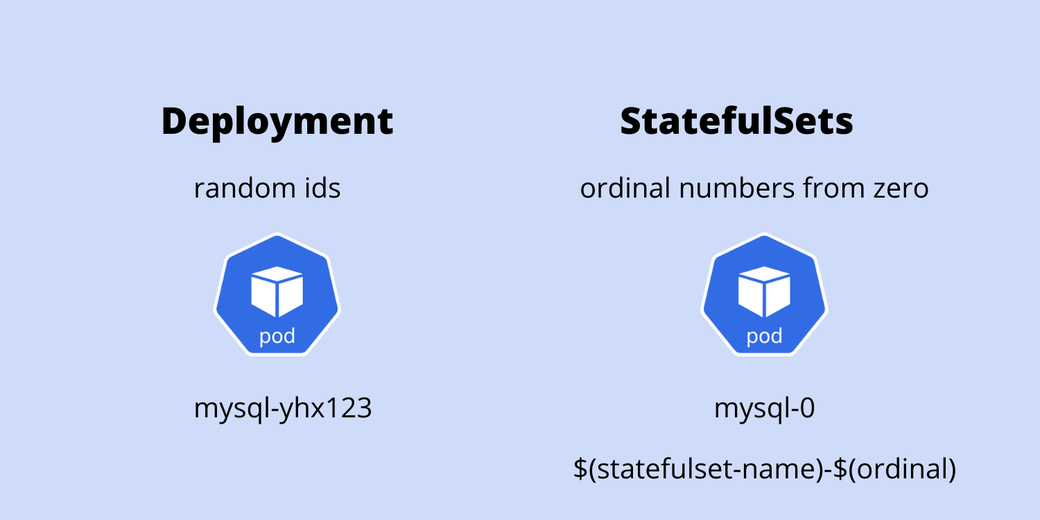
Stateful applications always need a sticky identity. While the Kubernetes Deployment object offers random IDs for each Pod, the Kubernetes StatefulSets controller offers an ordinal number for each Pod starting from zero, such as mysql-0, mysql-1, mysql-2, and so forth.

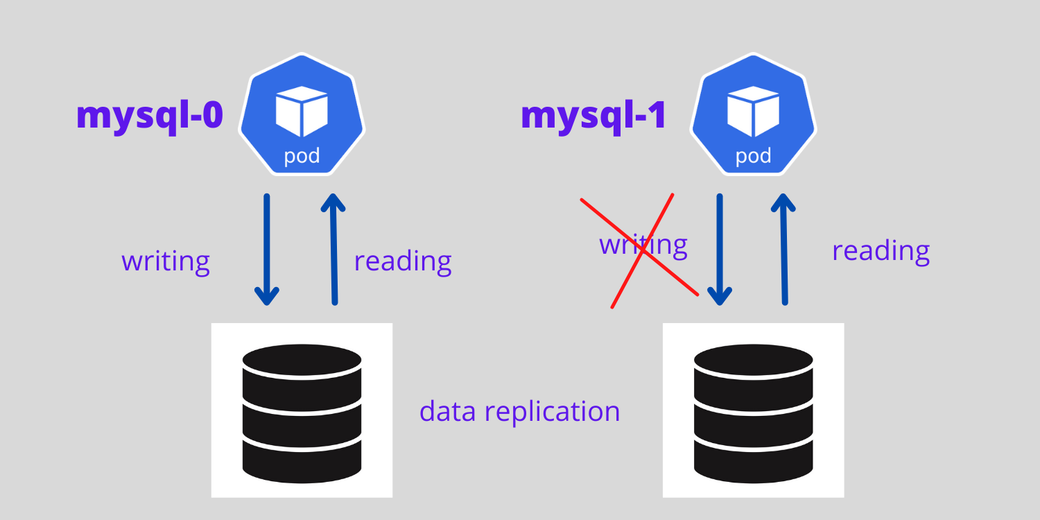
For stateful applications with a StatefulSet controller, it is possible to set the first Pod as primary and other Pods as replicas—the first Pod will handle both read and write requests from the user, and other Pods always sync with the first Pod for data replication. If the Pod dies, a new Pod is created with the same name.
The diagram below shows a MySQL primary and replica architecture with persistent volume and data replication architecture.
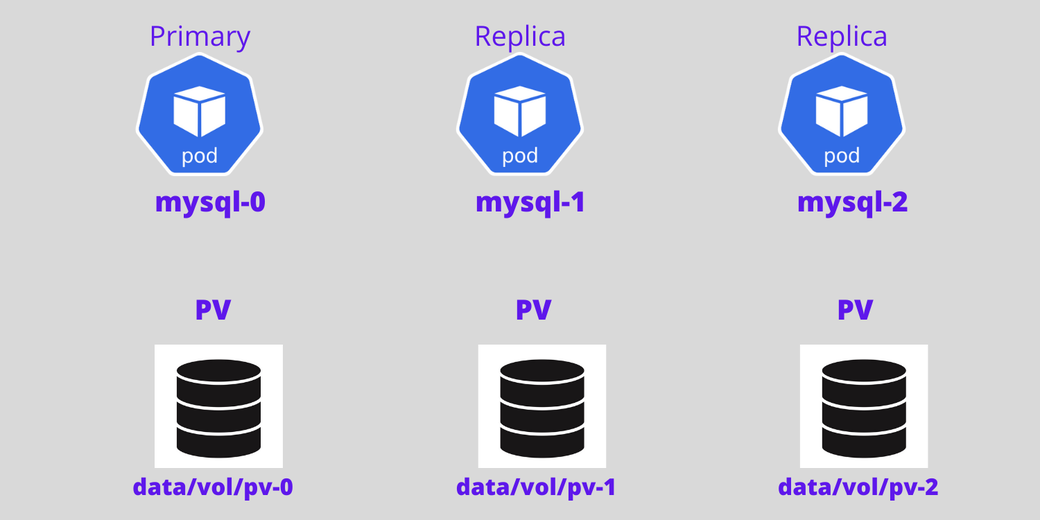
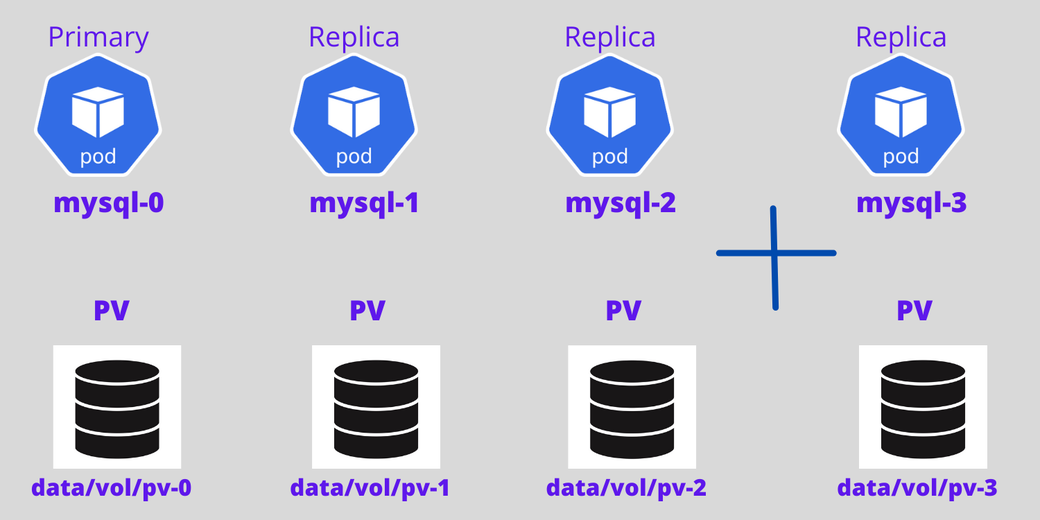
Now, add another Pod to that. The fourth Pod will only be created if the third Pod is up and running, and it will clone the data from the previous Pod.
In summary, StatefulSets provide the following advantages when compared to Deployment objects:
- Ordered numbers for each Pod
- The first Pod can be a primary, which makes it a good choice when creating a replicated database setup, which handles both reading and writing
- Other Pods act as replicas
- New Pods will only be created if the previous Pod is in running state and will clone the previous Pod’s data
- Deletion of Pods occurs in reverse order
#How to Create a StatefulSet in Kubernetes
In this section, you will learn how to create a Pod for MySQL database using the StatefulSets controller.
#Create a Secret
To start, you will need to create a Secret for the MySQL application that will store sensitive information, such as usernames and passwords. Here, I am creating a simple Secret. However, in a production environment, using the HashiCorp Vault is recommended. Use the following code to create a Secret for MySQL:
apiVersion: v1
kind: Secret
metadata:
  name: mysql-password
type: opaque
stringData:
  MYSQL_ROOT_PASSWORD: password
Save the code using the file name mysql-secret.yaml and execute the code using the following command on your Kubernetes cluster:
kubectl apply -f mysql-secret.yaml
Get the list of Secrets:
kubectl get secrets
#Create a MySQL StatefulSet Application
Before creating a StatefulSet application, check your volumes by getting the persistent volume list:
kubectl get pv
NAME                   CAPACITY   ACCESS MODES   RECLAIM     STATUS
pvc-e0567   		10Gi       	RWO            	Retain           Bound
Next, get the persistent volume claim list:
kubectl get pvc

NAME                      	      STATUS   VOLUME                 	    CAPACITY   ACCESS
mysql-store-mysql-set-0   Bound    	pvc-e0567d43ffc6405b   10Gi       	RWO
Last, get the storage class list:
kubectl get storageclass

NAME                    			PROVISIONER               	RECLAIMPOLICY
linode-block-storage    		linodebs.csi.linode.com   	Delete
linode-block-storage-retain (default)   linodebs.csi.linode.com  	Retain
Then use the following code to create a MySQL StatefulSet application in the Kubernetes cluster:
apiVersion: apps/v1
kind: StatefulSet
metadata:
  name: mysql-set
spec:
  selector:
    matchLabels:
      app: mysql
  serviceName: "mysql"
  replicas: 3
  template:
    metadata:
      labels:
        app: mysql
    spec:
      terminationGracePeriodSeconds: 10
      containers:
      - name: mysql
        image: mysql:5.7
        ports:
        - containerPort: 3306
        volumeMounts:
        - name: mysql-store
          mountPath: /var/lib/mysql
        env:
          - name: MYSQL_ROOT_PASSWORD
            valueFrom:
              secretKeyRef:
                name: mysql-password
                key: MYSQL_ROOT_PASSWORD
  volumeClaimTemplates:
  - metadata:
      name: mysql-store
    spec:
      accessModes: ["ReadWriteOnce"]
      storageClassName: "linode-block-storage-retain"
      resources:
        requests:
          storage: 5Gi
Here are a few things to note:
- The
kindis a StatefulSet.kindtells Kubernetes to create a MySQL application with the stateful feature. - The password is taken from the Secret object using the
secretKeyRef. - The Linode block storage was used in the
volumeClaimTemplates. If you are not mentioning any storage class name here, then it will take the default storage class in your cluster. - The replication count here is 3 (using the replica parameter), so it will create three Pods named
mysql-set-0,mysql-set-1, andmysql-set-2.
Next, save the code using the file name mysql.yaml and execute using the following command:
kubectl apply -f mysql.yaml
Now that the MySQL Pods are created, get the Pods list:
kubectl get pods

NAME          READY   STATUS      RESTARTS   AGE
mysql-set-0   1/1         Running        0                 142s
mysql-set-1   1/1         Running        0                 132s
mysql-set-2   1/1         Running        0                 120s
#Create a Service for the StatefulSet Application
Now, create the service for the MySQL Pod. Do not use the load balancer service for a stateful application, but instead, create a headless service for the MySQL application using the following code:
apiVersion: v1
kind: Service
metadata:
  name: mysql
  labels:
    app: mysql
spec:
  ports:
  - port: 3306
  clusterIP: None
  selector:
    app: mysql
Save the code using the file name mysql-service.yaml and execute using the following command:
kubectl apply -f mysql-service.yaml
Get the list of running services:
kubectl get svc
#Create a Client for MySQL
If you want to access MySQL, then you will need a MySQL client tool. Deploy a MySQL client using the following manifest code:
apiVersion: v1
kind: Pod
metadata:
  name: mysql-client
spec:
  containers:
  - name: mysql-container
    image: alpine
    command: ['sh','-c', "sleep 1800m"]
    imagePullPolicy: IfNotPresent
Save the code using the file name mysql-client.yaml and execute using the following command:
kubectl apply -f mysql-client.yaml
Then enter this into the MySQL client:
kubectl exec --stdin --tty mysql-client -- sh
Finally, install the MySQL client tool:
apk add mysql-client
#Access the MySQL Application Using the MySQL Client
Next, access the MySQL application using the MySQL client and create databases on the Pods.
If you are not already in the MySQL client Pod, enter it now:
kubectl exec -it mysql-client /bin/sh
To access MySQL, you can use the same standard MySQL command to connect with the MySQL server:
mysql -u root -p -h host-server-name
For access, you will need a MySQL server name. The syntax of the MySQL server in the Kubernetes cluster is given below:
stateful_name-ordinal_number.mysql.default.svc.cluster.local

#Example
mysql-set-0.mysql.default.svc.cluster.local
Connect with the MySQL primary Pod using the following command. When asked for a password, enter the one you made in the “Create a Secret” section above.
mysql -u root -p -h mysql-set-0.mysql.default.svc.cluster.local
Next, create a database on the MySQL primary, then exit:
create database erp;
exit;
Now connect the other Pods and create the database like above:
mysql -u root -p -h mysql-set-1.mysql.default.svc.cluster.local

mysql -u root -p -h mysql-set-2.mysql.default.svc.cluster.local
Remember that while Kubernetes helps you set up a stateful application, you will need to set up the data cloning and data sync by yourself. This cannot be done by the StatefulSets.
#Best Practices
If you are planning to deploy stateful applications, such as Oracle, MySQL, Elasticsearch, and MongoDB, then using StatefulSets is a great option. The following points need to be considered while creating stateful applications:
- Create a separate namespace for databases.
- Place all the needed components for stateful applications, such as ConfigMaps, Secrets, and Services, in the particular namespace.
- Put your custom scripts in the ConfigMaps.
- Use headless service instead of load balancer service while creating Service objects.
- Use the HashiCorp Vault for storing your Secrets.
- Use the persistent volume storage for storing the data. Then your data won’t be deleted even if the Pod dies or crashes.
Deployment objects are the most used controller to create Pods in Kubernetes. You can easily scale these Pods by mentioning replication count in the manifest file. For stateless applications, using Deployment objects is most suitable. For example, assume you are planning to deploy your Node.js application and you want to scale the Node.js application to five replicas. In this case, the Deployment object is well suited.
The diagram below shows how Deployment and StatefulSets assign names to the Pods.
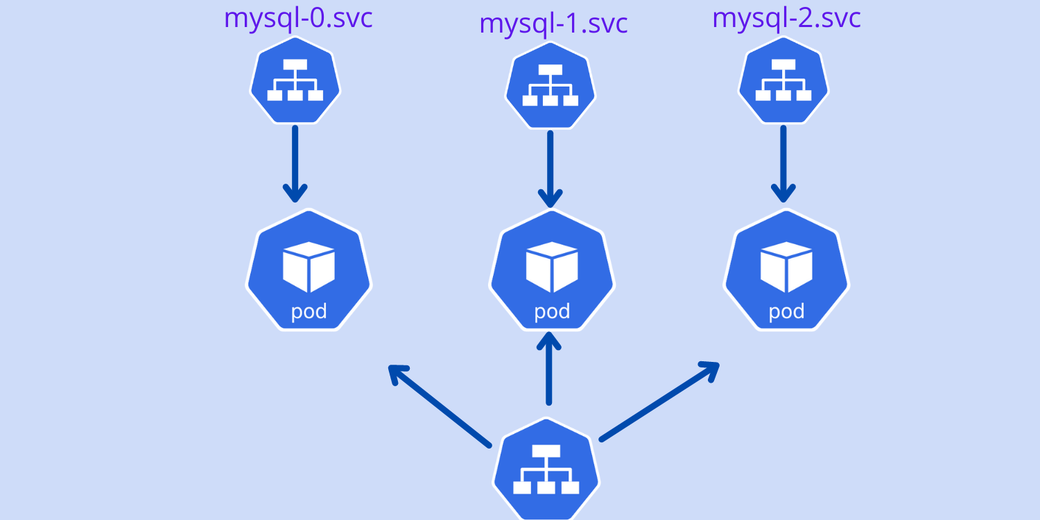
StatefulSets create ordinal service endpoints for each Pod created using the replica option. The diagram below shows how the stateful Pod endpoints are created with ordinal numbering and how they communicate with each other.
#Conclusion
In this article, you learned about Kubernetes’s two main controllers for creating Pods: Deployments and StatefulSets. A Deployment object is well suited for stateless applications, and the StatefulSets controller is well suited for stateful applications. If you are planning to deploy stateful applications, such as MySQL and Oracle, then you should use the StatefulSets controller instead of the Deployment object.
The StatefulSets controller offers an ordinal number feature for each Pod starting from zero. This helps stateful applications easily set up a primary-replica architecture, and if a Pod dies, a new Pod is re-created using the same name. This is a very useful feature and does not break the chain of stateful application clusters. If you are scaling down, then it deletes in the reverse order.
Use the StatefulSets controller in the Kubernetes cluster for deploying stateful applications, such as Oracle, MySQL, Elasticsearch, and MongoDB. While cloning and syncing data must still be completed manually, StatefulSets go a long way in easing the complexity involved in deploying stateful applications.
Photo by Photoholgic on Unsplash
#Additional Articles You May Like:
- Kubernetes Development Environments - A Comparison
- Development in Kubernetes - Local vs. Remote Clusters
- Docker Compose Alternatives for Kubernetes
- Docker Compose to Kubernetes: Step-by-Step Migration
- 5 Key Elements for a Great Developer Experience with Kubernetes
- Kubernetes Multi-Tenancy – A Best Practices Guide
- Kubernetes Network Policies: A Practitioner’s Guide
- Kubernetes RBAC: Basics and Advanced Patterns
- Kubernetes Readiness Probes - Examples & Common Pitfall
- 10 Essentials For Kubernetes Multi-Tenancy
- A Guide to Using Kubernetes for Microservices
- Kubernetes StatefulSet - Examples & Best Practices
- Kubernetes Service Account: What It Is and How to Use It
- Kubernetes NGINX Ingress: 10 Useful Configuration Options
- A Complete Guide to Kubernetes Cost Optimization
- Advanced Guide to Kubernetes Ingress Controllers
- GitOps + Kubernetes Explained
- Why Platform Engineering Teams Should Standardize on Kubernetes
- Platform Engineering on Kubernetes for Accelerating Development Workflows