Table of Contents
Using ngrok to create preview environments with vcluster
#Combining ngrok + vCluster
Local development can be great, and it allows you to work on something on your own hardware and view how it will look in a browser/other. What about if you want to share with someone who doesn’t have access to your network? That’s where the ngrok ingress controller comes in.
The ngrok ingress controller (https://github.com/ngrok/kubernetes-ingress-controller) can make it easy to create a preview environment that you can share with others using a public endpoint. You can share your application with a public endpoint, restrict who can view your application with OAuth, and configure other settings related to using Ingress, all without a LoadBalancer that is publicly accessible in front of your ingress controller.
Today we will configure ingress, using free tier options, to create a preview of an application with a public endpoint. Using the free tier will allow us to test out some of the features of this enterprise-grade ingress controller.
#What is the ngrok Ingress Controller
The ngrok ingress controller comprises an ingress class and a few other CRDs. It can be installed in a virtual cluster to provide secure external access to an application quickly. Here is the official description of what it is:
“ngrok is a simplified API-first ingress-as-a-service that adds connectivity, security, and observability to your apps and services.”
Now that we know what it is let’s jump in and test it out.
#Installing the ngrok ingress controller in a vcluster
In this example, we will install the ngrok ingress controller into a virtual cluster. Before we get started, there are a few requirements.
-
Requirements
- kubernetes cluster
- free ngrok account (https://dashboard.ngrok.com/signup)
- vcluster CLI (https://www.vcluster.com/docs/quickstart)
#vcluster
First, we need to get our virtual cluster running. For this step, you will need a Kubernetes cluster and the vcluster CLI installed. (https://www.vcluster.com/docs/quickstart)
If you are using Loft to create the virtual cluster, you will need to ensure that ingress syncing is disabled so that you can create a new ingress class on the virtual cluster. If it is enabled, then the class will get removed when everything is synced with the base cluster. This can be done by editing the resource in the Loft UI and ensuring that sync > ingresses > enabled = false.
As long as the base Kubernetes cluster you are using provides the LoadBalancer service, you can use the following:
vcluster create my-vcluster --expose
This will create a new vcluster in the namespace vcluster-my-vcluster on the host cluster. Once it has been created and you are connected to the virtual cluster, you can list the namespaces to ensure that your context has switched:
kubectl get ns
NAME              STATUS   AGE
default           Active   3m43s
kube-system       Active   3m43s
kube-public       Active   3m43s
kube-node-lease   Active   3m43s
After confirming you are in the right place, we can move on to the ngrok installation and deploy an application.
#ngrok
We will be following the ngrok k8s guide to get everything installed. Here’s a link to the guide, or you can follow along in the blog as we’ll cover the required steps.
https://ngrok.com/docs/using-ngrok-with/k8s/
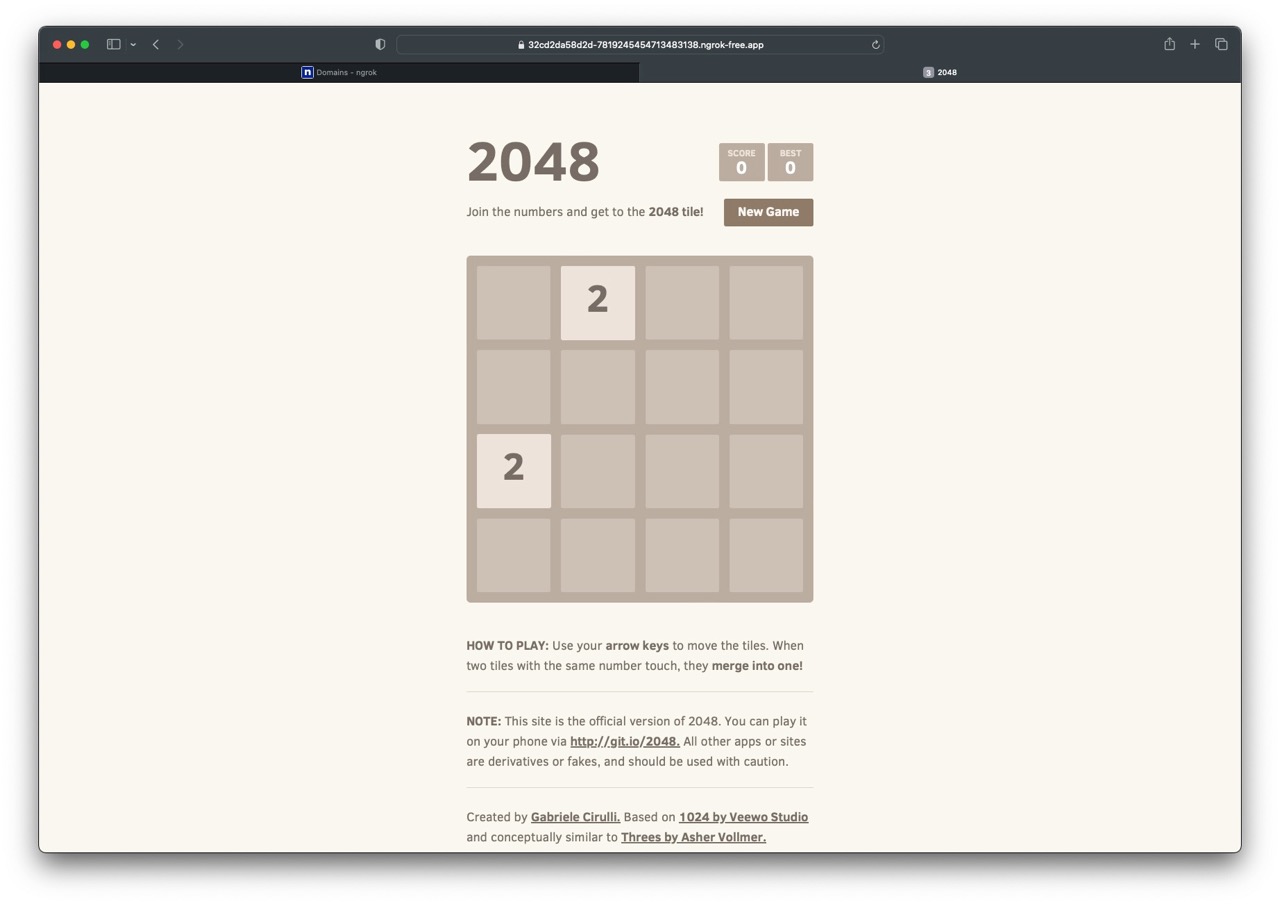
The ngrok free account will allow us to create a static subdomain with TLS support that we can register through the ngrok dashboard. Head over to your ngrok dashboard > Domains > and then create your free static domain.
This example will use the domain: 32cd2da58d2d-7819245454713483138.ngrok-free.app.

#Helm Install
Once we have created the domain, we can move back to the command line and add the ngrok repository to helm:
helm repo add ngrok https://ngrok.github.io/kubernetes-ingress-controller
Next, we will need to get our AUTHTOKEN (https://dashboard.ngrok.com/get-started/your-authtoken) and API_KEY (https://dashboard.ngrok.com/api). Export both so they can be used in the helm install command.
export NGROK_AUTHTOKEN=[AUTHTOKEN]
export NGROK_API_KEY=[API_KEY]
Now that we have our credentials exported, we can install the ingress controller using Helm. Run the following command scoped to the virtual cluster.
helm install ngrok-ingress-controller ngrok/kubernetes-ingress-controller \
  --namespace ngrok-ingress-controller \
  --create-namespace \
  --set credentials.apiKey=$NGROK_API_KEY \
  --set credentials.authtoken=$NGROK_AUTHTOKEN
You should see confirmation that looks like the output below:
NAME: ngrok-ingress-controller
LAST DEPLOYED: Thu Jun  8 12:42:47 2023
NAMESPACE: ngrok-ingress-controller
STATUS: deployed
REVISION: 1
TEST SUITE: None
NOTES:
================================================================================
The ngrok Ingress controller has been deployed as a Deployment type to your
cluster.
If you haven't yet, create some Ingress resources in your cluster and they will
be automatically configured on the internet using ngrok.
Once done, view your edges in the Dashboard https://dashboard.ngrok.com/cloud-edge/edges
Find the tunnels running in your cluster here https://dashboard.ngrok.com/tunnels/agents
If you have any questions or feedback, please join us in https://ngrok.com/slack and let us know!
Since the virtual clusters act like real clusters, we can use the same application example from the ngrok documentation to create a Service, Deployment, and Ingress resource. In the YAML below, you will need to modify the host. We will use the static domain we created earlier in the guide 32cd2da58d2d-7819245454713483138.ngrok-free.app.
Your domain will be different. After registering through the ngrok portal, make sure you copy and paste the domain into the next section, where we define the domain in the resource definition.
#Deploy an Application
Now that we have all the CRDs required and a new ingressclass, we can finally deploy our application. In this example, we will run a game, but you can easily drop in your application by updating the deployment and some of the naming used for reference in the other resources.
Save the YAML below as app.yaml, update YOUR_DOMAIN to match the domain that was created, and then deploy with kubectl create -f app.yaml:
apiVersion: v1
kind: Service
metadata:
  name: game-2048
  namespace: ngrok-ingress-controller
spec:
  ports:
    - name: http
      port: 80
      targetPort: 80
  selector:
    app: game-2048
---
apiVersion: apps/v1
kind: Deployment
metadata:
  name: game-2048
  namespace: ngrok-ingress-controller
spec:
  replicas: 1
  selector:
    matchLabels:
      app: game-2048
  template:
    metadata:
      labels:
        app: game-2048
    spec:
      containers:
        - name: backend
          image: alexwhen/docker-2048
          ports:
            - name: http
              containerPort: 80
---
# ngrok Ingress Controller Configuration
apiVersion: networking.k8s.io/v1
kind: Ingress
metadata:
  name: game-2048-ingress
  namespace: ngrok-ingress-controller
spec:
  ingressClassName: ngrok
  rules:
    - host: YOUR_DOMAIN
      http:
        paths:
          - path: /
            pathType: Prefix
            backend:
              service:
                name: game-2048
                port:
                  number: 80
Allow everything to get to a running status, then navigate to the URL we used in the Domain section. We should now be able to hit our application using the public endpoint. This version of the application is available to anyone. In the Bonus Points section of the blog, we discuss how you can use OAuth to restrict who can access your application.
#Resources Created
Once everything has been created, we should be able to see a few different resources that were created for us beyond the Service, Deployment, and Ingress resources:
kubectl  get pods,domains,httpsedges,tunnels -n ngrok-ingress-controller
NAME                                                                  READY   STATUS    RESTARTS   AGE
pod/ngrok-ingress-controller-kubernetes-ingress-controller-manc5tlg   1/1     Running   0          24h
pod/game-2048-c4b479d49-nsxmz                                         1/1     Running   0          15h

NAME                                                                           ID    REGION   DOMAIN   CNAME TARGET   AGE
domain.ingress.k8s.ngrok.com/32cd2da58d2d-7819245454713483138-ngrok-free-app                                          24h
domain.ingress.k8s.ngrok.com/vcluster-ngrok-free-app                                                                  15h

NAME                                                                              AGE
httpsedge.ingress.k8s.ngrok.com/32cd2da58d2d-7819245454713483138-ngrok-free-app   15h

NAME                                        FORWARDSTO                                                AGE
tunnel.ingress.k8s.ngrok.com/game-2048-80   game-2048.ngrok-ingress-controller.svc.cluster.local:80   15h
The pod is running the application, and then we have another pod running the ngrok ingress controller.
The domain contains exactly what the name implies, the domain you use for your application. In our example, this would be https://32cd2da58d2d-7819245454713483138.ngrok-free.app.
#ngrok Ingress CRDs and Troubleshooting
To get everything working, we installed a few different CRDs and an ingress class using Helm. All of this is viewable within the virtual cluster. Knowing what resources are created can help troubleshoot issues if any come up.
If you have created a new resource, but it isn’t resolving, I would start by checking the logs of the ingress controller to see if there are auth issues or other issues. This is probably the first place you would start if you were working with ngrok to figure out the issue as well. The ingress controller pod is running in the same namespace as our application:
kubectl get pods -n ngrok-ingress-controller
NAME                                                              READY   STATUS    RESTARTS   AGE
ngrok-ingress-controller-kubernetes-ingress-controller-manc5tlg   1/1     Running   0          25h
To get logs we would run:
kubectl logs -n ngrok-ingress-controller ngrok-ingress-controller-kubernetes-ingress-controller-manc5tlg
Next we would verify that the ingressclass was installed. In this example the nginx ingress controller is shared with the base cluster, but the ngrok ingress controller is only in our virtual cluster.
kubectl get ingressclasses.networking.k8s.io
NAME    CONTROLLER                         PARAMETERS   AGE
nginx   k8s.io/ingress-nginx               <none>       41h
ngrok   k8s.ngrok.com/ingress-controller   <none>       24h
We can move on to verify all of the CRDs are installed. These will inform us of what other resources we should be checking, such as Domain.
domains.ingress.k8s.ngrok.com
httpsedges.ingress.k8s.ngrok.com
ippolicies.ingress.k8s.ngrok.com
ngrokmodulesets.ingress.k8s.ngrok.com
tcpedges.ingress.k8s.ngrok.com
tunnels.ingress.k8s.ngrok.com
A working example will contain the domain we used to create the resource. These resources have corresponding options within the ngrok dashboard, letting you view what has been created.
kubectl get domain -n ngrok-ingress-controller
NAME                                              ID    REGION   DOMAIN   CNAME TARGET   AGE
32cd2da58d2d-7819245454713483138-ngrok-free-app                                          25h
#Cleanup
The easiest way to clean everything up is to delete the virtual cluster. If you want to keep the cluster around and remove the ngrok component, you can delete it using Helm. Remember that the installation happened within the ngrok-ingress-controller namespace, so we must scope to that namespace to view and delete resources.
#List
helm -n ngrok-ingress-controller list
NAME                    	NAMESPACE               	REVISION	UPDATED                             	STATUS  	CHART                               	APP VERSION
ngrok-ingress-controller	ngrok-ingress-controller	1       	2023-06-28 08:20:38.310785 -0700 PDT	deployed	kubernetes-ingress-controller-0.10.0	0.8.0
#Delete
helm uninstall -n ngrok-ingress-controller ngrok-ingress-controller
#Bonus Points
Now that you have an endpoint, you may want to secure it so that only specific people can access it. This can be achieved through the OAuth configuration in the kind NgrokModuleSet.
Follow along in the ngrok guide (https://ngrok.com/docs/using-ngrok-with/k8s/#step-3-add-edge-security-to-your-app)
In this example, we are only allowing users from @ngrok.com or @loft.sh to view the application:
# Module configurations for Circuit Breaking and OAuth
kind: NgrokModuleSet
apiVersion: ingress.k8s.ngrok.com/v1alpha1
metadata:
  name: oauth-and-circuit-breaking
  namespace: ngrok-ingress-controller
modules:
  circuitBreaker:
    trippedDuration: 10s
    rollingWindow: 10s
    numBuckets: 10
    volumeThreshold: 20
    errorThresholdPercentage: "0.50"
  oauth:
    google:
      emailDomains:
        - ngrok.com
        - loft.sh
To get this working, you will also need to update the Ingress configuration with an annotation:
 annotations:
    k8s.ngrok.com/modules: oauth-and-circuit-breaking
#Conclusion
The ability to share what you are working on or preview it on multiple devices using a public endpoint can help speed up the development process through collaboration. Additional features such as OAuth allow for security so you can ensure that only certain people can view it.
If you have any questions, or if you need help, join the ngrok slack (https://ngrok.com/slack) for ngrok questions or the Loft slack (slack.loft.sh) for vcluster questions.