Configure Single Sign-On
Loft supports all major Single-Sign-On (SSO) providers. To configure SSO for Loft, expand the desired SSO provider (e.g. Google, Okta, GitHub) field listed below and follow the instructions provided.
Most SSO provider connections do not allow localhost and require that you
set up a domain for your Loft instance first.
SSO Configuration Examples
GitHub
Create A GitHub App
In GitHub, navigate to
Settings > Developer Settings > OAuth Appsand create a new OAuth App with the following settings:- Application name: Loft Login via GitHub
- Homepage URL: https://loft.yourcompany.tld =
https:// + $LOFT_HOSTNAME - Auth callback URL: https://loft.yourcompany.tld/auth/github/callback =
https:// + $LOFT_HOSTNAME + /auth/github/callback
Remember the
$GITHUB_CLIENT_IDand$GITHUB_CLIENT_SECRETthat GitHub generates for your OAuth application because you will need it in the next step.Create Loft Config For GitHub
To tell Loft to use github for SSO, navigate to
Admin > Configin Loft and adjust your config as shown below:auth:
# Tell loft to use github authentication
github:
#
#
# REQUIRED CONFIGURATION
#
#
# ClientID of the github application. Can be string literal or pulled from the environment.
clientId: $CLIENTID
# ClientSecret of the github application. Can be string literal or pulled from the environment.
clientSecret: $CLIENTSECRET
# Callback URL in the form of https://your-loft-domain/auth/github/callback
redirectURI: https://loft.my.domain/auth/github/callback
#
#
# OPTIONAL CONFIGURATION
#
#
# (Optional) Loft queries the following organizations for group information.
# Group claims are formatted as "(org):(team)".
# For example if a user is part of the "engineering" team of the "coreos"
# org, the group claim would include "coreos:engineering".
#
# If orgs are specified in the config then user MUST be a member of at least one
# of the specified orgs to authenticate with loft.
orgs:
# Organization name in github (not slug, full name)
- name: My Organization
# (Optional) Names of teams in a github organization. A user will be able to
# authenticate if they are members of at least one of these teams.
teams:
- myteam
# (Optional) Required ONLY for GitHub Enterprise.
# This is the Hostname of the GitHub Enterprise account listed on the
# management console.
hostName: my-github.org
# (Optional) Required ONLY for GitHub Enterprise.
# Used to support self-signed or untrusted CA root certificates.
rootCA: /certs/github.caAuthenticate via GitHub
After saving the new Loft configuration, Loft will restart and you should be able to log in via GitHub. Beware that only members of your organization on GitHub can sign in and that everyone must grant access to view their organization during the login process.
Must Grant Access To OrganizationUsers must grant access to the organization you configured dex for in step 2 above, otherwise they will not be able to log in.
Disable Username + Password Authentication (optional)
To disable password-based authentication, navigate to
Admin > Configadd these two lines to your config:auth:
oidc: ... # This is your SSO configuration (make sure this is working!)
password:
disabled: true # Disable password-based authentication
OIDC
Create Loft Config For OIDC
Loft is able to use an OIDC provider as an authentication source.
To tell Loft to use OIDC for SSO, navigate to
Admin > Configin Loft and adjust your config as shown below:auth:
# Tell loft to allow OIDC for authentication
oidc:
#
#
# REQUIRED CONFIGURATION
#
#
# IssuerURL is the URL the provider signs ID Tokens as.
issuerUrl: https://accounts.google.com
# ClientID the JWT must be issued for, the "sub" field. Can be string literal or pulled from the environment.
clientId: $CLIENTID
# ClientSecret to issue tokens from the OIDC provider. Can be string literal or pulled from the environment.
clientSecret: $CLIENTSECRET
# Callback URL in the form of https://your-loft-domain/auth/oidc/callback
redirectURI: https://loft.my.domain/auth/oidc/callback
#
#
# OPTIONAL CONFIGURATION
#
#
# (Optional) Path to a PEM encoded root certificate of the provider.
caFile: /tmp/ca-file.crt
# (Optional) Specify whether to communicate without validating SSL certificates
insecureCa: false
# (Optional) UsernameClaim is the JWT field to use as the user's username.
# If not set defaults to email.
usernameClaim: email
# (Optional) If specified, causes claims mapping to username to be prefix with
# the provided value.
usernamePrefix: my-prefix-
# (Optional) If specified, causes the OIDCAuthenticator to try to populate the user's
# groups with an ID Token field.
groupsClaim: groups
# (Optional) If specified, causes claims mapping to group names to be prefixed with the
# value.
groupsPrefix: group-prefix-
# (Optional) If groups is non empty, access is denied if the user is not part of at least one
# of the specified groups. This requires groupsClaim to be set!
groups: ["my-oidc-group"]
# (Optional) If specified, tells the OIDCAuthenticator to try to populate the user's
# information from the UserInfo. This might be necessary for slim tokens such as used
# by Okta
getUserInfo: false
# (Optional) Scopes that should be sent to the server. If empty, defaults to "email" and "profile".
scopes: ["profile", "email"]
# (Optional) EmailClaim is the JWT field to use as the user's email.
emailClaim: "email"
# (Optional) LoftUsernameClaim is the JWT field to use as the user's ID (Kubernetes name) and username
loftUsernameClaim: "name"
# (Optional) PreferredUsername is the JWT field to use as the user's display name
preferredUsername: "preferred_username"Authenticate via OIDC
After saving the new Loft configuration, Loft will restart itself and you should be able to log in via your OIDC provider.
Disable Username + Password Authentication (optional)
To disable password-based authentication, navigate to
Admin > Configadd these two lines to your config:auth:
oidc: ... # This is your SSO configuration (make sure this is working!)
password:
disabled: true # Disable password-based authentication
GitLab
Create A GitLab App
In GitLab, navigate to
User Settings > Applicationsand create a new application with the following settings:- Application name: Loft Login via GitLab
- Redirect URI: https://loft.yourcompany.tld/auth/gitlab/callback =
https:// + $LOFT_HOSTNAME + /auth/gitlab/callback - Scopes:
read_user+openid
Remember the
$GITLAB_CLIENT_IDand$GITLAB_CLIENT_SECRETthat GitLab generates for your OAuth application because you will need it in the next step.Create Loft Config For GitLab
To tell Loft to use gitlab for SSO, navigate to
Admin > Configin Loft and adjust your config as shown below:auth:
# Tell loft to use gitlab authentication
gitlab:
#
#
# REQUIRED CONFIGURATION
#
#
# ClientID for the gitlab authentication. Can be string literal or pulled from the environment.
clientId: $CLIENTID
# ClientSecret for the gitlab authentication. Can be string literal or pulled from the environment.
clientSecret: $CLIENTSECRET
# Callback URL in the form of https://your-loft-domain/auth/gitlab/callback
redirectURI: https://loft.my.domain/auth/gitlab/callback
#
#
# OPTIONAL CONFIGURATION
#
#
# (Optional) BaseURL of the gitlab instance,
# default = https://gitlab.com
baseURL: https://my-gitlab-instance.com
# (Optional) Optional groups whitelist, communicated through the "groups" scope.
# If groups is omitted, all of the user's GitLab groups are returned.
# If groups is provided, this acts as a whitelist - only the user's GitLab
# groups that are in the configured groups below will go into the groups claim.
# Conversely, if the user is not in any of the configured groups, the user will
# not be authenticated.
groups:
- my-groupAuthenticate via GitLab
After saving the new Loft configuration, Loft will restart itself and you should be able to log in via GitLab.
Disable Username + Password Authentication (optional)
To disable password-based authentication, navigate to
Admin > Configadd these two lines to your config:auth:
oidc: ... # This is your SSO configuration (make sure this is working!)
password:
disabled: true # Disable password-based authentication
Microsoft
Create Loft Config For Microsoft
Loft is able to use Microsoft OAuth2 flow to identify the end user through their Microsoft account.
To tell Loft to use Microsoft for SSO, navigate to
Admin > Configin Loft and adjust your config as shown below:auth:
# Tell loft to use microsoft authentication
microsoft:
#
#
# REQUIRED CONFIGURATION
#
#
# ClientID of the microsoft application. Can be string literal or pulled from the environment.
clientId: $CLIENTID
# ClientSecret of the microsoft application. Can be string literal or pulled from the environment.
clientSecret: $CLIENTSECRET
# Callback URL in the form of https://your-loft-domain/auth/microsoft/callback
redirectURI: https://loft.my.domain/auth/microsoft/callback
#
#
# OPTIONAL CONFIGURATION
#
#
# (Optional) tenant configuration parameter controls what kinds of accounts
# may be authenticated in loft. By default, all types of Microsoft
# accounts (consumers and organizations) can authenticate in loft via Microsoft.
# To change this, set the tenant parameter to one of the following:
# common - both personal and business accounts can authenticate via Microsoft (default)
# consumers - only personal accounts can authenticate in loft
# organizations - only business/school accounts can authenticate in loft
# 'tenant uuid' or 'tenant name' - only accounts belonging to specific tenant
# identified by either 'tenant uuid' or 'tenant name' can authenticate in loft
tenant: common
# (Optional) It is possible to require a user to be a member of a particular
# group in order to be successfully authenticated in loft.
groups: []
# (Optional) Configuration option restricts the list to include only security groups.
# By default all groups (security, Office 365, mailing lists) are included.
onlySecurityGroups: false
# (Optional) Restrict the groups claims to include only the user’s groups
# that are in the configured groups
useGroupsAsWhitelist: falseAuthenticate via Microsoft
After saving the new Loft configuration, Loft will restart itself and you should be able to log in via Microsoft.
Disable Username + Password Authentication (optional)
To disable password-based authentication, navigate to
Admin > Configadd these two lines to your config:auth:
oidc: ... # This is your SSO configuration (make sure this is working!)
password:
disabled: true # Disable password-based authentication
Create Loft Config For Google
Loft is able to use Google’s OpenID Connect provider as an authentication source.
To tell Loft to use Google for SSO, navigate to
Admin > Configin Loft and adjust your config as shown below:auth:
# Tell loft to use google authentication
google:
#
#
# REQUIRED CONFIGURATION
#
#
# ClientID for the google authentication. Can be string literal or pulled from the environment.
clientId: $CLIENTID
# ClientSecret for the google authentication. Can be string literal or pulled from the environment.
clientSecret: $CLIENTSECRET
# Callback URL in the form of https://your-loft-domain/auth/google/callback
redirectURI: https://loft.my.domain/auth/google/callback
#
#
# OPTIONAL CONFIGURATION
#
#
# (Optional) defaults to "profile" and "email"
scopes: ["profile", "email"]
# (Optional) list of whitelisted domains. If this field is nonempty,
# only users from a listed domain will be allowed to log in
hostedDomains: []
# (Optional) list of whitelisted groups. If this field is nonempty,
# only users from a listed group will be allowed to log in
groups: []
# (Optional) path to service account json. If nonempty,
# and groups claim is made, will use authentication from file to
# check groups with the admin directory api
serviceAccountFilePath: /path/to/service/account.json
# (Optional) Required if serviceAccountFilePath is set. The email of
# a GSuite super user which the service account will impersonate
# when listing groups
adminEmail: myuser@mydomain.comAuthenticate via Google
After saving the new Loft configuration, Loft will restart itself and you should be able to log in via Google.
Disable Username + Password Authentication (optional)
To disable password-based authentication, navigate to
Admin > Configadd these two lines to your config:auth:
oidc: ... # This is your SSO configuration (make sure this is working!)
password:
disabled: true # Disable password-based authentication
Okta
Create A New App In Okta
The first step is to create a new Okta App for Loft.
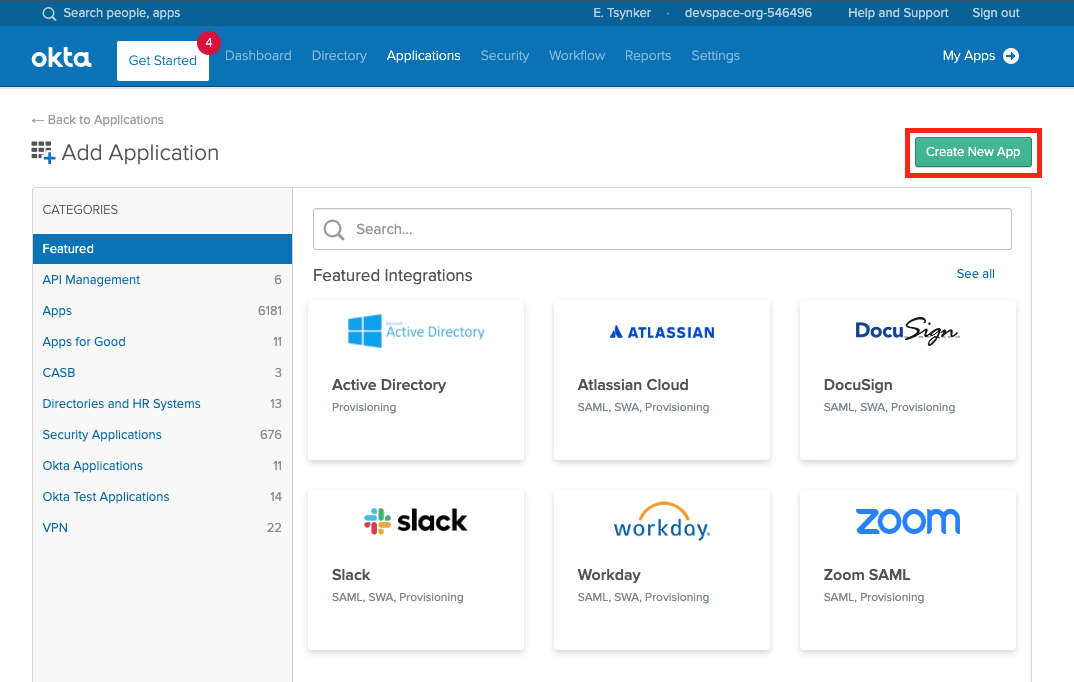
Okta - Create a new App in Okta Next select "Web" App and make sure OpenID Connect is the single sign on method.
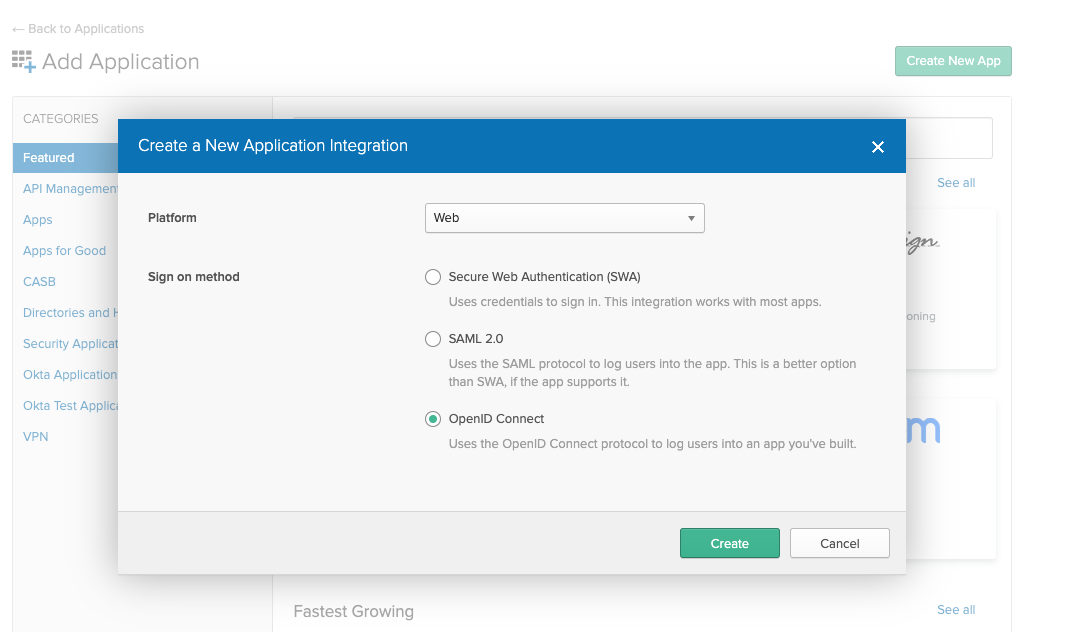
Okta - Web App with OpenID Connect as single sign on method In the next screen make sure the login redirect URIs contain your Loft instance domain:
# Exchange the ${my-loft-domain.com} with your Loft domain
https://${my-loft-domain.com}/auth/oidc/callback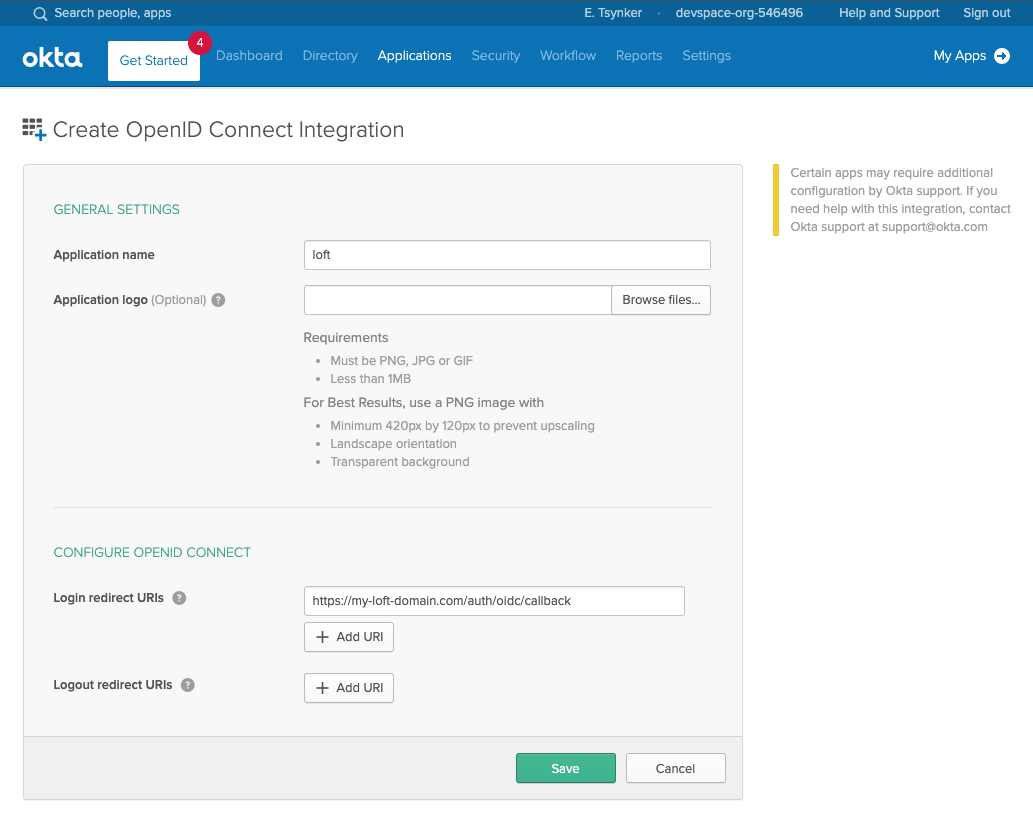
Okta - The App settings for Loft Enable Refresh Tokens
After creating an Okta app for Loft, ensure that "Refresh Token" is checked under "Allowed grant types" - otherwise your users will have to re-login everytime after a session expires.
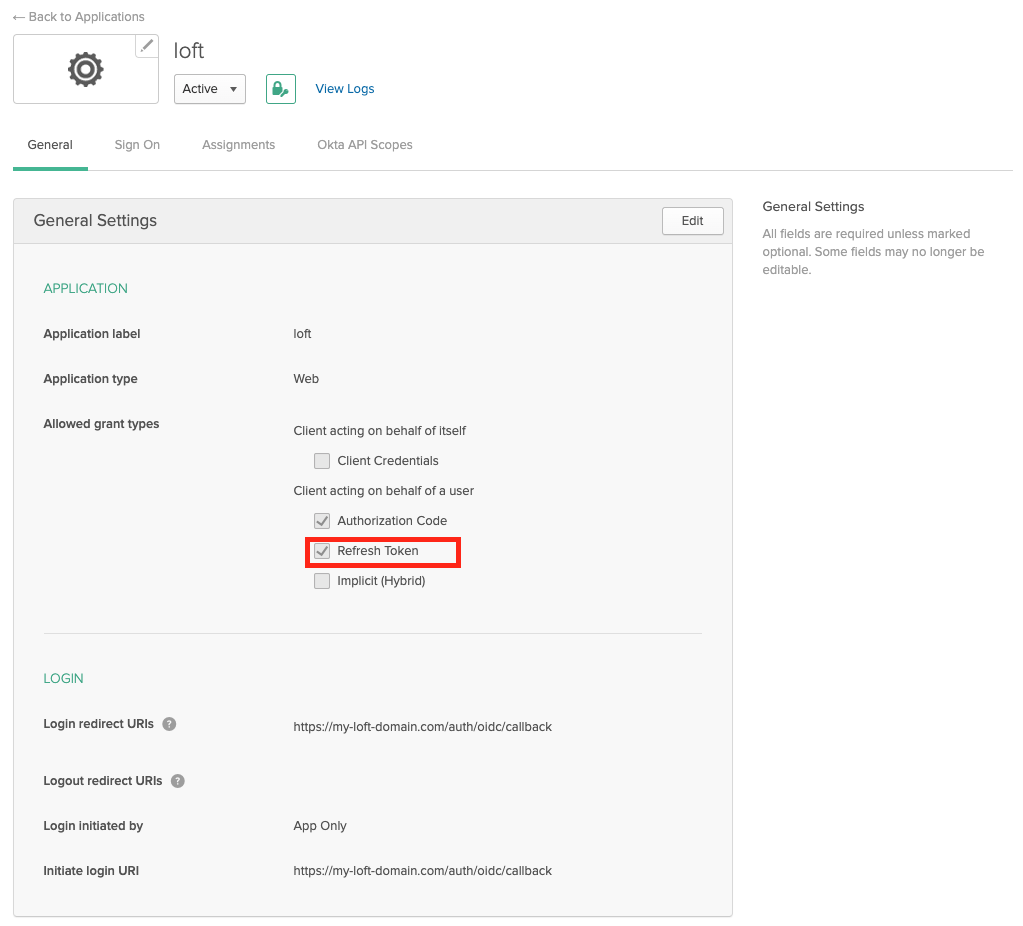
Okta - App Settings: Enable Refresh Tokens Enable Group Claims
If you want to propagate the users groups to Loft, then make sure the Group Filters in Okta are set accordingly. If you want to propagate all groups, add a RegEx filter with '.*'
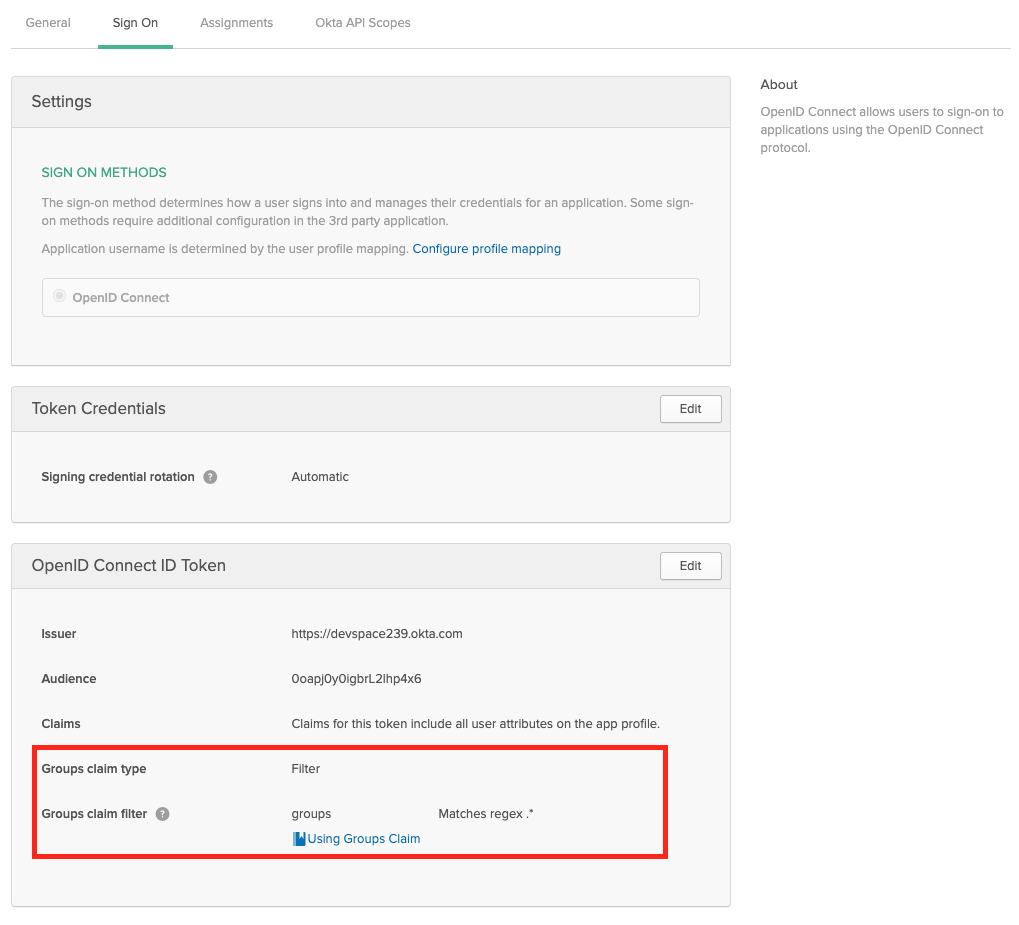
Okta - Propagate User Groups To Loft Configure Loft To Use Okta
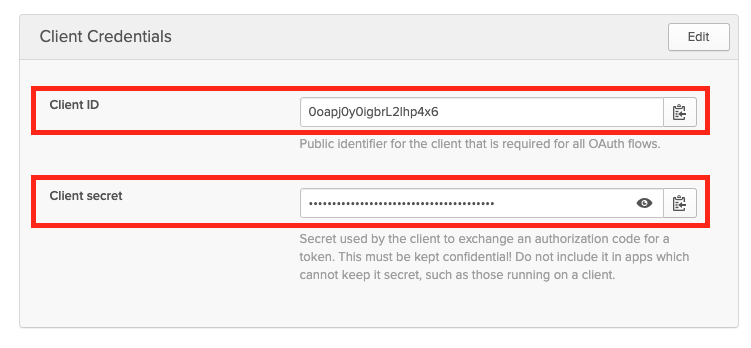
Okta - Client ID and Secret For App After configuring Okta for Loft, navigate to
Admin > Configin Loft and enter the following configuration:auth:
oidc:
issuerUrl: 'https://${MY-OKTA-SUBDOMAIN}.okta.com'
clientId: CLIENT_ID
clientSecret: CLIENT_SECRET
groupsClaim: groups
# This is needed because okta uses thin id tokens
# that do not contain the groups directly
getUserInfo: true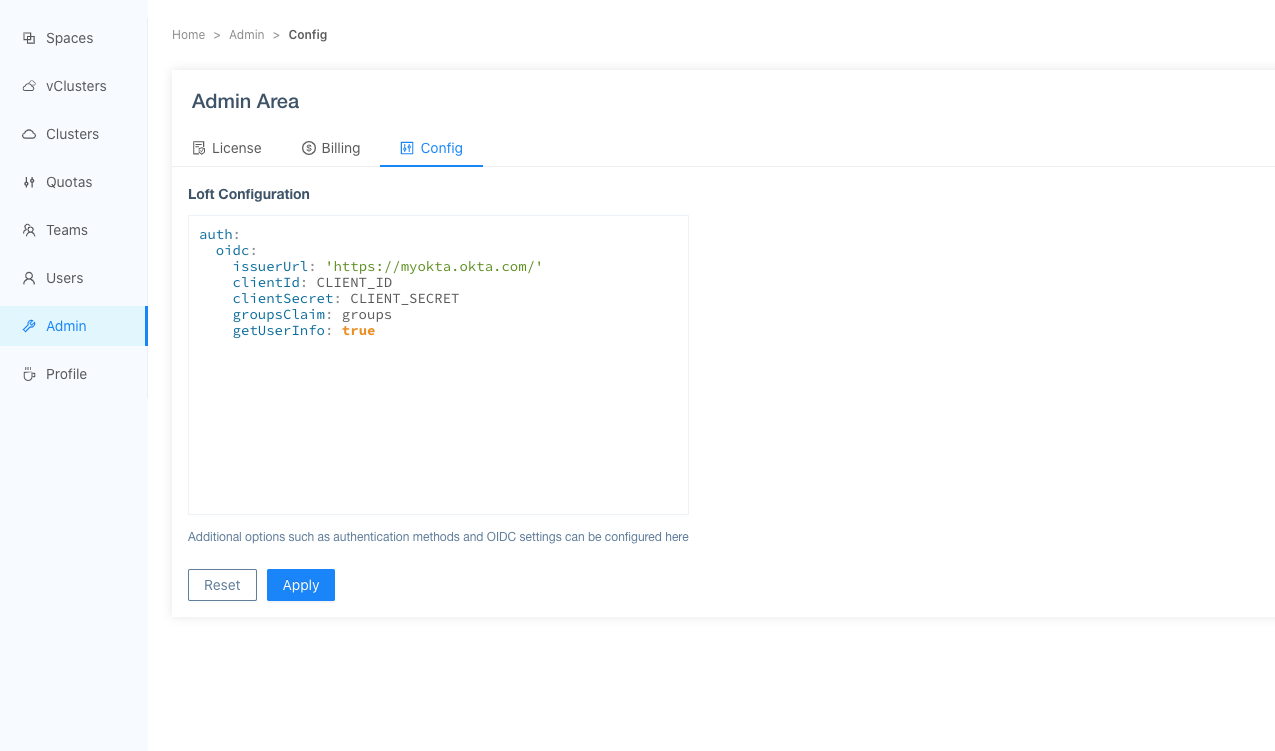
Loft - Configure Loft To Use Okta Add Users via Okta Assigments
Please make also sure that you have assigned the correct Users and Groups that you would like to access Loft in Okta.

Okta - Assign Users & Groups To Loft After users or their groups are assigned to Loft, they will be able to log in via Okta:

Loft - SSO via Okta Disable Username + Password Authentication (optional)
To disable password-based authentication, navigate to
Admin > Configadd these two lines to your config:auth:
oidc: ... # This is your SSO configuration (make sure this is working!)
password:
disabled: true # Disable password-based authentication
SAML 2.0
The SAML 2.0 connector in Loft does not support refresh tokens "since the SAML 2.0 protocol doesn't provide a way to requery a provider without interaction" (see dex documentation for SAML 2.0).
- **Create Loft Config For SAML v2.0**
Loft is able to use SAML v2.0 flow to identify the end user.
To tell Loft to use SAML for SSO, navigate to
Admin > Configin Loft and adjust your config as shown below:auth:
# Tell loft to use saml authentication
saml:
#
#
# REQUIRED CONFIGURATION
#
#
# SSO URL used for POST value.
ssoURL: https://saml.example.com/sso
# CA to use when validating the signature of the SAML response.
ca: /path/to/ca.pem
# CA's can also be provided inline as a base64'd blob.
#
# caData: ( RAW base64'd PEM encoded CA )
# Callback URL in the form of https://your-loft-domain/auth/saml/callback
redirectURI: https://loft.my.domain/auth/saml/callback
# Name of attributes in the returned assertions to map to ID token claims.
usernameAttr: name
emailAttr: email
groupsAttr: groups # optional
#
#
# OPTIONAL CONFIGURATION
#
#
# (Optional) List of groups to filter access based on membership
allowedGroups: ["Admins"]
# (Optional) To skip signature validation, uncomment the following field. This should
# only be used during testing and may be removed in the future
insecureSkipSignatureValidation: true
# (Optional) Manually specify loft's Issuer value.
# When provided loft will include this as the Issuer value during AuthnRequest.
# It will also override the redirectURI as the required audience when evaluating
# AudienceRestriction elements in the response.
entityIssuer: https://loft.my.domain/auth/saml/callback
# (Optional) Issuer value expected in the SAML response.
ssoIssuer: https://saml.example.com/sso
# (Optional) Delimiter for splitting groups returned as a single string.
#
# By default, multiple groups are assumed to be represented as multiple
# attributes with the same name.
#
# If "groupsDelim" is provided groups are assumed to be represented as a
# single attribute and the delimiter is used to split the attribute's value
# into multiple groups.
groupsDelim: ", "
# (Optional) Requested format of the NameID.
#
# The NameID value is is mapped to the user ID of the user. This can be an
# abbreviated form of the full URI with just the last component. For example,
# if this value is set to "emailAddress" the format will resolve to:
#
# urn:oasis:names:tc:SAML:1.1:nameid-format:emailAddress
#
# If no value is specified, this value defaults to:
#
# urn:oasis:names:tc:SAML:2.0:nameid-format:persistent
#
nameIDPolicyFormat: persistent Authenticate via SAML
After saving the new Loft configuration, Loft will restart itself and you should be able to log in via SAML.
Disable Username + Password Authentication (optional)
To disable password-based authentication, navigate to
Admin > Configadd these two lines to your config:auth:
oidc: ... # This is your SSO configuration (make sure this is working!)
password:
disabled: true # Disable password-based authentication
LDAP
Choose DEX_HOSTNAME And Configure DNS
Loft uses the CNCF project dex for single sign-on.
The easiest case is this one:
$LOFT_HOSTNAME = loft.mycompany.tld(where Loft is running)$DEX_HOSTNAME = dex.mycompany.tld(where dex should be running)
Create Dex Config For LDAP
Create the file
dex-config.yamlwith the following dex configuration:ingress:
enabled: true
hosts:
- host: dex.yourcompany.tld # Use $DEX_HOSTNAME
paths:
- path: /
config:
issuer: https://dex.yourcompany.tld # "https://" + $DEX_HOSTNAME
connectors:
- type: ldap
id: ldap
name: LDAP
config:
host: myldap.company.tld:636 # Your LDAP server hostname:port
# insecureNoSSL: true # Not recommended but required if not using TLS (port 389)
# insecureSkipVerify: true # Not recommended but required for self-signed certificates
# rootCAData: ( base64 encoded PEM file )
# startTLS: true # Use ldap:// instead of ldaps:// protocol
# The DN and password for an application service account. The connector uses
# these credentials to search for users and groups. Not required if the LDAP
# server provides access for anonymous auth.
# Please note that if the bind password contains a `$`, it has to be saved in an
# environment variable which should be given as the value to `bindPW`.
bindDN: uid=serviceaccount,cn=users,dc=example,dc=com
bindPW: password
# User search maps a username and password entered by a user to a LDAP entry.
userSearch:
# BaseDN to start the search from. It will translate to the query
# "(&(objectClass=person)(uid=<username>))".
baseDN: cn=users,dc=example,dc=com
# Optional filter to apply when searching the directory.
filter: "(objectClass=person)"
# username attribute used for comparing user entries. This will be translated
# and combined with the other filter as "(<attr>=<username>)".
username: uid
# The following three fields are direct mappings of attributes on the user entry.
# String representation of the user.
idAttr: uid
# Required. Attribute to map to Email.
emailAttr: mail
# Maps to display name of users. No default value.
nameAttr: name
# Group search queries for groups given a user entry.
groupSearch:
# BaseDN to start the search from. It will translate to the query
# "(&(objectClass=group)(member=<user uid>))".
baseDN: cn=groups,dc=freeipa,dc=example,dc=com
# Optional filter to apply when searching the directory.
filter: "(objectClass=group)"
# Represents group name.
nameAttr: name
# Following list contains field pairs that are used to match a user to a group. It adds an additional
# requirement to the filter that an attribute in the group must match the user's
# attribute value.
userMatchers:
- userAttr: uid
groupAttr: member
staticClients:
- name: Loft
id: loft # Define a $DEX_CLIENT_ID
secret: XXXXXXXXXXXXXX # Define a $DEX_CLIENT_SECRET (can be any secret key)
redirectURIs:
- 'https://loft.mycompany.tld/auth/oidc/callback' # Loft URL + /auth/oidc/callback
oauth2:
skipApprovalScreen: true
web:
http: 0.0.0.0:5556
storage:
type: kubernetes
config:
inCluster: trueFor details about configuring dex for LDAP, take a look at the dex documentation for LDAP.
Deploy Dex via Helm
After creating the file
dex-config.yaml, you can now install dex via helm:helm install dex dex --repo https://charts.dexidp.io \
--create-namespace --namespace dex \
-f dex-config.yaml \
--waitConfigure Loft To Use Dex For Authentication
To tell Loft to use dex for SSO, navigate to
Admin > Configin Loft and adjust your config as shown below:auth:
oidc:
issuerUrl: https://dex.mycompany.tld # Use $DEX_HOSTNAME (see above)
clientId: "" # Use $DEX_CLIENT_ID (see above)
clientSecret: "" # Use $DEX_CLIENT_SECRET (see above)
type: "github" # Optional: SSO Login Button Icon ("", github, gitlab, microsoft, google)
usernameClaim: "email" # Optional: Which part of the dex token to use as Loft username (default: email)
usernamePrefix: "" # Optional: Add prefix to usernameClaim for Loft username
groupsClaim: "groups" # Optional: Add Kubernetes groups for this user
groupsPrefix: "loft-" # Optional: Prefix for Kubernetes groups
caFile: "" # Optional: Path to a CA cert of dex within the Loft container (default: '')Authenticate via Dex + LDAP
After saving the new Loft configuration, Loft will restart itself and you should be able to log in via LDAP and dex.
Disable Username + Password Authentication (optional)
To disable password-based authentication, navigate to
Admin > Configadd these two lines to your config:auth:
oidc: ... # This is your SSO configuration (make sure this is working!)
password:
disabled: true # Disable password-based authentication
Other (OpenShift, LinkedIn ...)
Loft supports a variety of other auth providers. You can follow this generic guide to configure SSO for any of the auth providers, including:
- OpenShift
- AuthProxy
- Bitbucket Cloud
- Atlassian Crowd
- Gitea
Choose DEX_HOSTNAME And Configure DNS
Loft uses the CNCF project dex for single sign-on.
The easiest case is this one:
$LOFT_HOSTNAME = loft.mycompany.tld(where Loft is running)$DEX_HOSTNAME = dex.mycompany.tld(where dex should be running)
Create Dex Config For $OTHER_PROVIDER
Create the file
dex-config.yamlwith the following dex configuration:ingress:
enabled: true
hosts:
- host: dex.yourcompany.tld # Use $DEX_HOSTNAME
paths:
- path: /
config:
issuer: https://dex.yourcompany.tld # "https://" + $DEX_HOSTNAME
connectors:
- {YOUR_CONNECTOR_CONFIG} # SEE LINKS BELOW! (do not remove the '-' and indent correctly)
staticClients:
- name: Loft
id: loft # Define a $DEX_CLIENT_ID
secret: XXXXXXXXXXXXXX # Define a $DEX_CLIENT_SECRET (can be any secret key)
redirectURIs:
- 'https://loft.mycompany.tld/auth/oidc/callback' # Loft URL + /auth/oidc/callback
oauth2:
skipApprovalScreen: true
web:
http: 0.0.0.0:5556
storage:
type: kubernetes
config:
inCluster: trueCheck the official artifacthub.io page for all available options.
To fill the
connectorssection shown above, go to the appropriate docs page for the auth provider you want to use in combination with dex:Deploy Dex via Helm
After creating the file
dex-config.yaml, you can now install dex via helm:helm install dex dex --repo https://charts.dexidp.io \
--create-namespace --namespace dex \
-f dex-config.yaml \
--waitConfigure Loft To Use Dex For Authentication
To tell Loft to use dex for SSO, navigate to
Admin > Configin Loft and adjust your config as shown below:auth:
oidc:
issuerUrl: https://dex.mycompany.tld # Use $DEX_HOSTNAME (see above)
clientId: "" # Use $DEX_CLIENT_ID (see above)
clientSecret: "" # Use $DEX_CLIENT_SECRET (see above)
type: "github" # Optional: SSO Login Button Icon ("", github, gitlab, microsoft, google)
usernameClaim: "email" # Optional: Which part of the dex token to use as Loft username (default: email)
usernamePrefix: "" # Optional: Add prefix to usernameClaim for Loft username
groupsClaim: "groups" # Optional: Add Kubernetes groups for this user
groupsPrefix: "loft-" # Optional: Prefix for Kubernetes groups
caFile: "" # Optional: Path to a CA cert of dex within the Loft container (default: '')Authenticate via Dex + $OTHER_PROVIDER
After saving the new Loft configuration, Loft will restart itself and you should be able to log in via $OTHER_PROVIDER and dex.
Disable Username + Password Authentication (optional)
To disable password-based authentication, navigate to
Admin > Configadd these two lines to your config:auth:
oidc: ... # This is your SSO configuration (make sure this is working!)
password:
disabled: true # Disable password-based authentication
Multiple SSO Providers
In Loft, you can also configure multiple SSO providers together. This can be a very handy feature if you have multiple groups using different authentication providers based on team or geographical region. Configuration of multiple SSO providers of the same type is also possible. The latter is configured by using the "connectors" option. Below is an example Loft config "auth" section that contains three SSO providers (one OIDC, and two GitHub providers). When users log into Loft with such a configuration present, they will see three options for authentication as well as the default user/password box (which can be disabled if desired).
auth:
  github:
    clientId: test123
    clientSecret: test123
    redirectURI: https://my-loft-url/auth/github/callback
  oidc:
    clientId: test
    clientSecret: test
    issuerUrl: https://example-issuer.com
    redirectURI: https://my-loft-url/auth/oidc/callback
  # If you want to use multiple SSO configs of the same type you can use the connectors option
  connectors:
      # the id of the connector that will show up in the loft callback url
    - id: test
      # name to show in the UI
      displayName: Test GitHub
      # any regular sso config
      github:
        clientId: test
        clientSecret: test
        # Make sure to exchange test here with the connector id if you change that
        redirectURI: https://my-loft-url/auth/test/callback