Table of Contents
Pioneered at Netflix over a decade ago, chaos engineering is a term used to describe the organized and intentional introduction of failures into systems in pre-production or production to understand their outcomes better and plan effectively for these failures.
In a previous articles we have highlighted tools which can help you perform chaos engineering. In this article, we will go one step further and take a look at how vCluster can help you test as close to production by using Litmus.
The Importance of Testing Close to Production
Before diving deeper into the technicalities, it's essential to understand why testing close to production is critical. Traditional pre-production environments often require setting up a separate staging area, deploying the application, and running various tests such as load testing or failover simulations.
In Kubernetes environments, this typically means spinning up a separate cluster, often with limited resources to cut costs. While this setup is practical, it rarely mirrors the true production environment. As Netflix put it, "Learn with real scale, not toy models."
This is where vCluster shines. Instead of spinning up a separate environment, vCluster lets you leverage underlying host resources. You can create virtual Kubernetes clusters within a single physical cluster. This enables you to test applications at a near-production scale without the overhead of managing a full cluster.
For operations teams, this means monitoring whether Horizontal Pod Autoscaler (HPA) rules kick in as expected or validating the effectiveness of network policies. For developers, it provides insights into application behavior under real-world scenarios.
What is Chaos Mesh?
Chaos Mesh is an end-to-end chaos engineering platform for cloud-native infrastructure and applications. It is a CNCF incubating project and aims to help both developers and SREs gain meaningful insights from their applications from their applications.
Prerequisites
This tutorial assumes some familiarity with Kubernetes; additionally, you will need the following installed locally to follow along.
Create a virtual cluster
Begin by creating a virtual cluster. For this demonstration, let's consider that the infrastructure team is starting to introduce chaos mesh into your pre-prod cluster. Later in this tutorial, you will use Horizontal Pod Autoscaler (HPA). Because of this, you need to explicitly allow vCluster to sync metrics from the host cluster into your virtual cluster.
Create a custom vCluster config:
cat <<EOF > values.yaml
integrations:
  metricsServer:
    enabled: true
    nodes: true
    pods: true
EOF
Create a virtual cluster:
vcluster create pre-prod -n pre-prod -f values.yaml
Output is similar to:
11:48:27 warn There is a newer version of vcluster: v0.21.1. Run `vcluster upgrade` to upgrade to the newest version. 11:48:27 info Creating namespace pre-prod 11:48:27 info Detected local kubernetes cluster minikube. Will deploy vcluster with a NodePort & sync real nodes 11:48:27 info Create vcluster pre-prod... 11:48:27 info execute command: helm upgrade pre-prod /var/folders/gw/gd4m32rs5k5chjbf761w3zrw0000gn/T/vcluster-0.20.1.tgz-1751275844 --create-namespace --kubeconfig /var/folders/gw/gd4m32rs5k5chjbf761w3zrw0000gn/T/689082436 --namespace pre-prod --install --repository-config='' --values /var/folders/gw/gd4m32rs5k5chjbf761w3zrw0000gn/T/754764801 --values values.yaml 11:48:28 done Successfully created virtual cluster pre-prod in namespace pre-prod 11:48:30 info Waiting for vcluster to come up... 11:48:50 done vCluster is up and running 11:48:50 info Starting proxy container... 11:48:52 done Switched active kube context to vcluster_pre-prod_pre-prod_minikube - Use `vcluster disconnect` to return to your previous kube context - Use `kubectl get namespaces` to access the vcluster
Install Chaos Mesh
With a virtual cluster created, the next step is to install chaos mesh inside your virtual cluster. You can do this by using the helm chart:
helm repo add chaos-mesh https://charts.chaos-mesh.org

helm install chaos-mesh chaos-mesh/chaos-mesh -n=chaos-mesh --set chaosDaemon.runtime=docker --set chaosDaemon.socketPath=/var/run/docker.sock --version 2.7.0 --create-namespace
Chaos Mesh requires access to the container runtime socket, which varies depending on your Kubernetes cluster. This tutorial was written using Minikube, where the runtime is Docker, and the socket path is /var/run/docker.sock.
Most Kubernetes clusters use Containerd by default. For such environments, you should use:
helm install chaos-mesh chaos-mesh/chaos-mesh -n chaos-mesh \
  --set chaosDaemon.runtime=containerd \
  --set chaosDaemon.socketPath=/run/containerd/containerd.sock \
  --version 2.7.0
For clusters like K3s, MicroK8s, or those using CRI-O, refer to this section of the documentation.
Verify your installation
kubectl get po -n chaos-mesh
Output is similar to:
NAME                                        READY   STATUS    RESTARTS        AGE
chaos-controller-manager-867f657d95-8pcx6   1/1     Running   0               13m
chaos-controller-manager-867f657d95-d4hbs   1/1     Running   0               13m
chaos-controller-manager-867f657d95-h9fwv   1/1     Running   0               13m
chaos-daemon-2rgcj                          1/1     Running   0               13m
chaos-dashboard-7c66c9f685-h9sq6            1/1     Running   0               13m
chaos-dns-server-69dd8595bf-zsm2l           1/1     Running   0               13m
Your First Chaos Experiment
With Chaos Mesh installed, you’re almost ready to write your first experiment. Before diving in, let’s clarify some terminology. In Chaos Mesh, an experiment refers to a test designed to introduce controlled failures into your system. Experiments are divided into two categories:
- Kubernetes-level experiments: These target resources like pods, deployments, or services within your Kubernetes cluster.
- Physical node-level experiments: These focus on the underlying infrastructure, such as CPU stress or network disruptions on the nodes themselves.
In this tutorial, you’ll run two experiments—one targeting Kubernetes resources and another targeting a physical node. Each experiment will be created using a Kubernetes Custom Resource (CR) based on Chaos Mesh’s Custom Resource Definitions (CRDs).
PodChaos
One of the easiest experiments to write is PodChaos. This experiment randomly terminates a pod at a predefined interval, allowing you to simulate unexpected failures in your application. This can be particularly useful when testing consensus-based applications such as databases, message brokers, or distributed storage systems.
By using the PodChaos experiment in a virtual cluster, you can evaluate how well your application maintains quorum, the minimum number of nodes required to make progress. For example, you can test if your application continues to handle reads and writes effectively when a pod is unexpectedly terminated.
Begin by creating new deployment:
kubectl apply -f - <<EOF
apiVersion: apps/v1
kind: Deployment
metadata:
  name: whoami
  namespace: default
spec:
  replicas: 1
  selector:
    matchLabels:
      app: whoami
  template:
    metadata:
      labels:
        app: whoami
    spec:
      containers:
        - name: whoami
          image: traefik/whoami
          ports:
            - containerPort: 80
EOF
This will create a new deployment called whoami in the default namespace. Verify all pods are running correctly using:
kubectl get pods
Output is similar to:
whoami-76c9859cfc-lsxkm 1/1 Running 0 4s
Create a PodChaos experiment:
Next, apply the following manifest to create a PodChaos experiment:
kubectl apply -f - <<EOF
apiVersion: chaos-mesh.org/v1alpha1
kind: PodChaos
metadata:
  name: pod-failure-example
  namespace: default
spec:
  action: pod-failure
  mode: one
  duration: '120s'
  selector:
    labelSelectors:
      app: whoami
EOF
The manifest above defines a PodChaos experiment that runs for two minutes(120s) which is specified using the duration field, the mode is also set to one which will terminate one pod at a time for the duration of the experiment. Finally using selectors, specify the target, which are pods with the label app=whoami .
You can immediately verify the experiment is active by running:
kubectl get pods -wAdding the -w flag will watch the namespace for any events, such as pod restarts. Output is similar to:

Slowly but surely you should see pods start to get restarted which means the test is active.
Accessing Test Results
While you could view the test was performed through the CLI, this is by no means ideal. Chaos Mesh provides a dashboard for viewing and analyzing all test results.
To access the dashboard, you first need to generate credentials. The following manifest creates a ServiceAccount, a ClusterRole with the required permissions, and a ClusterRoleBinding to link the two. Apply the manifest using the command below:
kubectl apply -f - <<EOF
apiVersion: v1
kind: ServiceAccount
metadata:
  name: account-cluster-manager
  namespace: default

---
kind: ClusterRole
apiVersion: rbac.authorization.k8s.io/v1
metadata:
  name: role-cluster-manager
rules:
- apiGroups: [""]
  resources: ["pods", "namespaces"]
  verbs: ["get", "watch", "list"]
- apiGroups: ["chaos-mesh.org"]
  resources: ["*"]
  verbs: ["get", "list", "watch", "create", "delete", "patch", "update"]

---
kind: ClusterRoleBinding
apiVersion: rbac.authorization.k8s.io/v1
metadata:
  name: bind-cluster-manager
subjects:
- kind: ServiceAccount
  name: account-cluster-manager
  namespace: default
roleRef:
  kind: ClusterRole
  name: role-cluster-manager
  apiGroup: rbac.authorization.k8s.io
EOF
Generating a Token
Once the manifest is applied, generate a token for the ServiceAccount using the following command:
kubectl create token account-cluster-manager -n default This should output a token for the service account you just created. Save this to a secure location and run the following command to expose the dashboard:
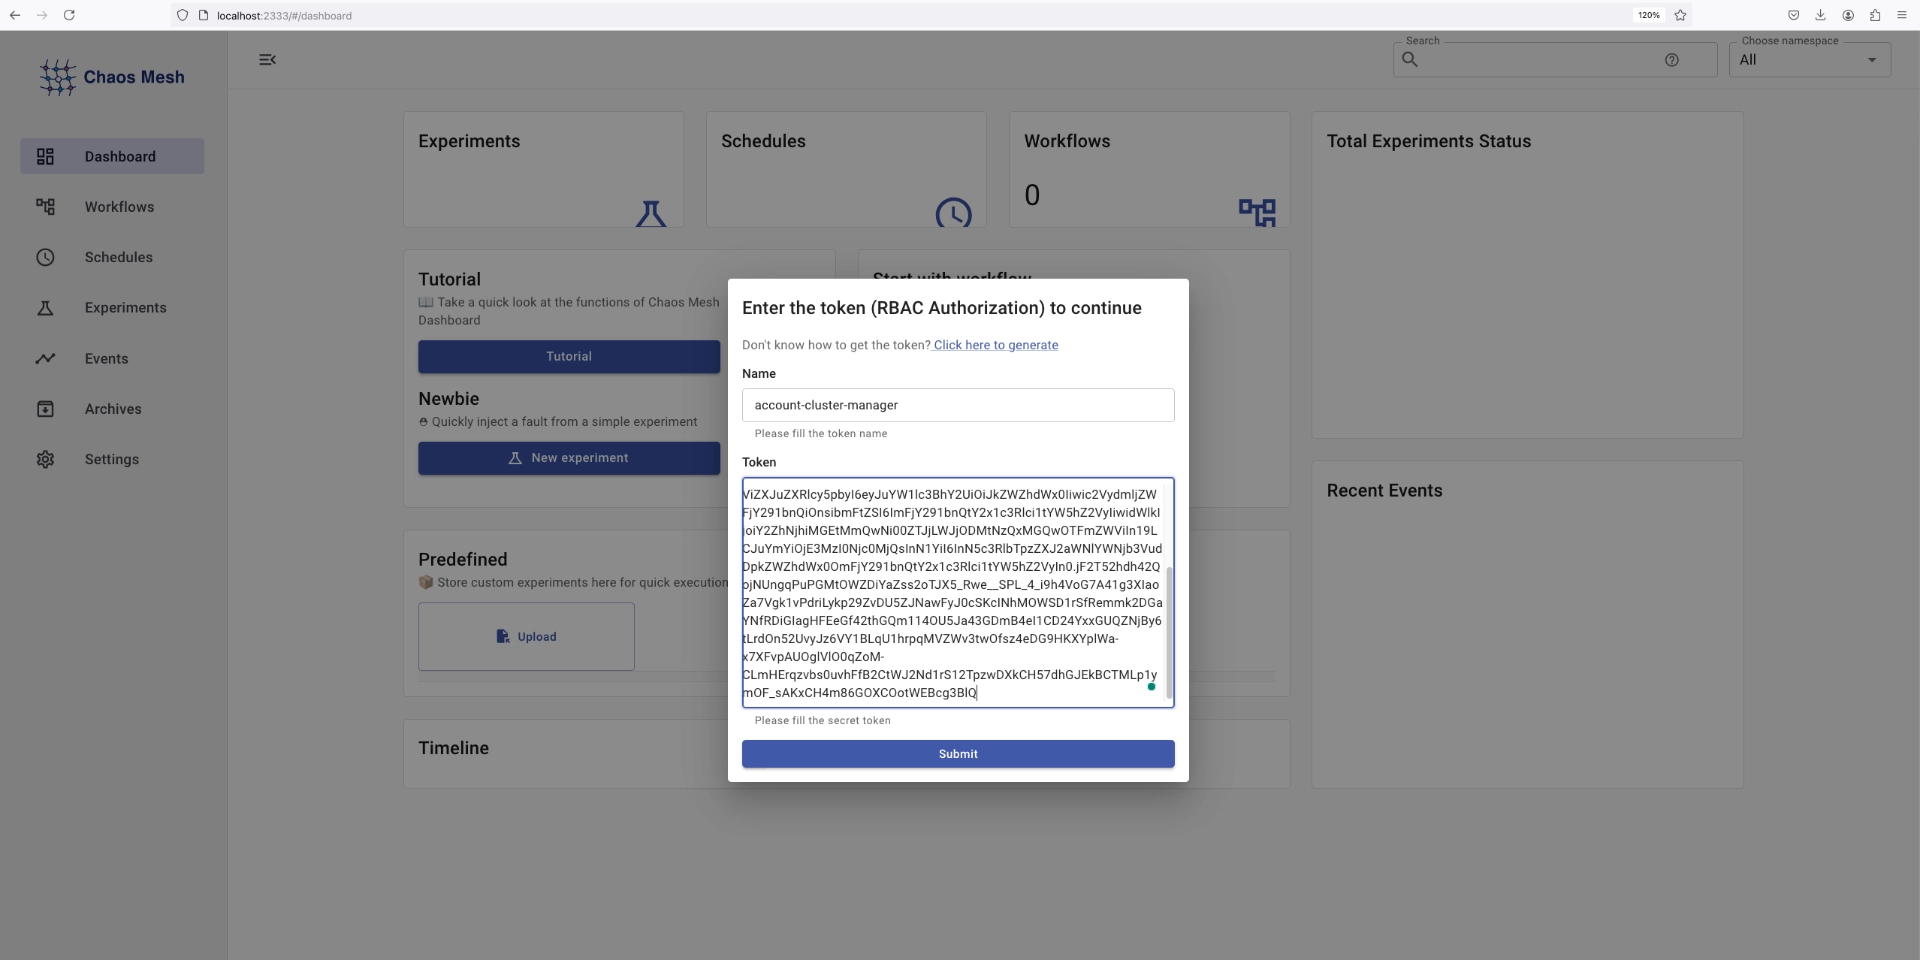
kubectl port-forward svc/chaos-dashboard -n chaos-mesh 2333:2333Navigating to http://localhost:2333 , should return a page like this:

Enter the credentials you just created, and you will be logged in.
StressChaos
The StressChaos CRD allows you to stress-test your application’s CPU or memory, simulating resource-intensive conditions. This is particularly useful for verifying metric-based scaling mechanisms, such as Kubernetes Horizontal Pod Autoscalers (HPA), to ensure they trigger under the correct conditions
Verify or Install Metrics Server
The metrics-server component is critical for collecting resource metrics like CPU and memory usage, which are required for HPA to function. To check if it’s installed, run the following command on your host cluster:
kubectl get deployment metrics-server -n kube-system If the deployment is not found on your host cluster, run the following commands after disconnecting from your virtual cluster:
vcluster disconnectInstall metrics-server:
kubectl apply -f - <<EOF
apiVersion: v1
kind: ServiceAccount
metadata:
  labels:
    k8s-app: metrics-server
  name: metrics-server
  namespace: kube-system

---
apiVersion: rbac.authorization.k8s.io/v1
kind: ClusterRole
metadata:
  labels:
    k8s-app: metrics-server
  name: system:metrics-server
rules:
- apiGroups: [""]
  resources: ["nodes/metrics", "pods", "nodes"]
  verbs: ["get", "list", "watch"]

---
apiVersion: apps/v1
kind: Deployment
metadata:
  labels:
    k8s-app: metrics-server
  name: metrics-server
  namespace: kube-system
spec:
  selector:
    matchLabels:
      k8s-app: metrics-server
  template:
    metadata:
      labels:
        k8s-app: metrics-server
    spec:
      serviceAccountName: metrics-server
      containers:
      - name: metrics-server
        image: registry.k8s.io/metrics-server/metrics-server:v0.7.2
        args:
        - --cert-dir=/tmp
        - --secure-port=10250
        - --kubelet-insecure-tls
        - --metric-resolution=15s
EOF
Reconnect to your virtual cluster:
vcluster connect pre-prod
Configure Horizontal Pod Autoscaler
Next, apply a HPA to scale the whoami deployment based on memory usage. The following manifest scales the pods between 1 and 8 replicas when the average memory usage exceeds 300Mi:
kubectl apply -f - <<EOF
apiVersion: autoscaling/v2
kind: HorizontalPodAutoscaler
metadata:
  name: whoami-hpa
  namespace: default
spec:
  scaleTargetRef:
    apiVersion: apps/v1
    kind: Deployment
    name: whoami
  minReplicas: 1
  maxReplicas: 8
  metrics:
  - type: Resource
    resource:
      name: memory
      target:
        type: AverageValue
        averageValue: 300Mi
EOF
Apply the StressChaos Experiment
Finally, create a StressChaos experiment to simulate memory pressure:
kubectl apply -f - <<EOF
apiVersion: chaos-mesh.org/v1alpha1
kind: StressChaos
metadata:
  name: mem-stress
  namespace: default
spec:
  mode: all
  selector:
    namespaces:
    - default
  stressors:
    memory:
      workers: 3
      size: 600MiB
      options: []  # Use an empty list for options
  duration: '120s'
EOF
The manifest above defines a StressChaos experiment that runs for 2 minutes (120s), as specified by the duration field. This experiment is configured in mode: all, meaning it will apply the stress test to all pods within the selected namespace(s).
Using the selector field, the experiment targets all pods in the default namespace. The stressors section specifies a memory stress test with the following configuration:
- Workers:
3— Three concurrent workers will be deployed to simulate the memory load. - Size:
600MiB— Each worker will attempt to allocate 600 MiB of memory.
As soon as you apply the manifest, you should see the HPA kick in. Verify this using:
kubectl get pods Output is similar to:

You can also check on the HPA directly:
kubectl get hpaOutput is similar to:
NAME         REFERENCE           TARGETS                   MINPODS   MAXPODS   REPLICAS   AGE
whoami-hpa   Deployment/whoami   memory: 639655936/300Mi   1         8         1          9h
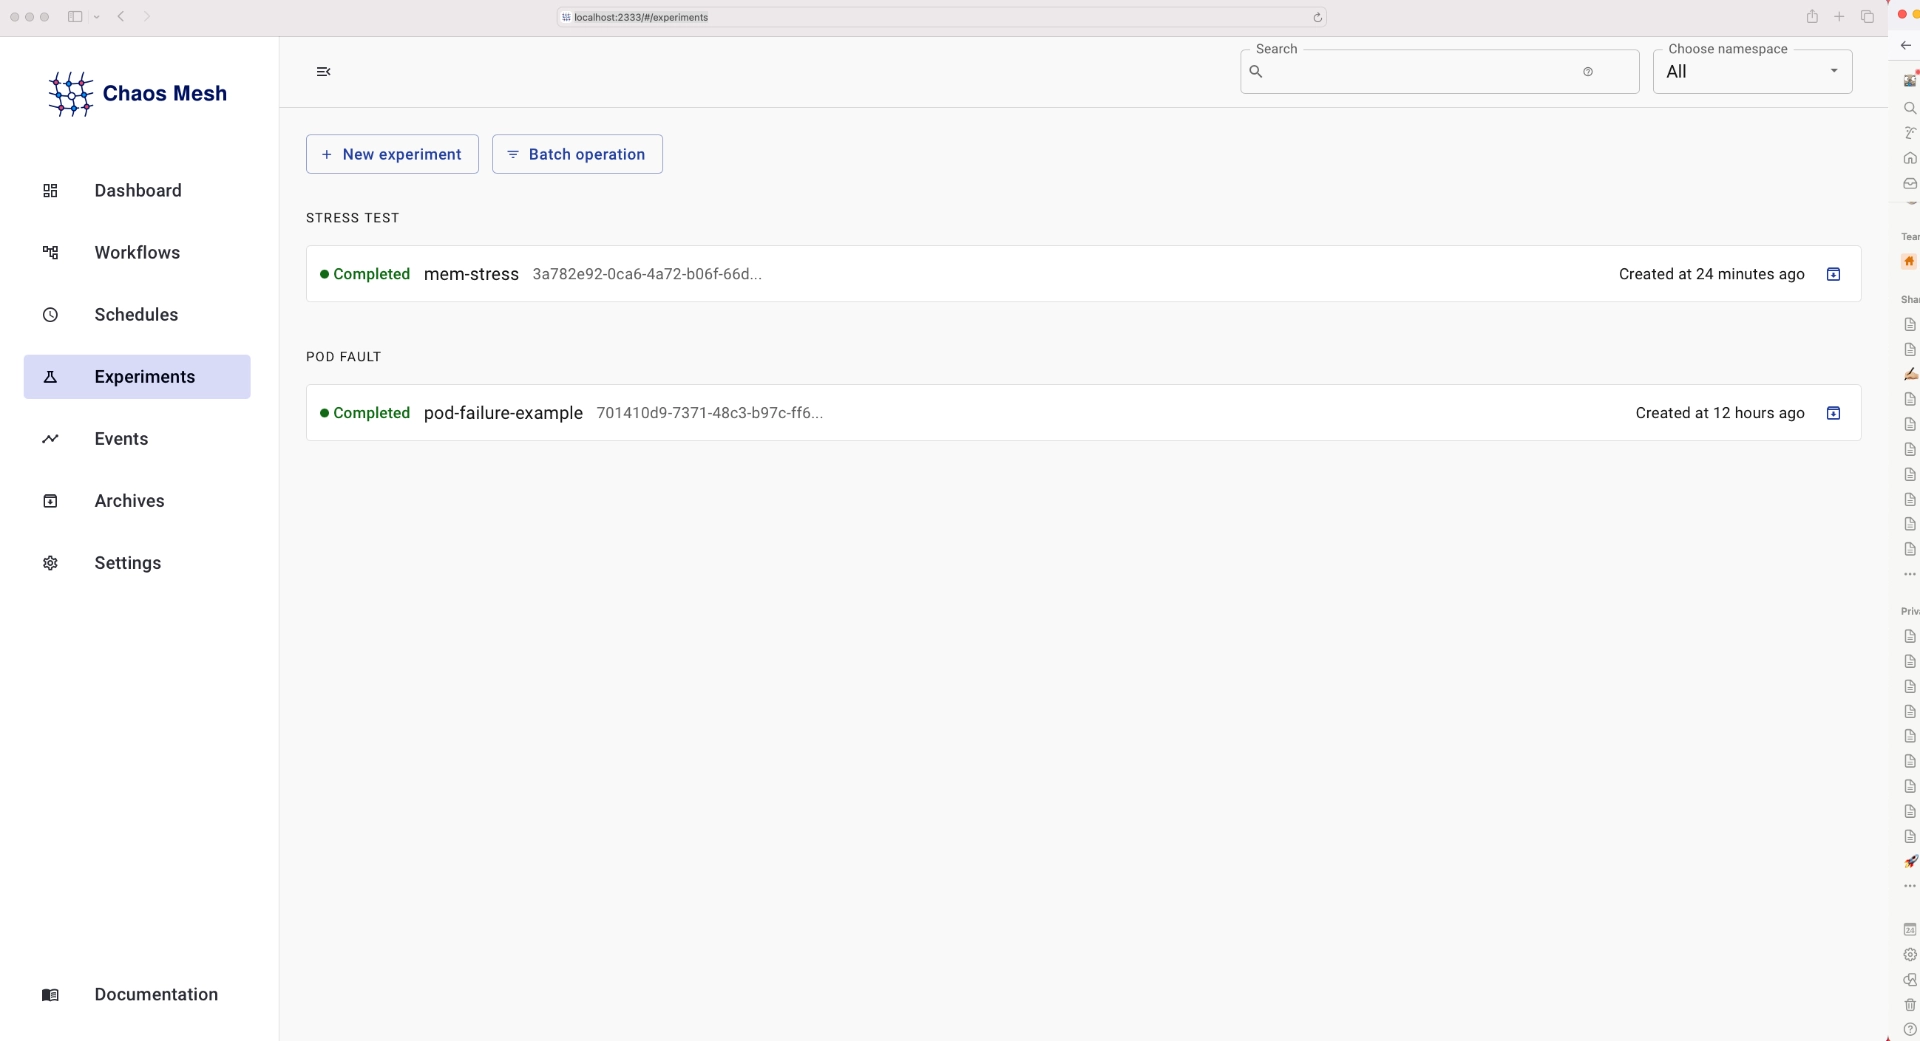
Finally, you can take a look at more detailed results of the experiments by navigating to http://localhost:2333/#/experiments , be sure to expose the dashboard if you haven’t already:
kubectl port-forward svc/chaos-dashboard -n chaos-mesh 2333:2333

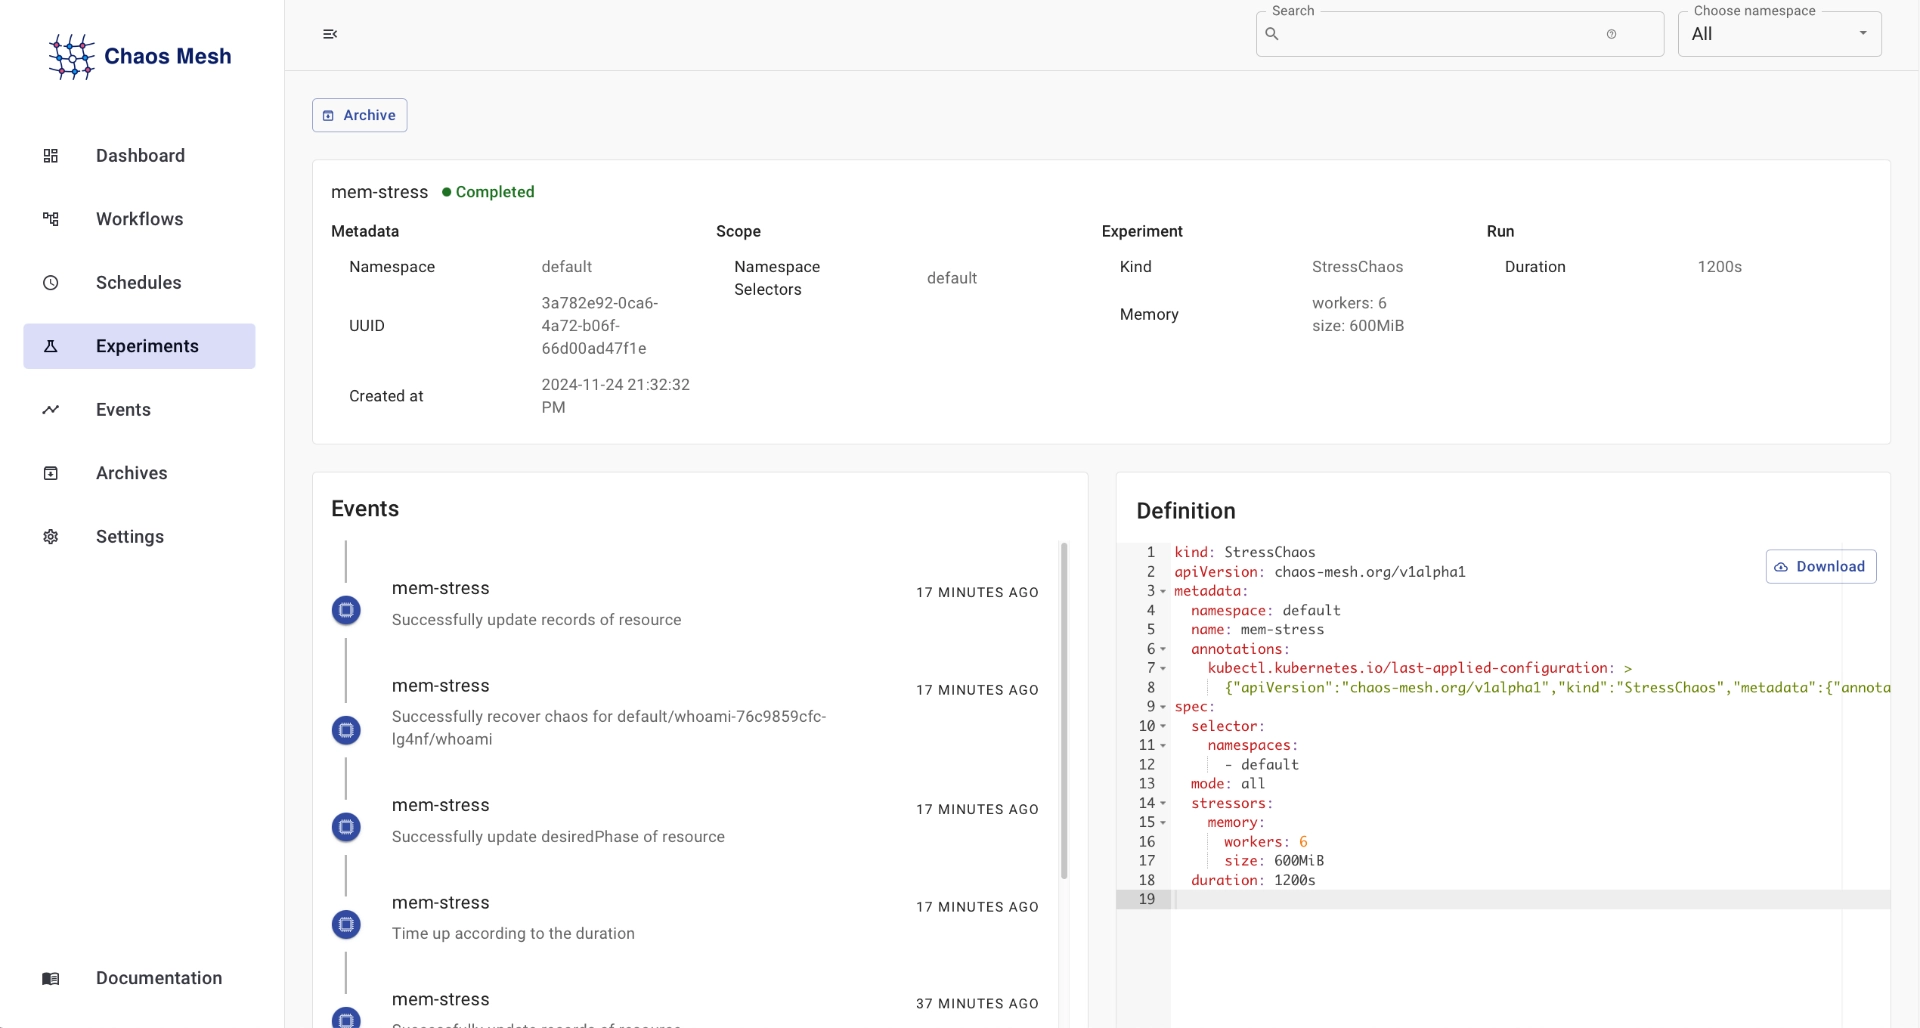
Select the mem-stress experiment, and you will be greeted with a more detailed view of the experiment:

This will show information such as the duration, namespace . Kind of experiment that was run ,events that occurred during the experiment and the manifest used. For the memory stress test, it displays what namespace it was run in, along with the number of workers(6 in this case) how much memory each worker used(600MiB) and the duration 1200
Conclusion
Chaos Engineering forces us to embrace failures and treat them as inevitable instead of hoping for the best outcome. With vCluster, teams can take this further and perform these tests as they would occur in production with no additional infrastructure costs.
While this blog covered only two experiments, Chaos Mesh has an extensive library of tests that you can leverage. Here are some suggestions for more chaos engineering content.
Don’t forget to check out the vCluster documentation for more details! Join our Slack here.


.png)

