

Table of Contents
In a fast-paced development environment, having an isolated and ephemeral environment to test changes for every pull request (PR) is a game-changer. In this blog, I’ll walk you through setting up ephemeral PR environments using vCluster, enabling seamless testing of your application in a Kubernetes environment. We'll also leverage GitHub Actions for automation, ensuring every labeled PR dynamically creates a vCluster, deploys the application, and cleans up upon merging or label removal.
Let’s dive into the step-by-step guide.
What is vCluster?
vCluster is a technology that allows you to create lightweight, isolated Kubernetes clusters within a host cluster. These virtual clusters offer full Kubernetes functionality while being resource-efficient, making them ideal for scenarios like PR testing environments.
Why Ephemeral PR Environments?
Ephemeral environments allow:
- Testing pull request changes in an isolated environment
- Quick validation without interfering with the main cluster
- Automatic cleanup post-testing
By leveraging vCluster and GitHub Actions, you can automate this workflow and ensure every PR gets its own dedicated environment.
Prerequisites:
Kubernetes cluster
You need to have a Kubernetes cluster, in this case I am using a DigitalOcean Kubernetes cluster but any should work. I am creating a realistic production scenario so for that I used a cluster that can create service type: LoadBalancer.
Command:
kubectl get nodes
Output:
kubectl get nodes
NAME              STATUS   ROLES    AGE   VERSION
live-demo-e0is0   Ready    <none>   19d   v1.31.1
live-demo-e0is1   Ready    <none>   19d   v1.31.1
live-demo-e0isz   Ready    <none>   19d   v1.31.1
Deploying Ingress controller
Command
kubectl apply -f https://raw.githubusercontent.com/kubernetes/ingress-nginx/controller-v1.9.4/deploy/static/provider/cloud/deploy.yamlOutput
kubectl get po,svc -n ingress-nginx
NAME                                           READY   STATUS      RESTARTS   AGE
pod/ingress-nginx-admission-create-lcb85       0/1     Completed   0          19d
pod/ingress-nginx-admission-patch-xl2fk        0/1     Completed   0          19d
pod/ingress-nginx-controller-79fcc99b4-7f7ls   1/1     Running     0          19d
Getting the LoadBalancer IP for the ingress controller:
Command:kubectl get svc -n ingress-nginx
Output:
NAME                                         TYPE           CLUSTER-IP      EXTERNAL-IP      PORT(S)                      AGE
service/ingress-nginx-controller             LoadBalancer   10.109.28.126   209.38.160.229   80:31228/TCP,443:30435/TCP   19d
service/ingress-nginx-controller-admission   ClusterIP      10.109.15.162   <none>           443/TCP                      19d
Domain mapping:
For our application we need dynamic ingress for testing so what we have done here is added the loadbalancer IP of the ingress controller as the A record to the Domain.

Connect the Kubernetes cluster to the platform
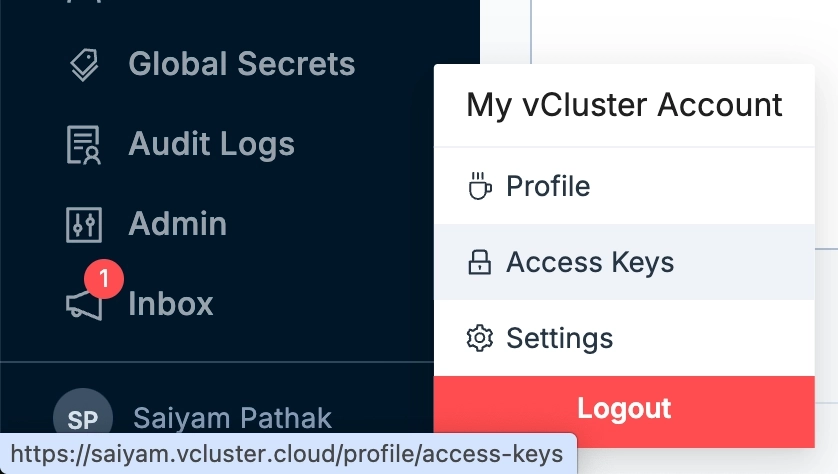
We will enable vCluster Pro in order to use templates and create the clusters. For simplicity, I am using my vcluster.cloud account and then creating the access key to login. In this way I don’t have to run any agent on the current cluster. You can either run vcluster platform start or sign up on vCluster cloud and once you login, you should be able to go to access keys and create a short lived access key for the demo (remember to delete the key post demo for security reasons).
Command:
vcluster platform login https://saiyam.vcluster.cloud --access-key <your-access-key>Output:

Create a template under vCluster templates in the vCluster cloud platform instance.
sync:
  fromHost:
    ingressClasses:
      enabled: true
  toHost:
    ingresses:
      enabled: true
external:
  platform:
    autoSleep:
      afterInactivity: 3600  # Automatically sleep after 1 hour of inactivity
Until now we have a Kubernetes cluster with ingress controller installed and the Public IP of the nginx controller pointed to our domain.
We also have logged into the platform using the access keys created using vcluster.cloud. Now let’s see the demo application that we have.
Demo Application
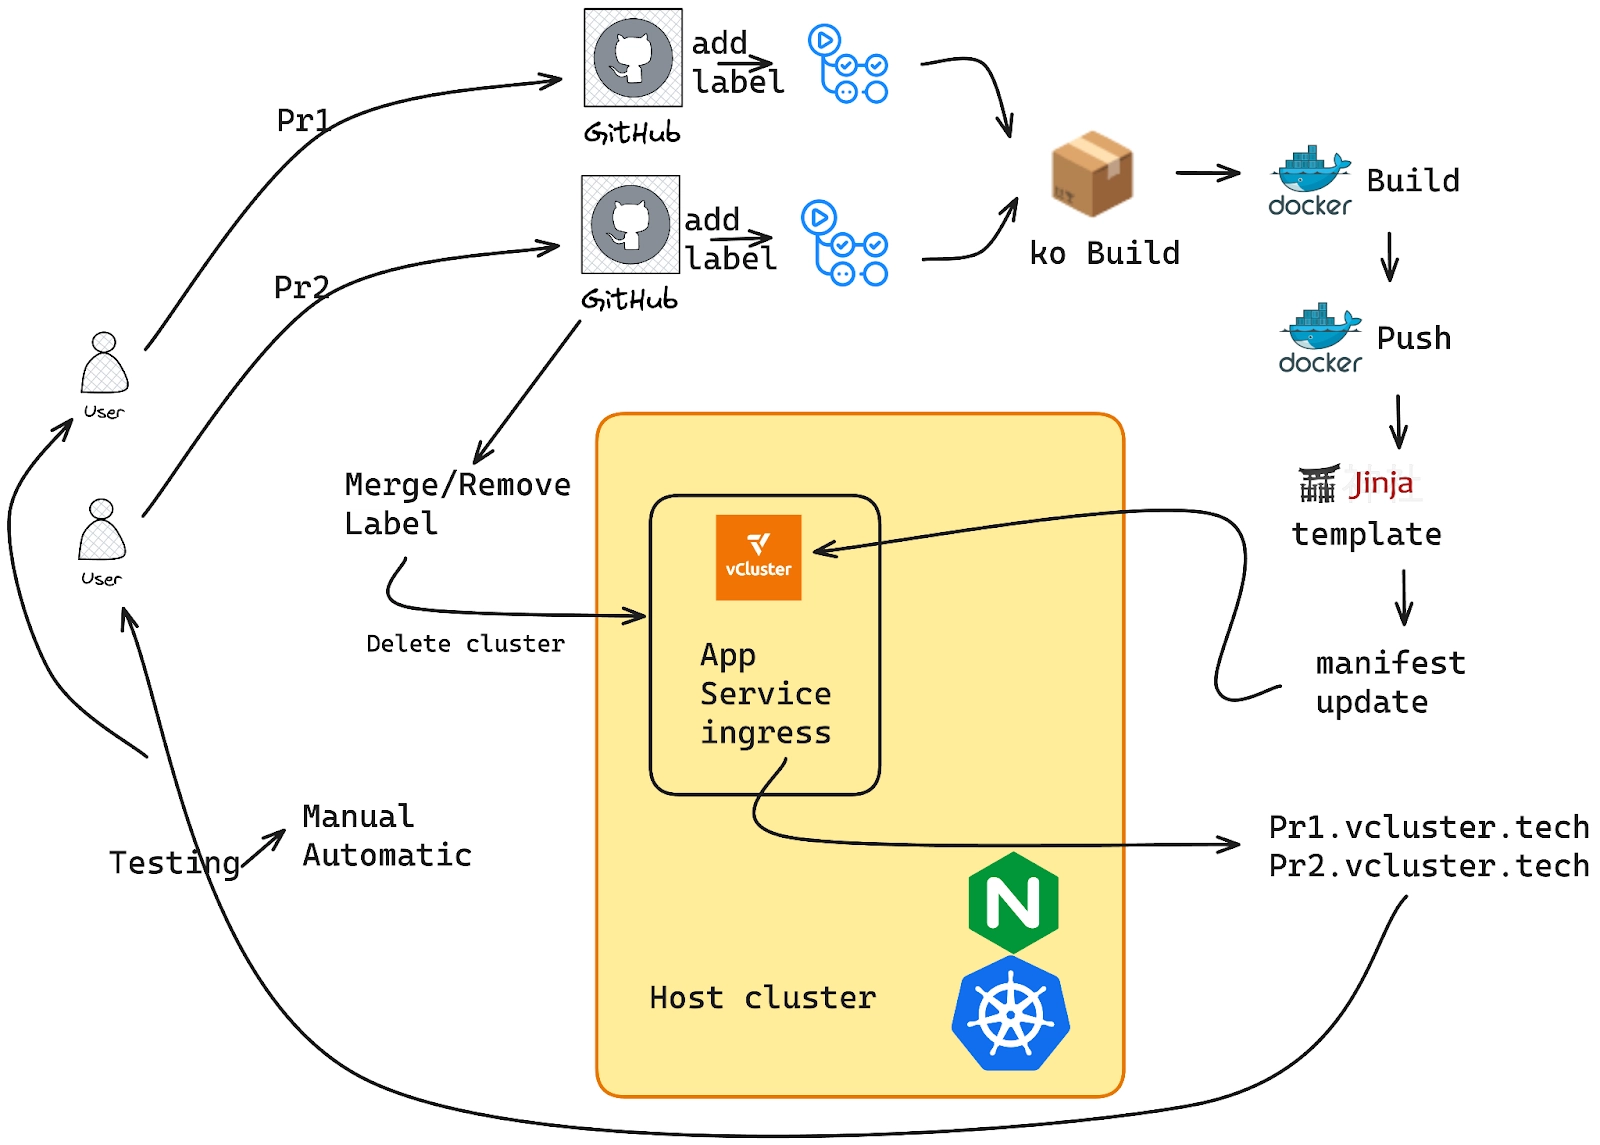
The scenario we are trying to achieve here involves a sample application deployed onto a Kubernetes cluster. Often, in organizations, new features or bug fixes need to be deployed and tested before being merged into the main branch. In this case, a developer raises a pull request and adds a label to test it. Based on GitHub Actions, the application is built, and then a deployment, service, and ingress Kubernetes object file are generated and pushed to a new branch. A virtual cluster is created, and the new deployment file is applied, allowing the developer to test and verify the new application deployment.
Let’s see how this looks in practice.
GitHub repo - https://github.com/saiyam1814/vcluster-demo
The application for this demo is a simple Go-based HTTP server:
package main
import (
	"fmt"
	"net/http"
)
func handler(w http.ResponseWriter, r *http.Request) {
	fmt.Fprintln(w, "Hellooo, World for blog!!")
}
func main() {
	http.HandleFunc("/", handler)
	fmt.Println("Starting server on :8080")
	err := http.ListenAndServe(":8080", nil)
	if err != nil {
		panic(err)
	}
}
Step 1: Setting Up the Deployment Template
The application is packaged as a Kubernetes deployment and exposed via a service and ingress. The deployment uses Jinja2 templating to inject dynamic values like the image tag and ingress host.
tmpl/deploy.j2:
apiVersion: apps/v1
kind: Deployment
metadata:
  name: hello-world
  labels:
    app: hello-world
spec:
  replicas: 1
  selector:
    matchLabels:
      app: hello-world
  template:
    metadata:
      labels:
        app: hello-world
    spec:
      containers:
      - name: hello-world
        image: {{ image_deploy_tag }}
        ports:
        - containerPort: 8080
---
apiVersion: v1
kind: Service
metadata:
  name: hello-world
spec:
  ports:
  - port: 80
    targetPort: 8080
  selector:
    app: hello-world
---
apiVersion: networking.k8s.io/v1
kind: Ingress
metadata:
  name: hello-world
spec:
  ingressClassName: nginx
  rules:
  - host: {{ ingress_tag }}
    http:
      paths:
      - pathType: Prefix
        path: "/"
        backend:
          service:
            name: hello-world
            port:
              number: 80
Step 2: Automating with GitHub Actions
GitHub Actions handles the workflow from building the application to deploying it on a vCluster.
PR Workflow
File: .github/workflows/build-and-deploy.yml This workflow:
- Builds the application with the latest changes made by the developer using ko
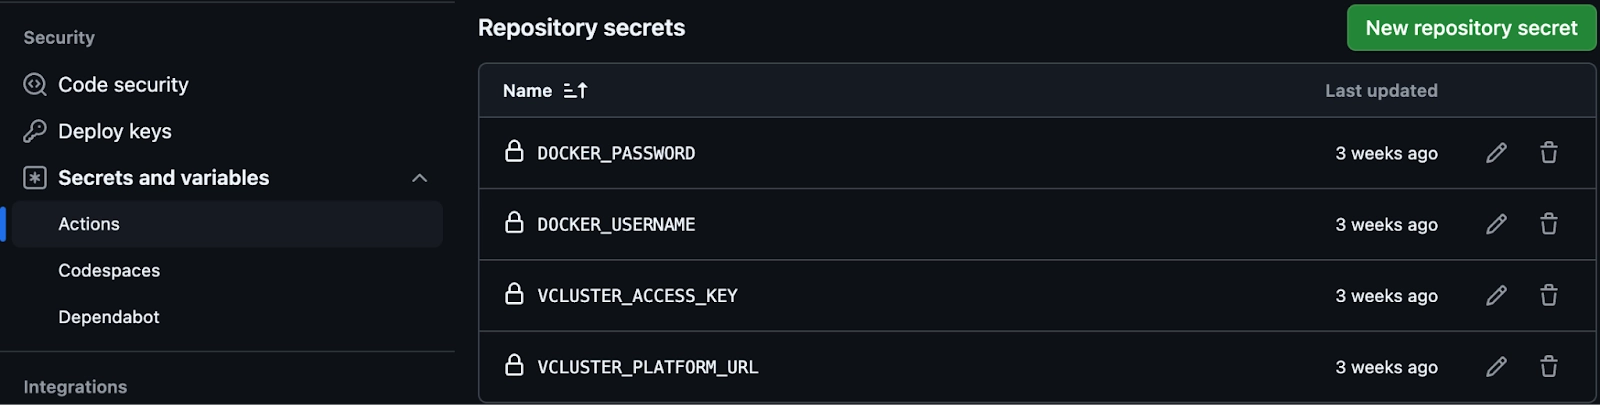
- Pushes the container image to docker hub account(credentials for which should be set in the Actions secret as described previously)
- Creates a deployment manifest using Jinja2 - The action will replace the ingress host and the deployment image variables mentioned in the jinja template and then push to a new feature branch.
- Creates a vCluster.
- Deploys the application to the vCluster.
- Exposes it via ingress for testing.
name: Build and Deploy with vCluster

on:
  pull_request:
    types: [labeled]

jobs:
  build-and-deploy:
    if: ${{ github.event.label.name == 'test' }}
    runs-on: ubuntu-latest

    steps:
      # Step 1: Checkout PR Code
      - name: Checkout PR Code
        uses: actions/checkout@v3
        with:
          ref: ${{ github.event.pull_request.head.sha }}


      # Step 2: Set up Go
      - name: Set up Go
        uses: actions/setup-go@v4
        with:
          go-version: '1.22.5'


      # Step 3: Set up ko
      - name: Set up ko
        uses: ko-build/setup-ko@v0.6
        with:
          version: v0.14.1


      # Step 4: Log in to Docker Hub
      - name: Log in to Docker Hub
        env:
          KO_DOCKER_REPO: docker.io/saiyam911
        run: |
          echo "${{ secrets.DOCKER_PASSWORD }}" | ko login docker.io --username ${{ secrets.DOCKER_USERNAME }} --password-stdin


      # Step 5: Build and Push Image
      - name: Build and Push Image
        env:
          KO_DOCKER_REPO: docker.io/saiyam911/vcluster-demo
        run: |
          cd app
          export IMAGE_TAG=sha-$(git rev-parse --short HEAD)
          echo "image_deploy_tag=docker.io/saiyam911/vcluster-demo:$IMAGE_TAG" >> $GITHUB_ENV
          ko build --bare -t $IMAGE_TAG


      # Step 6: Generate Deployment Manifest
      - name: Generate Deployment Manifest
        uses: cuchi/jinja2-action@v1.1.0
        with:
          template: tmpl/deploy.j2
          output_file: deploy/deployment.yaml
          strict: true
          variables: |
            image_deploy_tag=${{ env.image_deploy_tag }}
            ingress_tag=pr${{ github.event.pull_request.number }}.vcluster.tech


      # Step 7: Install vCluster CLI
      - name: Install vCluster CLI
        uses: loft-sh/setup-vcluster@main


      # Step 8: Login to vCluster Platform
      - name: Login to vCluster Platform instance
        env:
          LOFT_URL: ${{ secrets.VCLUSTER_PLATFORM_URL }}
          ACCESS_KEY: ${{ secrets.VCLUSTER_ACCESS_KEY }}
        run: |
          vcluster platform login $LOFT_URL --access-key $ACCESS_KEY


      # Step 9: Create vCluster for the PR
      - name: Create A vCluster
        env:
          NAME: pr-${{ github.event.pull_request.number }}
        run: |
          vcluster platform create vcluster $NAME --project default --template my-template --link "Preview=http://pr${{ github.event.pull_request.number }}.vcluster.tech"


      # Step 10: Deploy to vCluster
      - name: Deploy Application to vCluster
        run: |
          kubectl apply -Rf deploy/


      # Step 11: Test Application with curl
      - name: Test Application
        run: |
          sleep 10
          curl --retry 5 --retry-delay 10 http://pr${{ github.event.pull_request.number }}.vcluster.tech
Step 3: Cleanup Workflow
Once the PR is merged or the label is removed, the ephemeral vCluster is deleted.
File: .github/workflows/cleanup.yml
name: Clean Up vCluster

on:
  pull_request:
    types: [closed, unlabeled]

jobs:
  cleanup:
    if: (github.event.action == 'closed' && github.event.pull_request.merged == true) || github.event.label.name == 'test'
    runs-on: ubuntu-latest

    steps:
      # Step 1: Install vCluster CLI
      - name: Install vCluster CLI
        uses: loft-sh/setup-vcluster@main


      # Step 2: Login to vCluster Platform
      - name: Login to vCluster Platform instance
        env:
          LOFT_URL: ${{ secrets.VCLUSTER_PLATFORM_URL }}
          ACCESS_KEY: ${{ secrets.VCLUSTER_ACCESS_KEY }}
        run: |
          vcluster platform login $LOFT_URL --access-key $ACCESS_KEY


      # Step 3: Delete vCluster
      - name: Delete vCluster
        env:
          NAME: pr-${{ github.event.pull_request.number }}
        run: |
          vcluster platform delete vcluster $NAME --project default
How It Works
A developer creates a PR to do the feature changes.
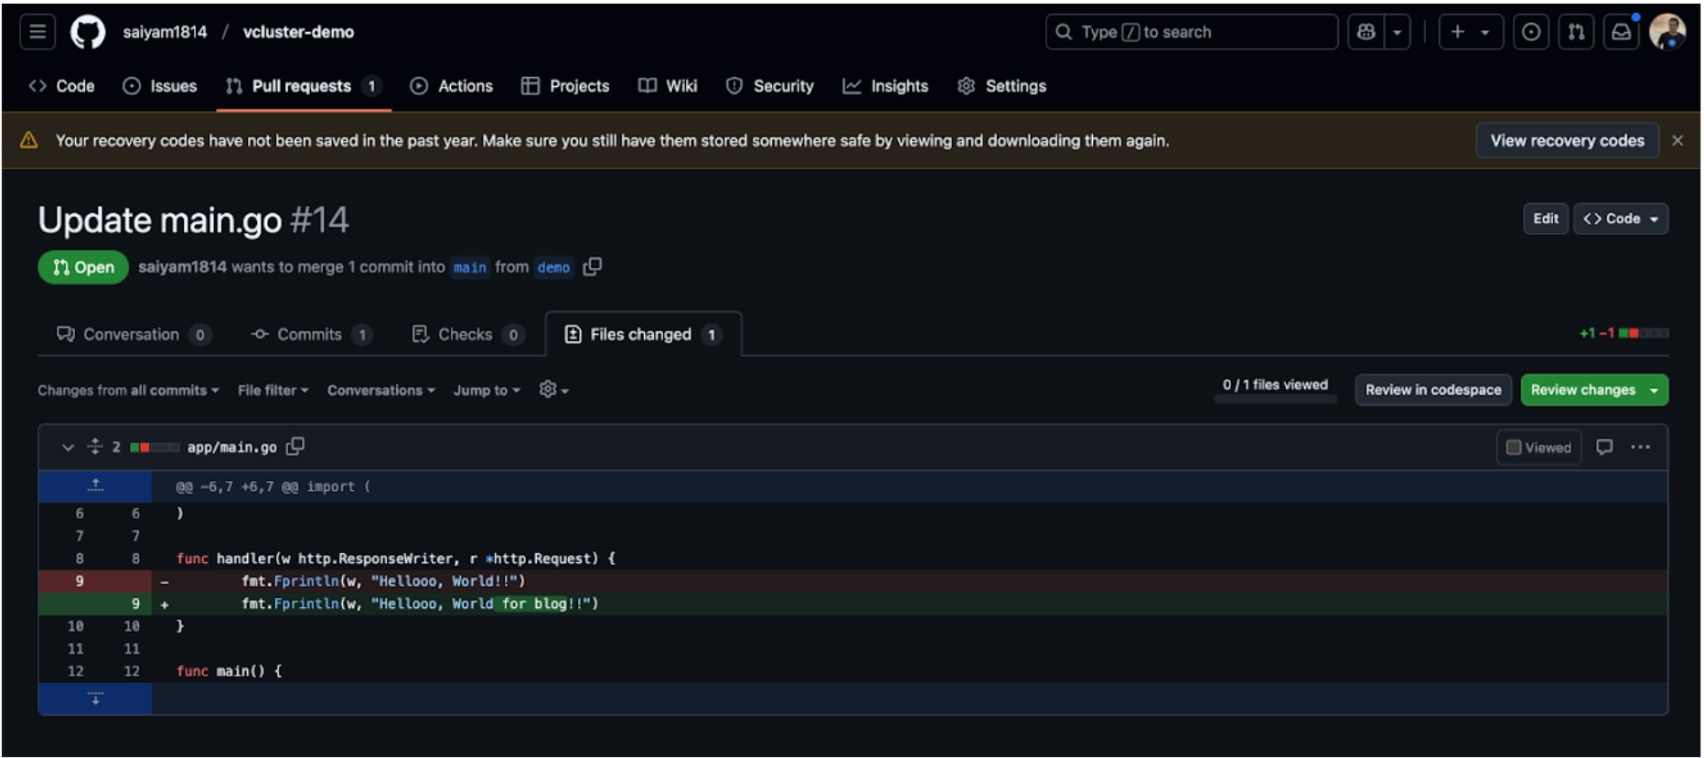
With a small change the developer has raised a PR and now needs to add a test label.
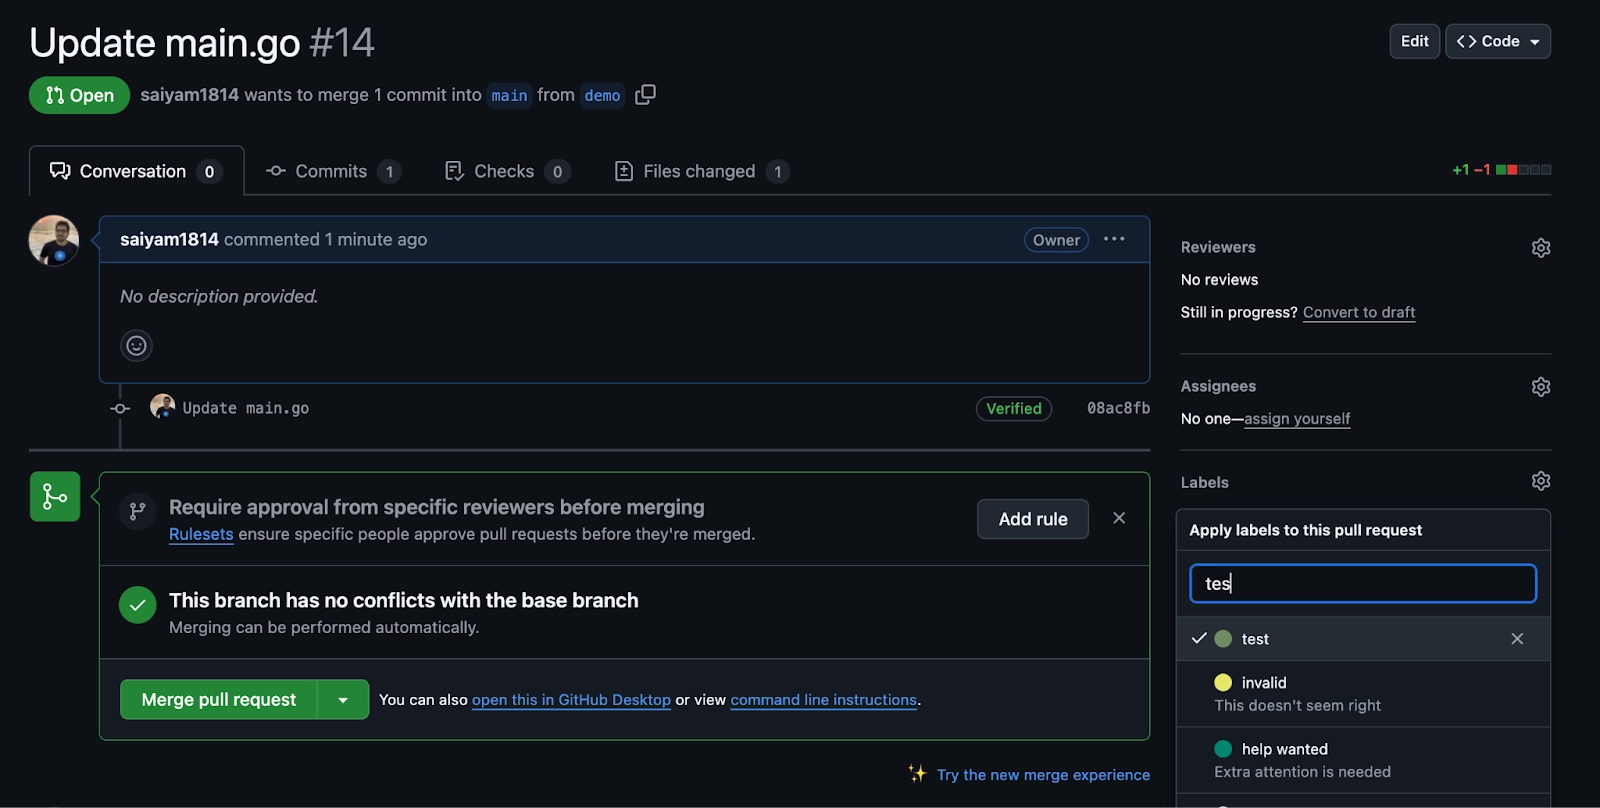
As soon as the label is added the GitHub actions kicks off
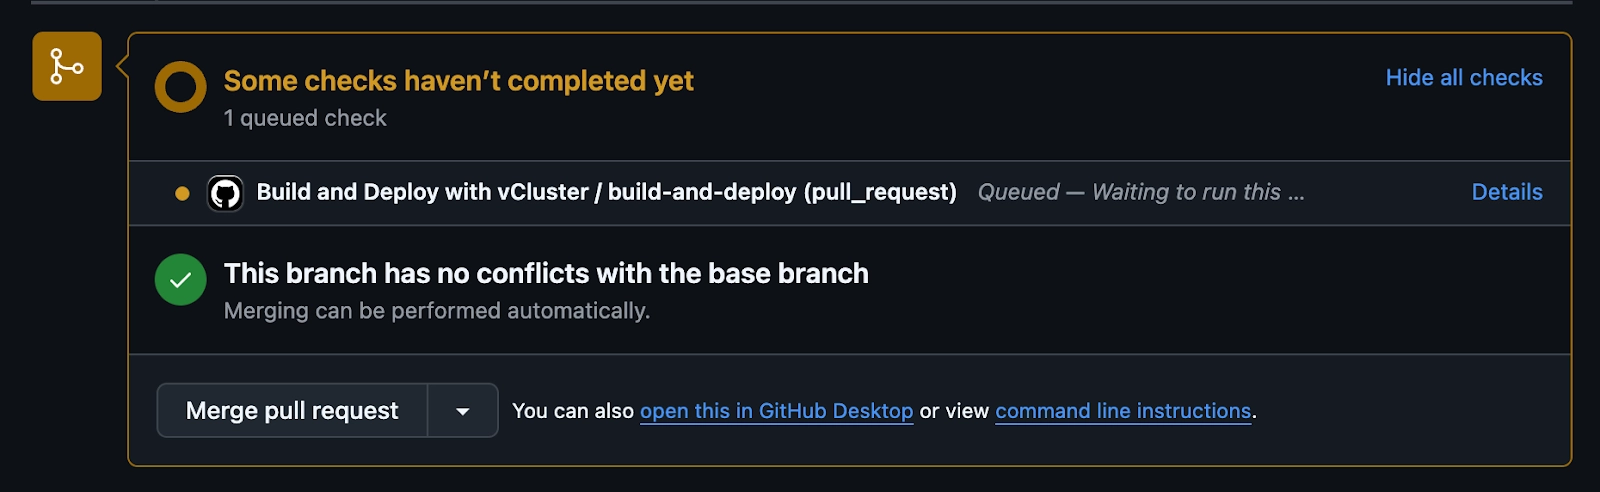
In the vCluster platform cloud instance you will be able to see the cluster getting created and the application will be deployed.


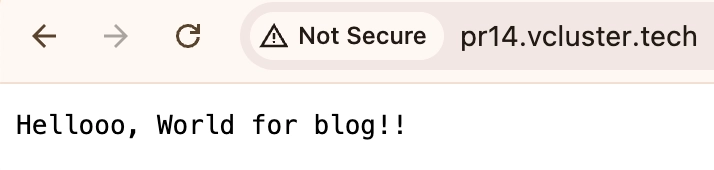
The Action is completed and pr14.vcluster.tech is created as part of ingress.
The application is accessible at http://pr<PR_NUMBER>.vcluster.tech.
As you can see the latest changes made by the developer are deployed.
Cleanup:
Upon PR merge or label removal, the ephemeral vCluster is automatically deleted.
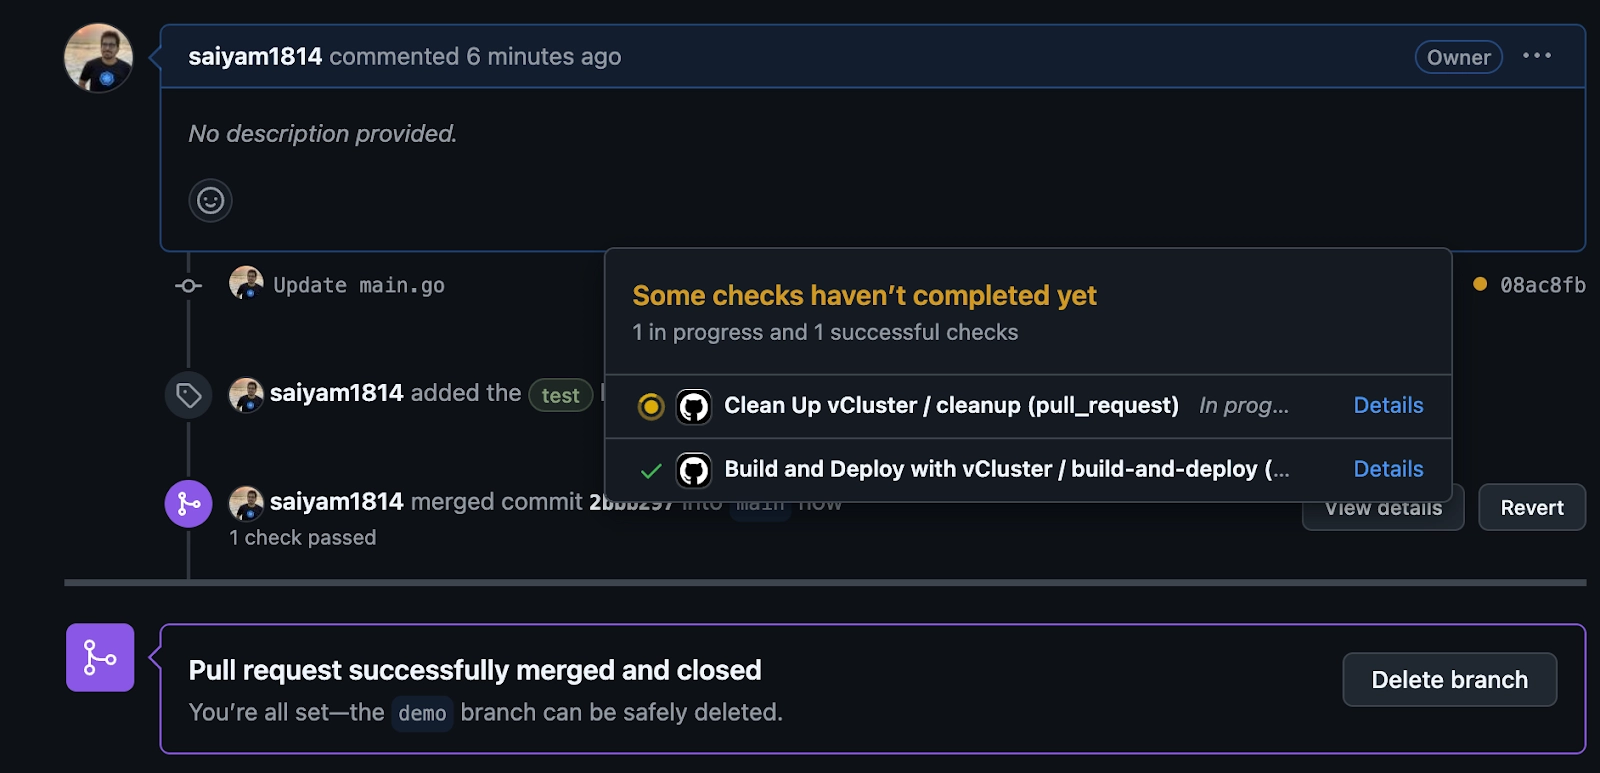
After merging, the cleanup action is triggered, which will clear the virtual cluster.
Conclusion
Ephemeral PR environments using vCluster simplify testing, reduce resource usage, and provide a seamless developer experience. By combining vCluster with GitHub Actions, you can achieve an automated and efficient workflow for testing PRs.
Check out the demo repository and give it a try! 🚀
Let me know your thoughts or if you face any challenges while implementing this.
We will be doing this as part of our workshop happening on 20th March 2025.

.png)
