Table of Contents
I’ve been wanting to talk about how to use KubeVirt with vCluster for a while now, and with this new release support has been added. It’s time to dust off some of your cloud-init skills and get back to deploying virtual machines, Kubernetes edition.
Requirements
There are a couple of requirements before we can get started. I’m going to assume that you have installed these things:
- Kubernetes - If you are running K8s/K3s on VMs you need to make sure you are using a VM with a CPU that supports KVM
- vCluster CLI
- virtctl - used to connect to the VMs and configure access
- vCluster Platform (There’s a Trial if you want to try this out!)
- Optional - Kubectx - we use this to check our context
We will get KubeVirt running on the base cluster, then create a vCluster and share those resources with it. We will then launch a Virtual Machine and verify access.
Install KubeVirt
We need to install KubeVirt first. To do so, we’ll follow the steps provided by the project. I went ahead and created a script (pulled from the KubeVirt docs) that installs everything. This will install KubeVirt and the Container Data Importer. Make sure you are running this on the base cluster so that KubeVirt is installed since we are going to share the resources with the Virtual Cluster and rely on the base Cluster CRD.
#!/bin/bash
export VERSION=$(curl -s https://storage.googleapis.com/kubevirt-prow/release/kubevirt/kubevirt/stable.txt)
echo $VERSION
kubectl create -f https://github.com/kubevirt/kubevirt/releases/download/$VERSION/kubevirt-operator.yaml
kubectl create -f https://github.com/kubevirt/kubevirt/releases/download/$VERSION/kubevirt-cr.yaml
export TAG=$(curl -s -w %{redirect_url} https://github.com/kubevirt/containerized-data-importer/releases/latest)
export VERSION=$(echo ${TAG##*/})
kubectl create -f https://github.com/kubevirt/containerized-data-importer/releases/download/$VERSION/cdi-operator.yaml
kubectl create -f https://github.com/kubevirt/containerized-data-importer/releases/download/$VERSION/cdi-cr.yaml
Create a vCluster
After we have KubeVirt running on the base cluster, we can create a virtual cluster with the KubeVirt options enabled. Since we’re using vCluster Platform to create the vCluster, let’s go ahead and create a template. This assumes that the vCluster Platform is installed and that you can log in and create templates, create virtual clusters, and any other resources needed - basically, you are the admin. If you are not the admin and are using vCluster Platform then you may want to reach out to an admin and have them create the template for you.
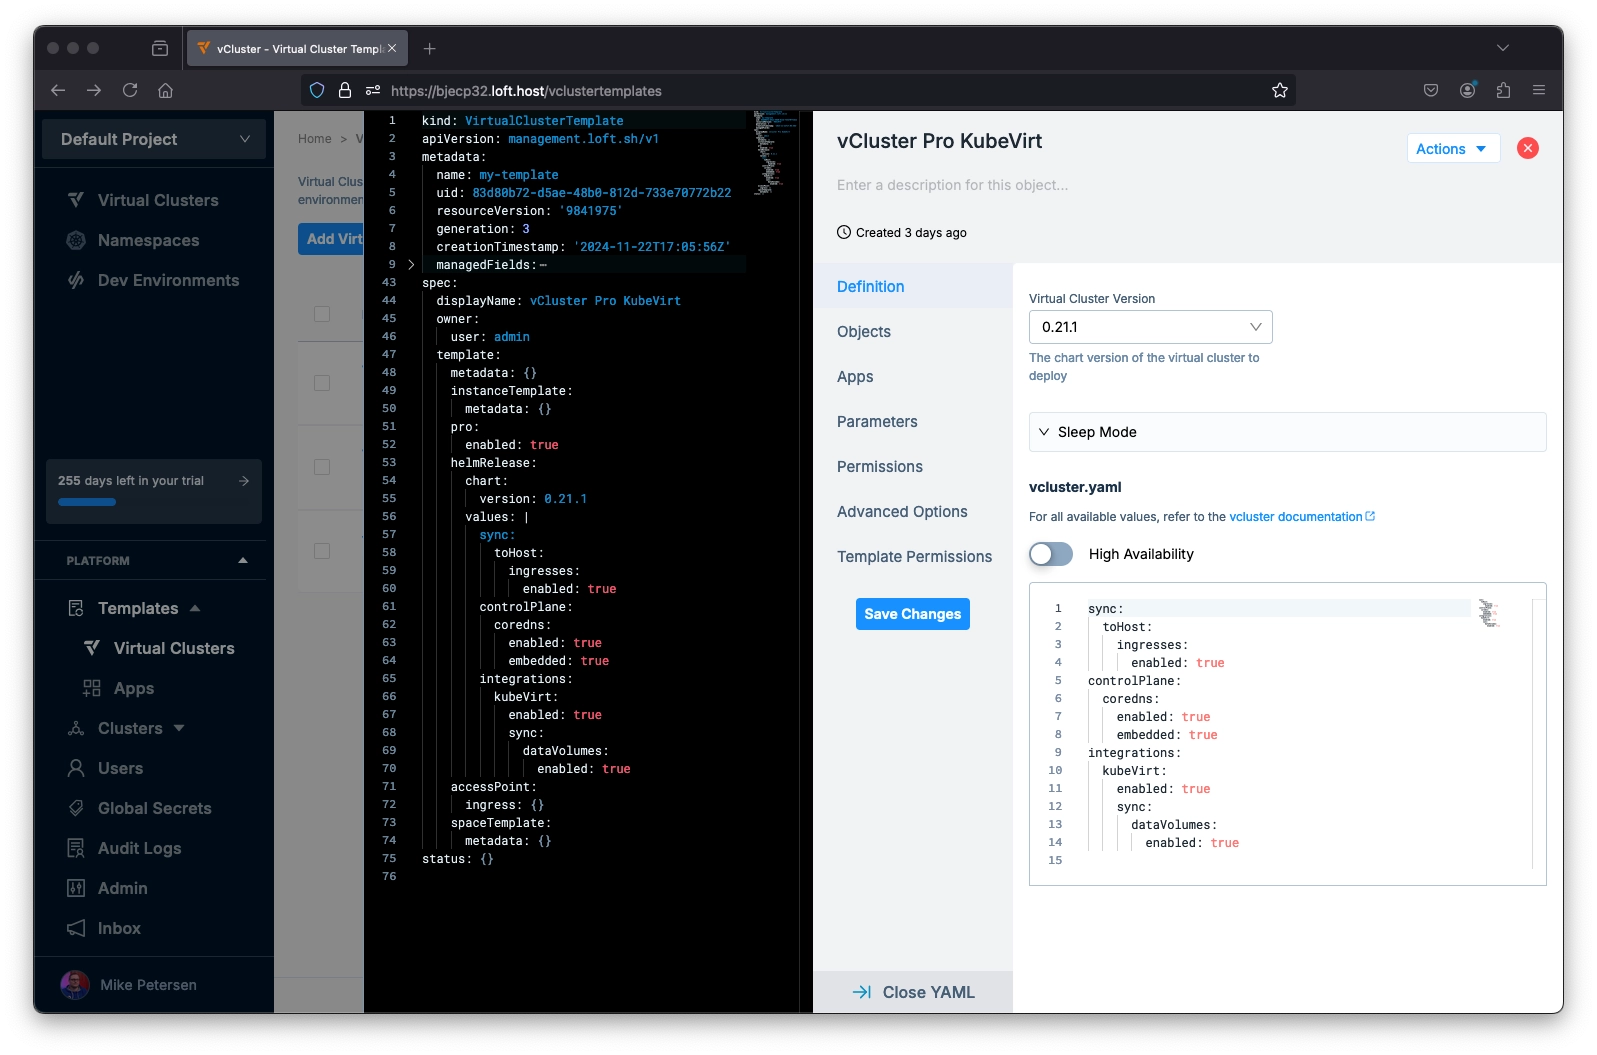
In the UI go to Templates > Virtual Clusters > Add Virtual Cluster Template.

In this example, we use vCluster version 0.21.1 and then paste the below configuration into the vcluster.yaml, and then save the template.
sync:
  toHost:
    ingresses:
      enabled: true
controlPlane:
  coredns:
    enabled: true
    embedded: true
integrations:
  kubeVirt:
    enabled: true
    sync:
      dataVolumes:
        enabled: true
You can enable KubeVirt with or without DataVolumes. In this example, we want to deploy multiple types of VMs, one with a containerdisk and one with a DataVolume, so we enable the dataVolume sync option.
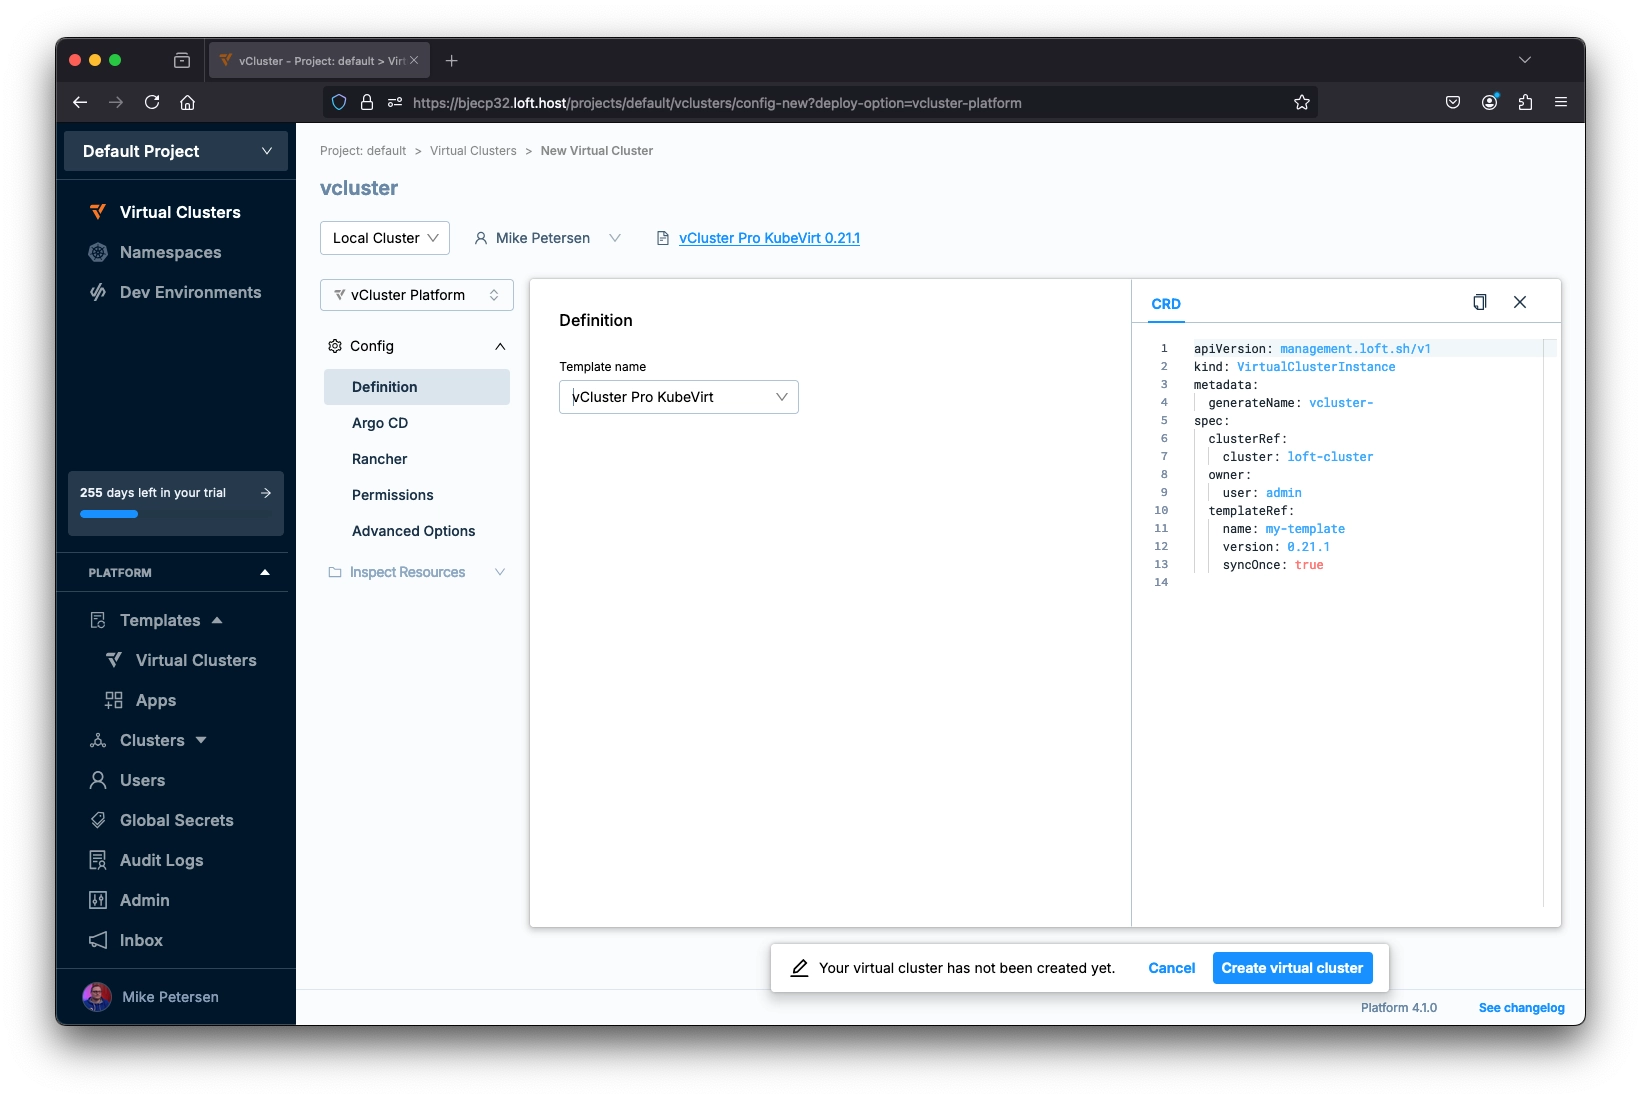
Now, it is time to deploy the vCluster. Select Virtual Clusters in the left menu and then “Create virtual cluster.” In this menu we will select the template we just created instead of filling in the information in the wizard. After selecting the template, select “Create virtual cluster” and wait for the virtual cluster to finish deploying.

Deploy a Virtual Machine with Containerdisk
Now that our virtual cluster is running, we can deploy a VM. Time to head to the CLI!
With the context set to the virtual cluster, we can launch one of the virtual machines as an example. Let's get connected to the vCluster and confirm our context first.
vcluster list
vcluster connect VCLUSTER_NAME
kubectx
Here's a list of the available containerdisk images that you can use from KubeVirt.
https://github.com/kubevirt/containerdisks
We will start by deploying a basic Ubuntu VM with a containerdisk as the storage type.
Copy the below YAML into ubuntu.yaml and then create it with the following:
kubectl create -f ubuntu.yaml
apiVersion: kubevirt.io/v1
kind: VirtualMachine
metadata:
  name: ubuntu-vm
spec:
  running: true
  template:
    metadata:
      labels:
        kubevirt.io/domain: ubuntu-vm
    spec:
      domain:
        devices:
          disks:
          - disk:
              bus: virtio
            name: containerdisk
          - disk:
              bus: virtio
            name: cloudinitdisk
          rng: {}
        resources:
          requests:
            memory: 1024M
      terminationGracePeriodSeconds: 0
      volumes:
      - containerDisk:
          image: quay.io/containerdisks/ubuntu:24.04
        name: containerdisk
      - cloudInitNoCloud:
          userData: |-
            #cloud-config
            password: ubuntu
            chpasswd: { expire: False }
        name: cloudinitdisk
Once the VM is running, we can connect to it using the virtctl command.
virtctl console ubuntu-vm
We set the password to “ubuntu,” and the user will be ubuntu as well. So you can log in within the console using ubuntu:ubuntu.
Congrats! You have deployed your first virtual machine inside a virtual cluster on Kubernetes!
Deploy a Virtual Machine with a DataVolume and Cloud Image
Containerdisks are great, but what about if we want to use a cloud image that we created for another platform - think OpenStack or other platforms that use qcow2 images. We can still use cloud images that we created, and we can even use cloud-init to set them up for us. KubeVirt also adds some functionality that makes it easier to import SSH Keys using Secrets instead of pasting the information into userData in cloud-init.
We can specify the cloud image using the url section in the DataVolume kind (installed with the cdi.) In this example we’re just grabbing the Ubuntu Server image, but you can point this to a resolvable url where you are hosting other images if needed. This will create a 10 gb volume and then import the image into it, then we can attach our VM to it.
Copy the below YAML into dv_ubuntu.yaml and then create it with:
kubectl create -f dv_ubuntu.yaml
apiVersion: cdi.kubevirt.io/v1beta1
kind: DataVolume
metadata:
  name: "ubuntu-vm"
spec:
  storage:
    accessModes:
      - ReadWriteOnce
    resources:
      requests:
        storage: 10Gi
  source:
    http:
      url: "https://cloud-images.ubuntu.com/noble/20241120/noble-server-cloudimg-amd64.img"
The VM will now reference the PVC created by the DataVolume - ubuntu-vm. Once the VM has been created it will kick off the import process for the DataVolume and create a PV and PVC.
Let’s look at the other differences in this YAML compared to the first VM we deployed. We are adding access credentials because we want to import an SSH key. We are also still setting up a password because this is just an example and maybe you want to test out SSH and Console access. The PVC is also referenced from the DataVolume we created, and since the volume already has the OS, we won’t have to specify an image.
Let’s create the secret before deploying the virtual machine.
kubectl create secret generic my-pub-key --from-file=key1=PATH_TO_PUB_KEY
If there are issues with the secret, you may need to reference the base cluster secret until a bug has been resolved using my-pub-key-x-project-x-vcluster-id. So for the Default project, or if you name a project something like Developer, and the vCluster is named vcluster-zgw5c, it would look like this:
my-pub-key-x-developer-x-vcluster-zgw5c
kubectl create secret generic my-pub-key-x-developer-x-vcluster-zgw5c --from-file=key1=PATH_TO_PUB_KEY
Now copy the YAML information below into ubuntu_dv_pvc.yaml (or whatever name you want) and create it with:
kubectl create -f ubuntu_dv_pvc.yaml
apiVersion: kubevirt.io/v1
kind: VirtualMachine
metadata:
  labels:
    kubevirt.io/os: linux
  name: ubuntu-vm
spec:
  running: true
  template:
    metadata:
      labels:
        kubevirt.io/domain: ubuntu-vm
    spec:
      domain:
        cpu:
          cores: 2
        devices:
          disks:
          - disk:
              bus: virtio
            name: disk0
          - cdrom:
              bus: sata
              readonly: true
            name: cloudinitdisk
        machine:
          type: q35
        resources:
          requests:
            memory: 1024M
      accessCredentials:
      - sshPublicKey:
          source:
            secret:
              secretName: my-pub-key
          propagationMethod:
            noCloud: {}
      volumes:
      - name: disk0
        persistentVolumeClaim:
          claimName: ubuntu-vm
      - cloudInitNoCloud:
          userData: |
            #cloud-config
            password: ubuntu
            chpasswd: { expire: False}
        name: cloudinitdisk
If you want to watch the progress, you can run the following:
kubectl get datavolume ubuntu-vm -w
If there are issues, you can check the pods running and describe the virt-launcher pod to see if anything shows up in events.
Connect to the VM
Now that the VM is running, we could just run virtctl console to connect to it, but what about if we want to expose it so someone can SSH with an IP? Virtctl can do that, too; we need to expose the VM and select the service type. In this example, we’ll expose it over a LoadBalancer, but you could also expose it over a NodePort if you don’t have access to a LoadBalancer.
virtctl expose vmi ubuntu-vm --port=22 --name=ubuntu-vm-ssh --type=LoadBalancer
kubectl get services
In my example, I’m using MetalLB on-prem, and the IP address I end up with is:
ubuntu-vm-ssh LoadBalancer 10.43.240.1 192.168.86.16 22:32399/TCP 2d20h
Let’s get connected:
ssh ubuntu@192.168.86.16
If you are using a NodePort you're going to connect to one of the worker node IP addresses on the high port number associated with the NodePort, something like:
ssh ubuntu@192.168.86.10 -p 31241
Since the default user on the Ubuntu VM is Ubuntu, we’re using that to connect. You can configure more options to add users, make other updates, or even install additional tools with cloud-init.
One thing you want to make sure is available in the image before it’s deployed is the Qemu Guest Agent. If you are doing everything in the cloud-init section, then you can import the SSH key there, but it looks like if you’re doing it in the AccessCredentials then it assumes you’re using a cloud image with it already installed. This can come up if you use a raw image instead of the qcow2 image from some vendors. Most of this is transferable to a Fedora or CentOS image if you want to use something other than Ubuntu.
KubeVirt Cleanup
If you are just installing KubeVirt to try this out then you can run this helpful cleanup script to get rid of the resources on the base cluster when you are done.
Check your context first, and verify which cluster you are connected to:
kubectx
After you've verified the cluster and are on the base cluster where we installed this initially, you can run the following:
#!/bin/bash
export VERSION=$(curl -s https://storage.googleapis.com/kubevirt-prow/release/kubevirt/kubevirt/stable.txt)
kubectl delete -n kubevirt kubevirt kubevirt --wait=true # --wait=true should anyway be default
kubectl delete apiservices v1.subresources.kubevirt.io # this needs to be deleted to avoid stuck terminating namespaces
kubectl delete mutatingwebhookconfigurations virt-api-mutator # not blocking but would be left over
kubectl delete validatingwebhookconfigurations virt-operator-validator # not blocking but would be left over
kubectl delete validatingwebhookconfigurations virt-api-validator # not blocking but would be left over
kubectl delete -f https://github.com/kubevirt/kubevirt/releases/download/$VERSION/kubevirt-operator.yaml --wait=false
export TAG=$(curl -s -w %{redirect_url} https://github.com/kubevirt/containerized-data-importer/releases/latest)
export VERSION=$(echo ${TAG##*/})
kubectl delete -f https://github.com/kubevirt/containerized-data-importer/releases/download/$VERSION/cdi-operator.yaml
kubectl delete -f https://github.com/kubevirt/containerized-data-importer/releases/download/$VERSION/cdi-cr.yaml
Conclusion
Sometimes I miss using OpenStack, not enough to install it again, but I miss the configuration and using cloud-init. KubeVirt rewards some of that knowledge and it feels great using it when you need a VM instead of a container. If you have to run VMs but want to run everything in Kubernetes, this is a great way to get started. You’ll need to build more around it to support it, like having an image repository of your cloud images (probably a lot more that goes into it, but since this is just a demo, we’re not going to architect a VMware competitor!)


.png)

