

Table of Contents
Kubernetes Ingress is the most widely used Kubernetes resource for exposing an application to the outside world. Understanding the concepts and Layer-7 load balancing may sound difficult, but with this article, it won’t be.
This article uses Google Kubernetes Engine (GKE) as the host Kubernetes cluster, where you will install the Nginx Ingress controller and cert-manager to get TLS certificates for your web apps. With that, you can run an application with proper TLS.
This article touches on how to create a virtual cluster using vCluster to reuse the host cluster ingress controller and cert-manager to create ingress. This approach allows your virtual clusters to reuse the ingress controller running on the host cluster, GKE in our case, and the cert-manager.
If you are hearing about virtual clusters for the first time, then read more here.
Prerequisites
Ensure these are installed:
- Google Cloud SDK (gcloud) – To interact (create/delete) with GKE. Make sure to have a project and a billing account linked and authenticated. Install [Note: You can use the UI if you prefer]
- Kubernetes CLI (kubectl) – To manage Kubernetes clusters. Install
- vCluster CLI – To create virtual clusters within a single Kubernetes cluster. Install
- A Domain Name – This is used to configure A Records, DNS, and TLS.
Basic Kubernetes Knowledge – Familiarity with Deployments, Ingress, and Services.
Setting Up GKE Cluster
Once you have completed the prerequisites, you can proceed to the next step: creating your Kubernetes cluster. This cluster will serve as the environment where you deploy your controllers, deployments, services as well as your virtual clusters.
With gcloud installed, you can create your cluster using the command `gcloud container clusters create`, along with a few parameters to specify the project and location of the deployment:
Command:
gcloud container clusters create test --project=hrittik-project --zone asia-southeast1-cAfter you apply the above command, your gcloud SDK will begin creating the cluster. This process will take a few minutes, and once completed, a kubeconfig entry will be generated that allows you to interact with the cluster using kubectl.
Successful cluster creation will look something similar:
Creating cluster test in asia-southeast1-c... Cluster is being health-checked (Kubernetes Control Plane is healthy)...done.
Created [https://container.googleapis.com/v1/projects/hrittik-project/zones/asia-southeast1-c/clusters/test].
To inspect the contents of your cluster, go to: https://console.cloud.google.com/kubernetes/workload_/gcloud/asia-southeast1-c/test?project=hrittik-project
kubeconfig entry generated for test

NAME  LOCATION           MASTER_VERSION      MASTER_IP       MACHINE_TYPE  NODE_VERSION        NUM_NODES  STATUS
test  asia-southeast1-c  1.30.8-gke.1051000  34.124.254.219  e2-medium     1.30.8-gke.1051000  3          RUNNING
Setting Up the Ingress Controller
Once your GKE cluster is set up and operational, the next step is to install an Ingress Controller to handle the routing of external traffic to your services. In this section, we will use NGINX as our Ingress Controller. NGINX is a popular and reliable choice for Kubernetes ingress management, renowned for its flexibility and performance.
Ingress will act as a reverse proxy to route traffic outside the cluster to specific Kubernetes Services based on the Ingress Rules.
Cluster Admin Permissions
To configure Ingress on GKE, the first step is to provide the user cluster-admin permissions to carry out the operational tasks:
kubectl create clusterrolebinding cluster-admin-binding \
  --clusterrole cluster-admin \
  --user $(gcloud config get-value account)
Success in this step will create a cluster-admin-binding in your cluster like below:
clusterrolebinding.rbac.authorization.k8s.io/cluster-admin-binding createdIngress Controller Deployment
With the appropriate permissions configured, the next step is to deploy the controller which will manage all of the routing logic. The step’s as simple as running the command in your cluster:
kubectl apply -f https://raw.githubusercontent.com/kubernetes/ingress-nginx/controller-v1.12.0/deploy/static/provider/cloud/deploy.yamlSuccess will create resources in an ingress-nginx namespace as shown below:
namespace/ingress-nginx created
serviceaccount/ingress-nginx created
serviceaccount/ingress-nginx-admission created
role.rbac.authorization.k8s.io/ingress-nginx created
role.rbac.authorization.k8s.io/ingress-nginx-admission created
clusterrole.rbac.authorization.k8s.io/ingress-nginx created
clusterrole.rbac.authorization.k8s.io/ingress-nginx-admission created
rolebinding.rbac.authorization.k8s.io/ingress-nginx created
rolebinding.rbac.authorization.k8s.io/ingress-nginx-admission created
clusterrolebinding.rbac.authorization.k8s.io/ingress-nginx created
clusterrolebinding.rbac.authorization.k8s.io/ingress-nginx-admission created
configmap/ingress-nginx-controller created
service/ingress-nginx-controller created
service/ingress-nginx-controller-admission created
deployment.apps/ingress-nginx-controller created
job.batch/ingress-nginx-admission-create created
job.batch/ingress-nginx-admission-patch created
ingressclass.networking.k8s.io/nginx created
validatingwebhookconfiguration.admissionregistration.k8s.io/ingress-nginx-admission created
Testing Ingress Controller
The key point to focus on is that the ingress-controller will be exposed as a LoadBalancer by default, which we will explore later in the configuring A Record Section. For now, to verify the installation, check if your pods are running by using the command below:
kubectl get pods -n ingress-nginx
The Status as Running means everything is configured correctly:
~ ❯ kubectl get pods -n ingress-nginx
NAME                                       READY   STATUS      RESTARTS   AGE
ingress-nginx-admission-create-bh7nl       0/1     Completed   0          100s
ingress-nginx-admission-patch-bvlhf        0/1     Completed   0          100s
ingress-nginx-controller-cbb88bdbc-5dkxt   1/1     Running     0          101s
Installing Cert-Manager on the Host Cluster
Now that your Ingress Controller is set up and running, the next step is to install Cert-Manager to automate the management and issuance of TLS certificates. Cert-Manager is a powerful Kubernetes project that simplifies obtaining and renewing SSL/TLS certificates from various certificate authorities (CAs) like for eg: Let's Encrypt.
This tutorial uses Cert Manager to create and store certificates as Kubernetes Secrets automatically.
Installation of cert-manager
The installation process is straightforward; simply execute the command below on your cluster:
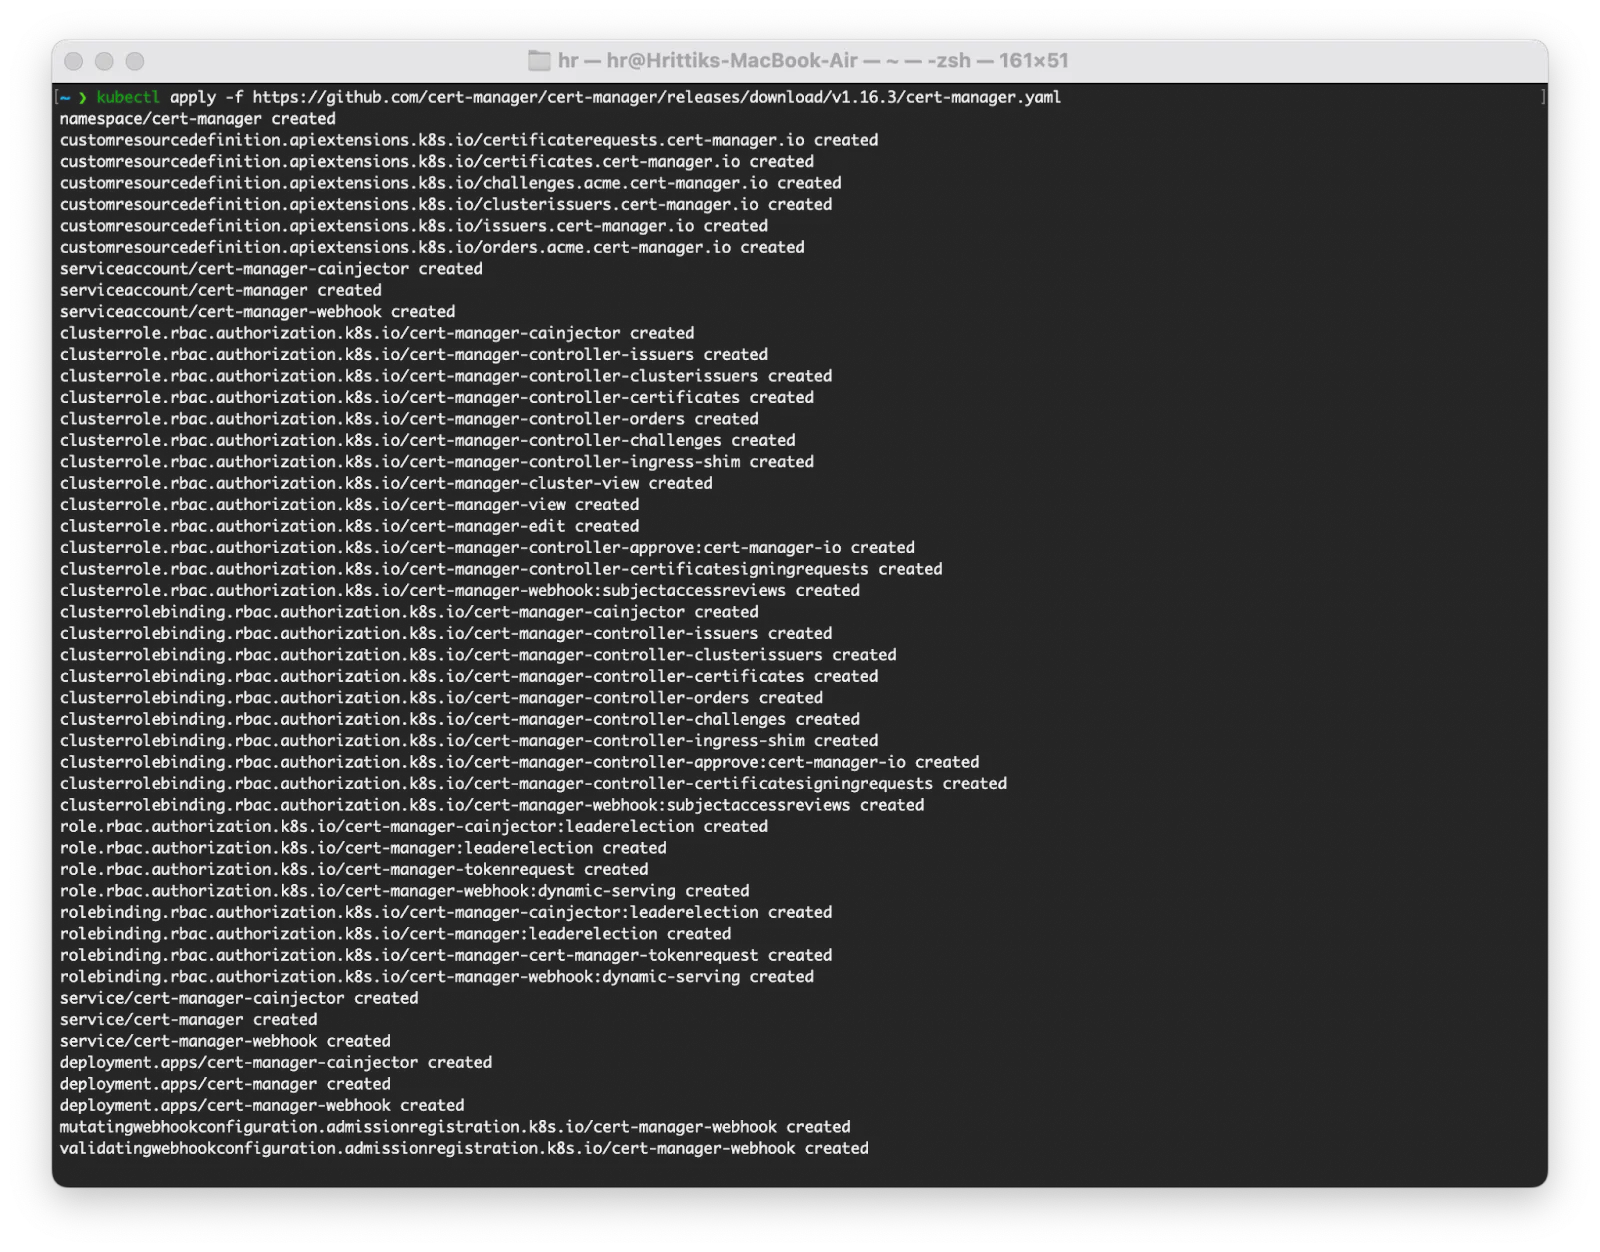
kubectl apply -f https://github.com/cert-manager/cert-manager/releases/download/v1.16.3/cert-manager.yaml
Successful installation will look similar to below:
Verifying cert-manager Installation
Once installed, you can verify that Cert-Manager is running by checking the pods in the cert-manager namespace:
kubectl get pods --namespace cert-managerSuccessful creation will display a manager pod, a cainjector pod, and a webhook pod to verify domain authority within that namespace, as shown below:
~ ❯ kubectl get pods --namespace cert-manager

NAME                                       READY   STATUS    RESTARTS   AGE
cert-manager-6c7fdcbcd5-6lp94              1/1     Running   0          2m11s
cert-manager-cainjector-64d77f8498-f6p7d   1/1     Running   0          2m12s
cert-manager-webhook-68796f6795-59sqq      1/1     Running   0          2m11s
Creating a Certificate Issuer CRD
A Certificate Issuer instructs the manager on how to obtain certificates. There are two primary types of issuers:
1. ClusterIssuer: This issuer is available throughout the entire cluster and is recommended for most cases.
2. Issuer: This issuer is limited to a specific namespace.
In this example, we will use a ClusterIssuer with Let's Encrypt as the verification server. Don’t forget to update your email address in the YAML below before applying:
kubectl apply -f - <<EOF
apiVersion: cert-manager.io/v1
kind: ClusterIssuer
metadata:
 name: letsencrypt-prod
 namespace: cert-manager
spec:
 acme:
   # The ACME server URL
   server: https://acme-v02.api.letsencrypt.org/directory
   # Email address used for ACME registration
   email: test-hrittik@example.com # Replace with your email
   # Name of a secret used to store the ACME account private key
   privateKeySecretRef:
     name: letsencrypt-prod
   # Enable the HTTP-01 challenge provider
   solvers:
   - http01:
       ingress:
         class: nginx
EOF
Success will look similar:
clusterissuer.cert-manager.io/letsencrypt-prod createdVerify the Cluster Issuer
To verify successful installation, use the below command to get the clusterissuer CRD:
kubectl get clusterissuer letsencrypt-prodSuccessful output will be similar to:
NAME AGE
letsencrypt-staging 3m
Configuring A Records for Domain
Now that you have set up your NGINX Ingress Controller and are issuing certificates with Cert-Manager, it’s time to configure the A Records for your domain. In Google Kubernetes Engine (GKE), A Records are used for mapping.
An A Record (Address Record) in DNS points a domain or subdomain to a specific IP address. In this case, you need to direct your domain (for example, hrittikhere.live) to the external IP address of your NGINX Ingress Controller. This will allow external traffic to be properly routed to your cluster.
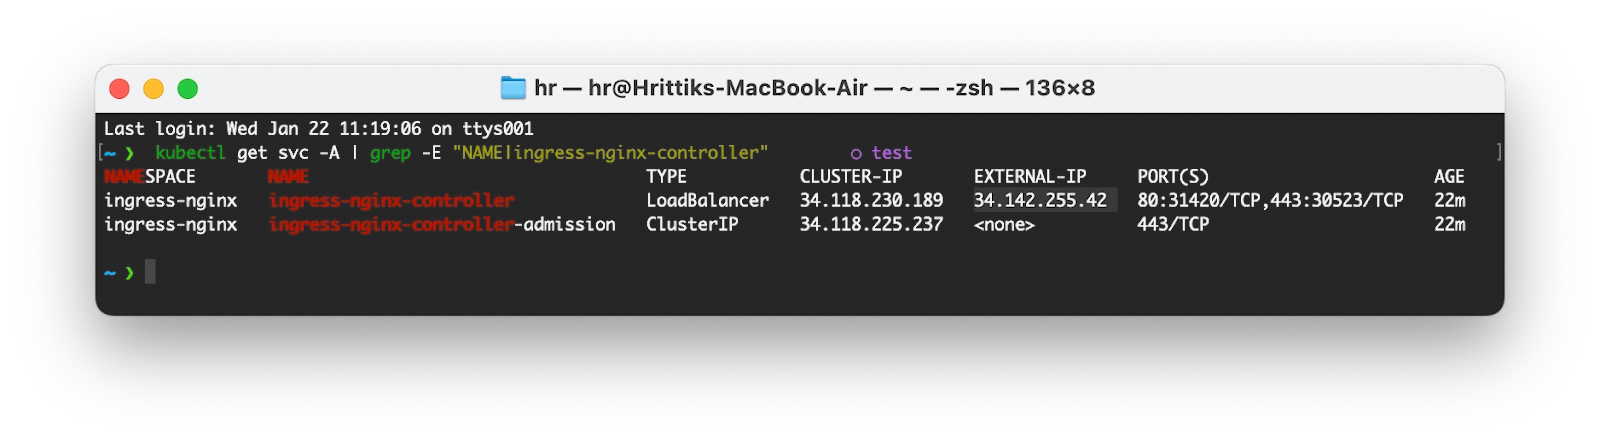
Getting the External-IP
After installing the NGINX Ingress Controller, a LoadBalancer type service will be created that automatically allocates an external IP address. To find the allocated IP, use the following command:
kubectl get svc -A | grep -E "NAME|ingress-nginx-controller"
The output will display a list of services, from which you should select the one that has an external IP. Keep the IP address readily available:
Configuring A Name Record on Domain Provider
The next step is to log in to your domain provider and navigate to the DNS Record section. Depending on the provider, the UI might change but you just need to configure four three things once you click on Create New Record:
Name/Host: * # Wildcard to capture all Hosts
Type: A # A record for GCP
Value: 34.142.255.42 # External IP address of your NGINX Ingress Controller
TTL: 300 # Use the default value.
On the Dashboard, this will look something similar to below:
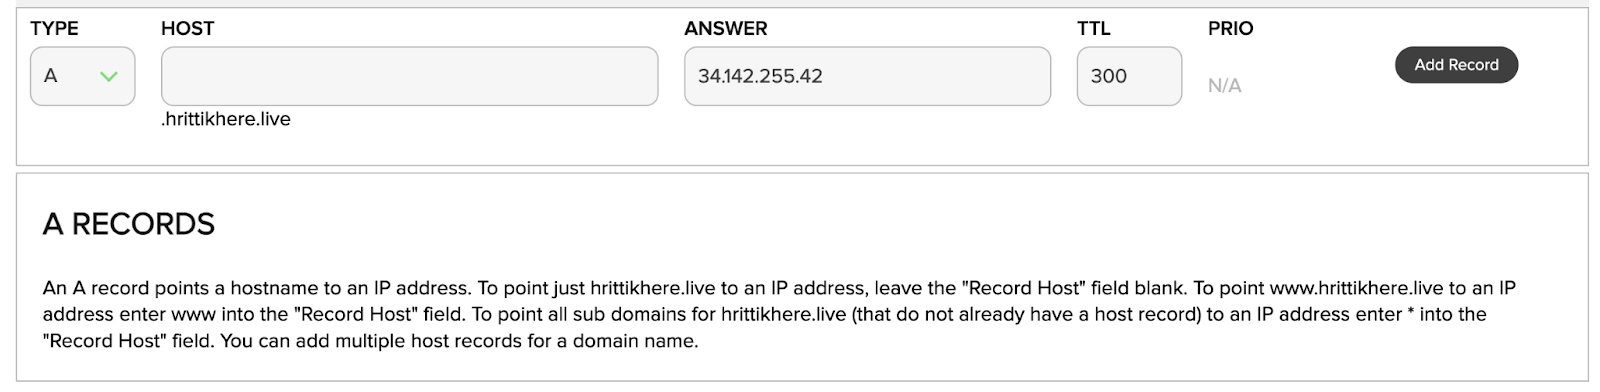
Click on Add Record and you will be all ready for the next step!
Creating an Application on the Host Cluster
Now, you have all of the moving pieces in place: domain to serve your application, ingress controller for Load Balancing and Cert-Manager for TLS. The only missing piece is application so the next step is to deploy one simple game to your cluster.
The following YAML deployed three things together:
Service: Exposes the game application via a Kubernetes Service.
Deployment: Deploys the game application.
Ingress: Defines routing rules for the Ingress Controller to route external traffic to the Service.
kubectl apply -f - <<EOF
apiVersion: v1
kind: Service
metadata:
  name: game-2048
  namespace: default
spec:
  ports:
    - name: http
      port: 80
      targetPort: 80
  selector:
    app: game-2048
---
apiVersion: apps/v1
kind: Deployment
metadata:
  name: game-2048
  namespace: default
spec:
  replicas: 1
  selector:
    matchLabels:
      app: game-2048
  template:
    metadata:
      labels:
        app: game-2048
    spec:
      containers:
        - name: backend
          image: alexwhen/docker-2048
          ports:
            - name: http
              containerPort: 80
---
apiVersion: networking.k8s.io/v1
kind: Ingress
metadata:
  name: game-2048-ingress
  namespace: default
  annotations:
    cert-manager.io/cluster-issuer: "letsencrypt-prod"
    nginx.ingress.kubernetes.io/rewrite-target: /
spec:
  ingressClassName: nginx
  rules:
    - host: game.hrittikhere.live
      http:
        paths:
          - path: /
            pathType: Prefix
            backend:
              service:
                name: game-2048
                port:
                  number: 80
  tls:
  - hosts:
    - game.hrittikhere.live
    secretName: letsencrypt-prod
EOF
Success will create three objects in your cluster:
service/game-2048 created
deployment.apps/game-2048 created
ingress.networking.k8s.io/game-2048-ingress created
Verification of Ingress
To find the ingress Host you can use the following command:
kubectl get ingressSuccess will look something like this:
~/Code/ingress ❯ kubectl get ingress
NAME                CLASS    HOSTS                   ADDRESS         PORTS     AGE

game-2048-ingress   nginx    game.hrittikhere.live   34.142.255.42   80, 443   51s
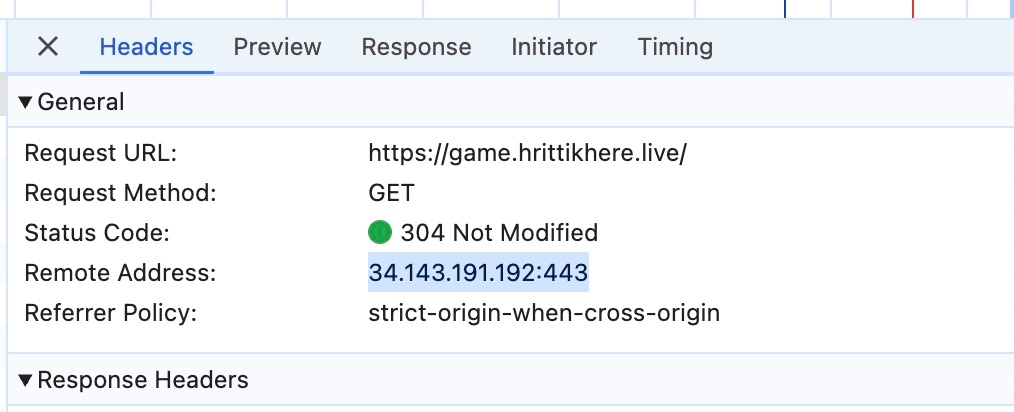
If you go to the following URL, you will find your application running on the host:
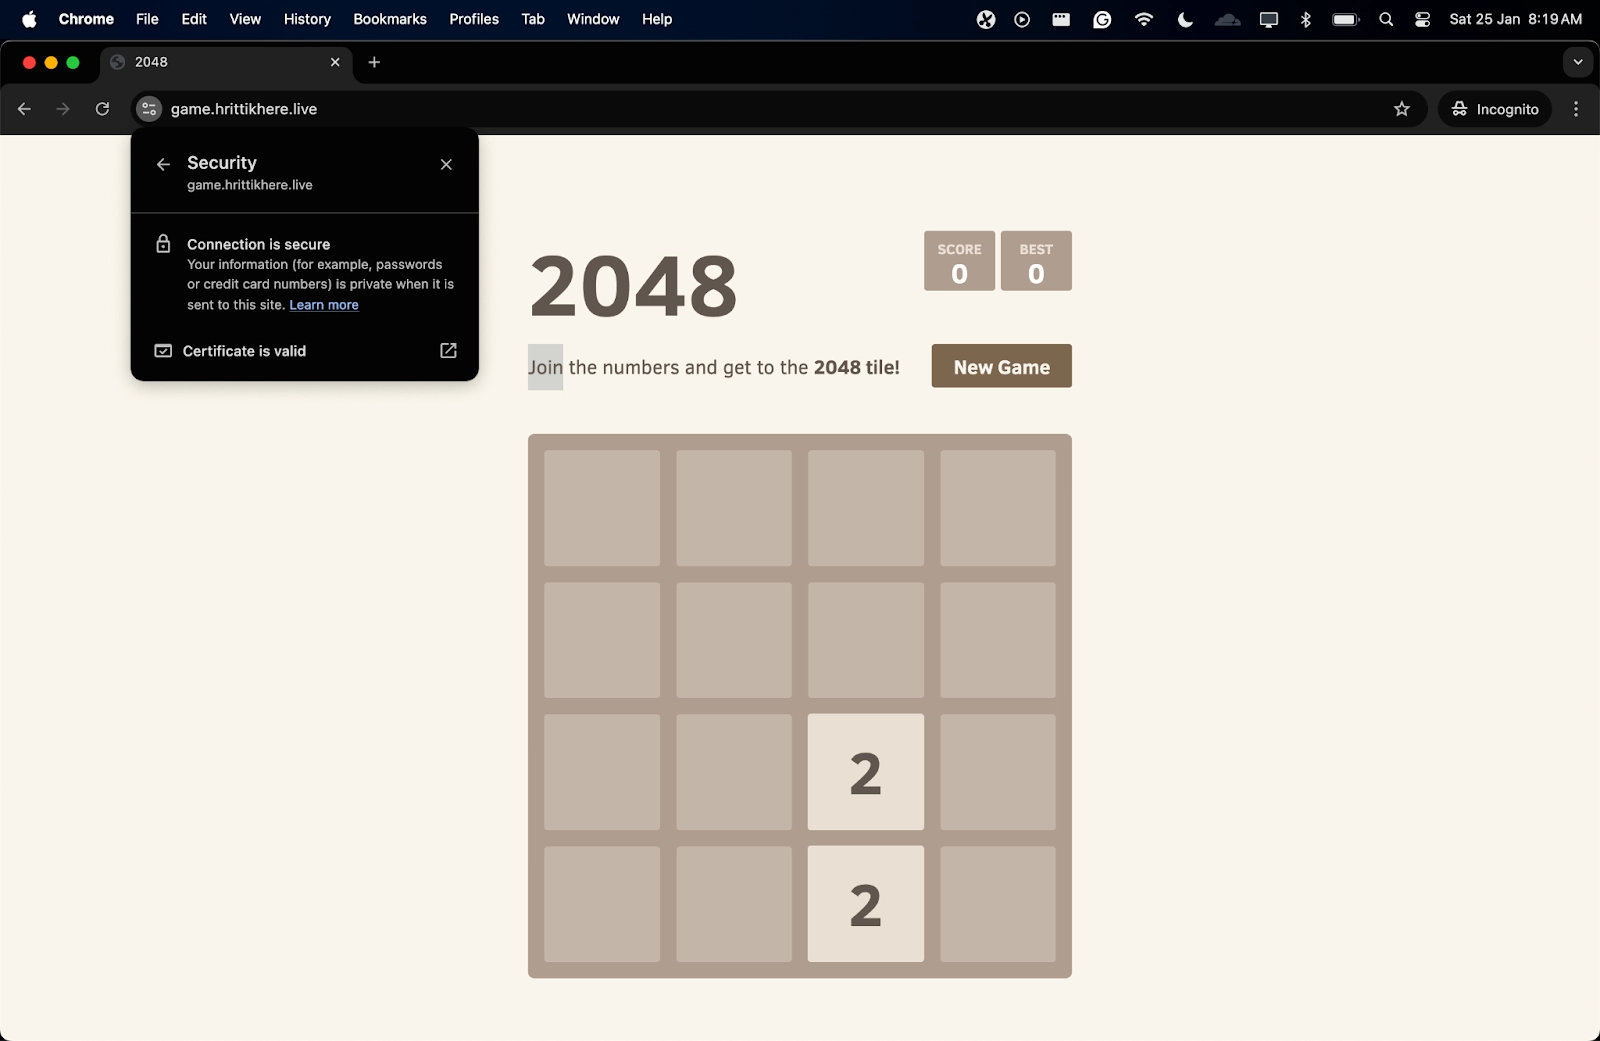
If you check the network tab, the Remote Address corresponds to the LoadBalancer assigned by the Ingress Controller. In simple terms, the Ingress Controller assigns the subdomain and serves the service smoothly.
Syncing Ingress Resources with vCluster between your Virtual Clusters
After completing this tutorial, you will see that it’s a bit complicated to set up the backbone to create ingress resources. However, imagine the IT headache if you’re operating 100s of Clusters and managing all these certificates and secrets while making sure your domains are linked well. Sounds Challenging?
vCluster saves you from these and many similar problems. What vCluster does is create virtual clusters on top of your host clusters in specific namespaces. This will help you create a virtual cluster for each of your teams with full admin privileges in seconds instead of the hours it takes to create a normal cluster and configure all the required resources.
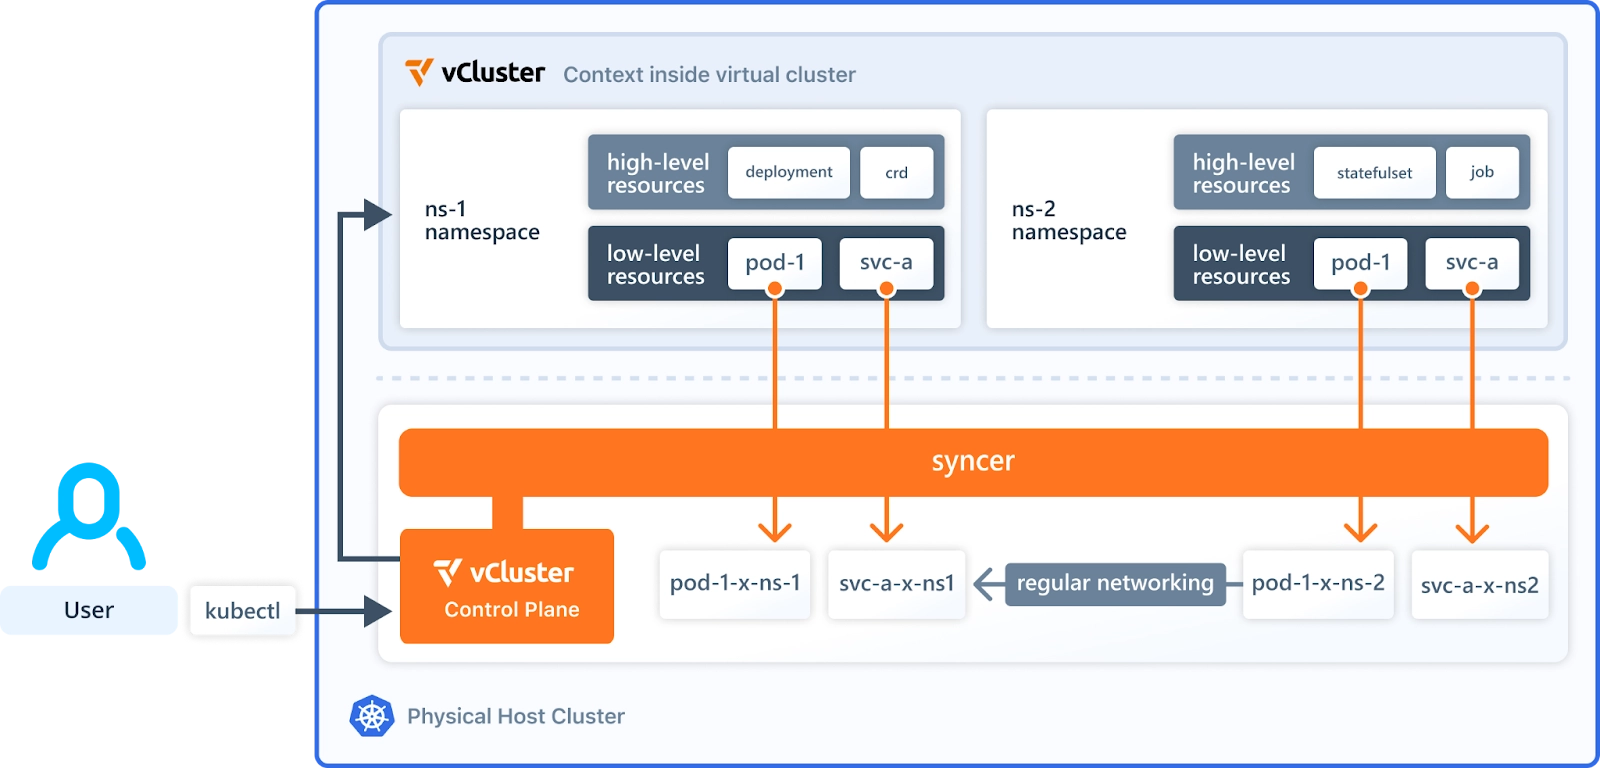
You just define a virtual cluster and what host cluster features you want in your virtual cluster. For example, if we want to ingressClasses from our Host Cluster and sync ingresses back to our host cluster from the virtual cluster to back to your host it’s as simple as defying it in the vcluster.yaml file like below:
sync:
  fromHost:
    ingressClasses:
      enabled: true
  toHost:
    ingresses:
      enabled: true
With this, whatever application you’re running on your virtual cluster can request and run an ingress smoothly. Let’s see a demo but the first step is to create the virtual cluster using the vCluster CLI [Installation Step]:
vcluster create my-vcluster -f vcluster.yaml
Success will look something like this:
11:35:20 done Successfully created virtual cluster my-vcluster in namespace vcluster-my-vclusterWith that, make sure that you’re in the virtual cluster context and you can apply the same application again with a new subdomain path:
kubectl apply -f - <<EOF
apiVersion: v1
kind: Service
metadata:
  name: game-2048
  namespace: default
spec:
  ports:
    - name: http
      port: 80
      targetPort: 80
  selector:
    app: game-2048
---
apiVersion: apps/v1
kind: Deployment
metadata:
  name: game-2048
  namespace: default
spec:
  replicas: 1
  selector:
    matchLabels:
      app: game-2048
  template:
    metadata:
      labels:
        app: game-2048
    spec:
      containers:
        - name: backend
          image: alexwhen/docker-2048
          ports:
            - name: http
              containerPort: 80
---
apiVersion: networking.k8s.io/v1
kind: Ingress
metadata:
  name: game-2048-ingress
  namespace: default
  annotations:
    cert-manager.io/cluster-issuer: "letsencrypt-prod"
    nginx.ingress.kubernetes.io/rewrite-target: /
spec:
  ingressClassName: nginx
  rules:
    - host: game1.hrittikhere.live
      http:
        paths:
          - path: /
            pathType: Prefix
            backend:
              service:
                name: game-2048
                port:
                  number: 80
  tls:
  - hosts:
    - game1.hrittikhere.live
    secretName: letsencrypt-prod
EOF
The success will look like this again when you have three things configured:
service/game-2048 created
deployment.apps/game-2048 created
ingress.networking.k8s.io/game-2048-ingress created
On the CLI, if you do kubectl get ingress you will see a new ingress resource created with the new specified host:

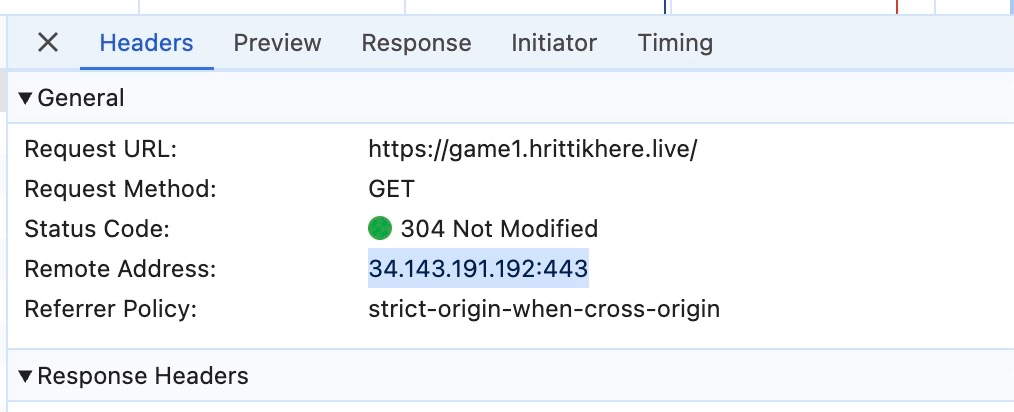
Now, if you check game1.hrittikhere.live, you will find a similar game running alongside. With just one vCluster configuration, you can create multiple new clusters, and all of them will have ingress functioning seamlessly.
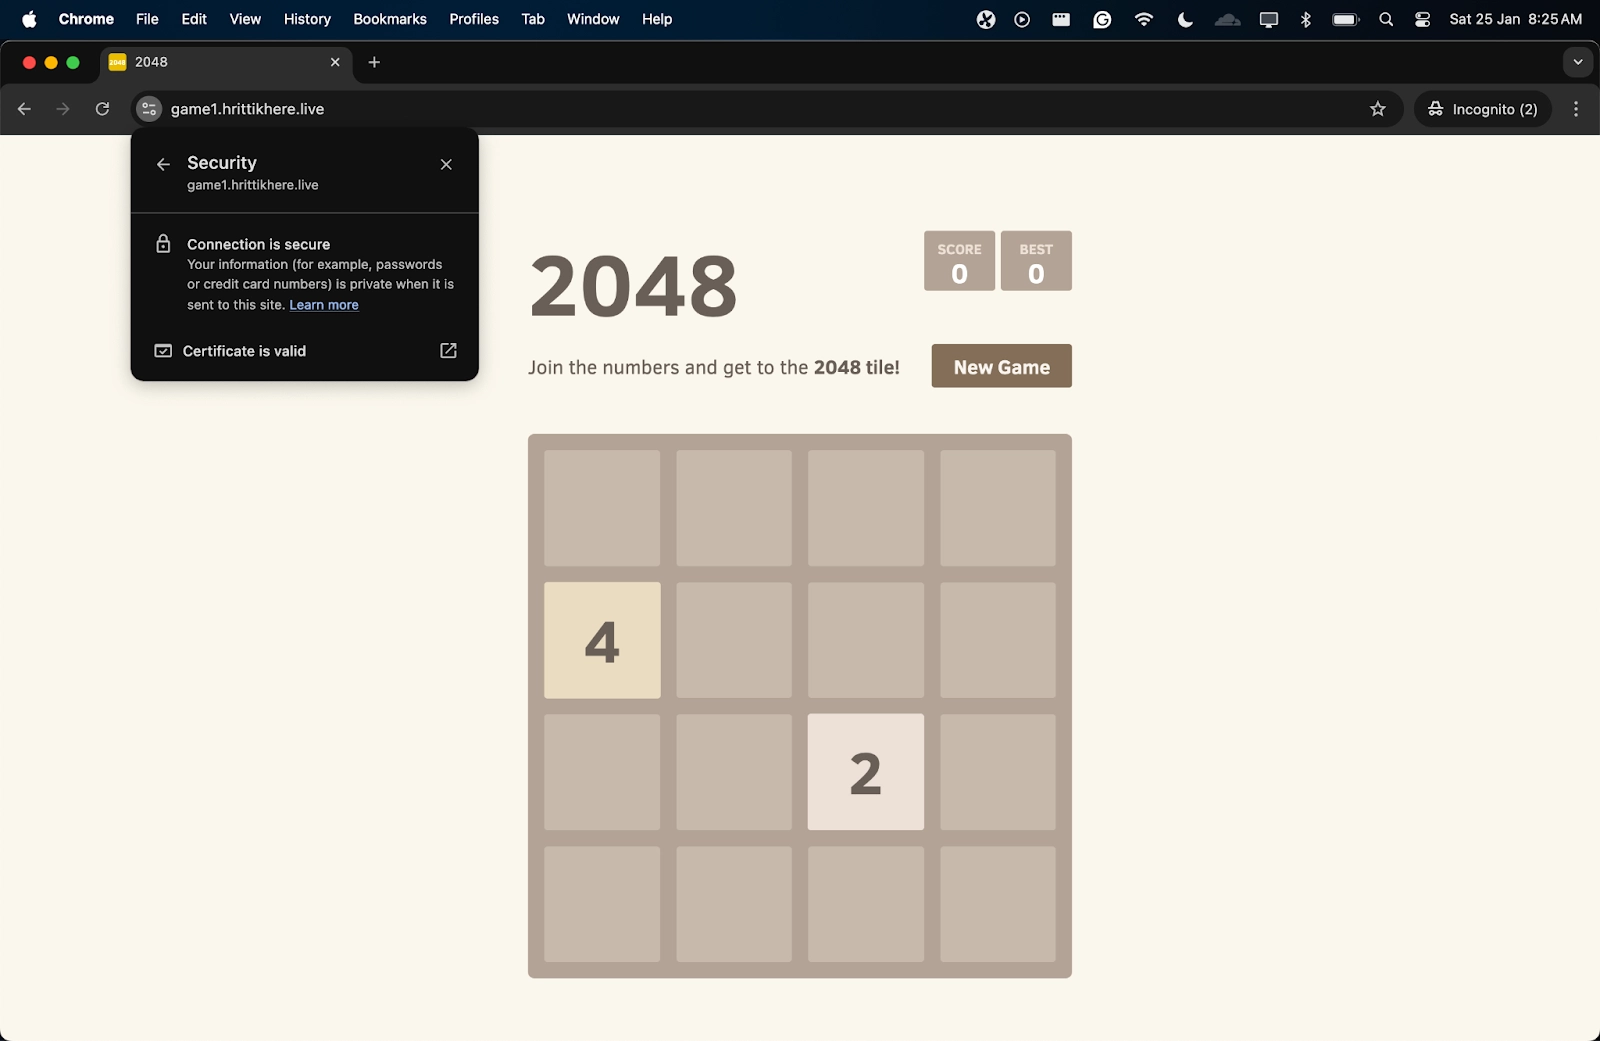
The IP is also again the same as your host cluster, ensuring all the networking is working smoothly:
Clean Up
With everything working the cleaning steps are very simple. You can remove the DNS Record from your service provider through the UI by clicking on delete record and for the GKE Cluster use the following command with your own parameters:
gcloud container clusters delete test --project=hrittik-project --zone asia-southeast1-cSuccessful deletion will look something like this:
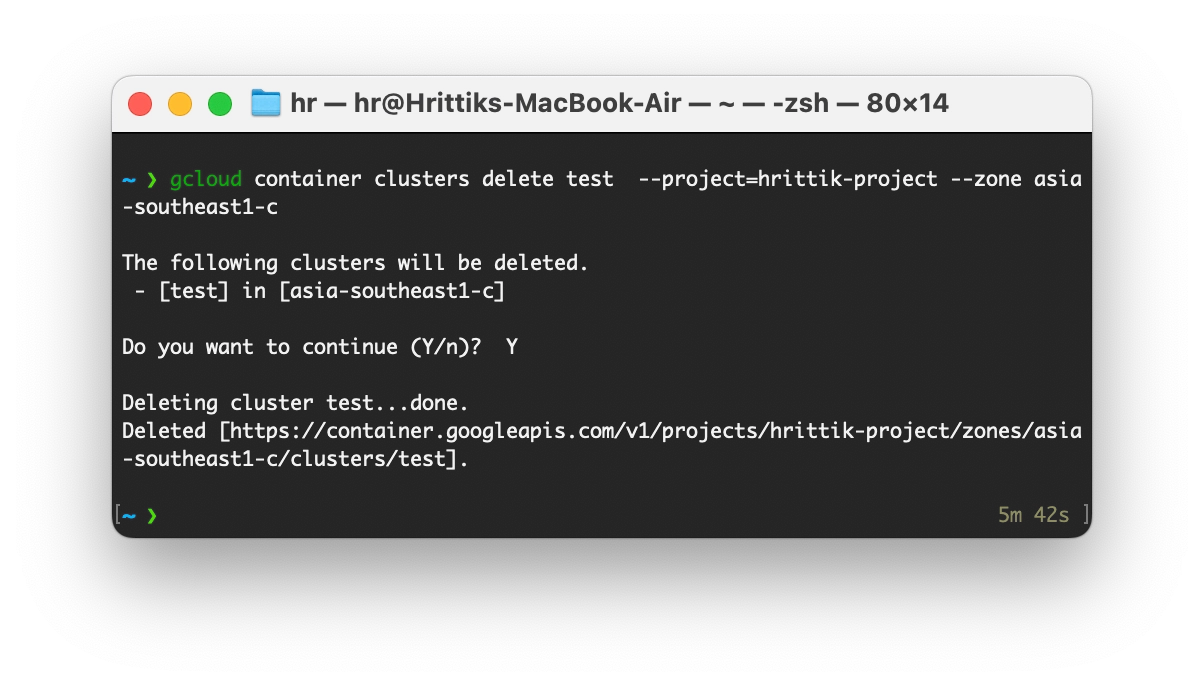
With that, you have cleared all the resources, including your virtual clusters.
Final Thoughts
With this guide, we’ve explored how to configure an Ingress Controller using NGINX in a GKE (Google Kubernetes Engine) environment and to set up TLS certificates with Cert-Manager. We’ve also seen how to configure DNS A Records to point to a Kubernetes cluster’s external IP and route traffic efficiently to our services.
In addition to all of this, you’ve learned how powerful vCluster can be, especially when dealing with multi-tenant Kubernetes environments. If you're managing several teams or clusters, using vCluster allows you to create isolated, lightweight Kubernetes clusters (virtual clusters) within a larger host cluster, providing the flexibility of separate clusters without needing to pay for the control plane cost of each cluster.
More Questions? Join our Slack to talk to the team behind vCluster!
.png)

