Add User Authentication
Loft provides regular email+password based authentication but also integrates with a variety of external auth providers for single sign-on via the OpenID Connect protocol. You can even configure Loft to use multiple authentication providers if that is what you need.
- Password
- GitHub
- GitLab
- LDAP
- Okta
- SAML 2.0
- Other Options
Authentication with username and password is enabled by default but you can also disable password-based authentication if you want to force users to use single sign-on (SSO).
When using password-based authentication, you have to manually add users either via the UI or via kubectl.
- UI
- kubectl
Create User
Send Invite Link To User (optional)
If you did not specify a password for the user in step 1, Loft will automatically generate an invite link with a one-time access token for this user. If you send these invite links to your users, they will be logged in and asked to change their password.
Create file user.yaml:
apiVersion: management.loft.sh/v1
kind: User
metadata:
  name: john
spec:
  displayName: John Doe
  email: john@acme.tld
  username: john
  subject: john           # Kubernetes subject (use username if in doubt)
  passwordRef:            # Specify this to set the password for the user
    key: password
    secretName: john-password
    secretNamespace: loft
Create file password.yaml:
apiVersion: v1
kind: Secret
metadata:
  name: john-password
  namespace: loft
type: Opaque
data:
  password: INSERT_BASE64_ENCODED_SHA256_PASSWORD_HASH
Create the user using kubectl:
# IMPORTANT: Run these commands inside the cluster where Loft is running
kubectl apply -f password.yaml
kubectl apply -f user.yaml
Create A GitHub App
In GitHub, navigate to Settings > Developer Settings > OAuth Apps and create a new OAuth App with the following settings:
- Application name: Loft Login via GitHub
- Homepage URL: https://loft.yourcompany.tld =
https:// + $LOFT_HOSTNAME - Auth callback URL: https://loft.yourcompany.tld/auth/github/callback =
https:// + $LOFT_HOSTNAME + /auth/github/callback
Remember the $GITHUB_CLIENT_ID and $GITHUB_CLIENT_SECRET that GitHub generates for your OAuth application because you will need it in the next step.
Create Loft Config For GitHub
To tell Loft to use github for SSO, navigate to Admin > Config in Loft and adjust your config as shown below:
auth:
  # Tell loft to use github authentication
  github:
    #
    #
    # REQUIRED CONFIGURATION
    #
    #
    # ClientID of the github application. Can be string literal or pulled from the environment.
    clientId: $CLIENTID
    # ClientSecret of the github application. Can be string literal or pulled from the environment.
    clientSecret: $CLIENTSECRET
    # Callback URL in the form of https://your-loft-domain/auth/github/callback
    redirectURI: https://loft.my.domain/auth/github/callback
    #
    #
    # OPTIONAL CONFIGURATION
    #
    #
    # (Optional) Loft queries the following organizations for group information.
    # Group claims are formatted as "(org):(team)".
    # For example if a user is part of the "engineering" team of the "coreos"
    # org, the group claim would include "coreos:engineering".
    #
    # If orgs are specified in the config then user MUST be a member of at least one
    # of the specified orgs to authenticate with loft.
    orgs:
      # Organization name in github (not slug, full name)
    - name: My Organization
      # (Optional) Names of teams in a github organization. A user will be able to
      # authenticate if they are members of at least one of these teams.
      teams:
      - myteam
    # (Optional) Required ONLY for GitHub Enterprise.
    # This is the Hostname of the GitHub Enterprise account listed on the
    # management console.
    hostName: my-github.org
    # (Optional) Required ONLY for GitHub Enterprise.
    # Used to support self-signed or untrusted CA root certificates.
    rootCA: /certs/github.ca
    # (Optional) Cluster Account Templates that will be automatically added for new users
    # logging in through this authentication
    clusterAccountTemplates:
      # The name of the cluster account template
    - name: my-cluster-account-template
      sync: true
    # (Optional) A mapping between groups and cluster account templates.
    # If the user has a certain group, the cluster account template
    # will be added during creation
    groupClusterAccountTemplates:
      # Name of the group from the token
      - group: my-group
        # Names of the cluster account templates to apply
        clusterAccountTemplates:
        - name: my-cluster-account-template
          sync: true
Authenticate via GitHub
After saving the new Loft configuration, Loft will restart and you should be able to log in via GitHub. Beware that only members of your organization on GitHub can sign in and that everyone must grant access to view their organization during the login process.
Users must grant access to the organization you configured dex for in step 2 above, otherwise they will not be able to log in.
Disable Username + Password Authentication (optional)
To disable password-based authentication, navigate to Admin > Config add these two lines to your config:
auth:
  oidc: ...             # This is your SSO configuration (make sure this is working!)
  password:
    disabled: true      # Disable password-based authentication
Create A GitLab App
In GitLab, navigate to User Settings > Applications and create a new application with the following settings:
- Application name: Loft Login via GitLab
- Redirect URI: https://loft.yourcompany.tld/auth/gitlab/callback =
https:// + $LOFT_HOSTNAME + /auth/gitlab/callback - Scopes:
read_user+openid
Remember the $GITLAB_CLIENT_ID and $GITLAB_CLIENT_SECRET that GitLab generates for your OAuth application because you will need it in the next step.
Create Loft Config For GitLab
To tell Loft to use gitlab for SSO, navigate to Admin > Config in Loft and adjust your config as shown below:
auth:
  # Tell loft to use gitlab authentication
  gitlab:
    #
    #
    # REQUIRED CONFIGURATION
    #
    #
    # ClientID for the gitlab authentication. Can be string literal or pulled from the environment.
    clientId: $CLIENTID
    # ClientSecret for the gitlab authentication. Can be string literal or pulled from the environment.
    clientSecret: $CLIENTSECRET
    # Callback URL in the form of https://your-loft-domain/auth/gitlab/callback
    redirectURI: https://loft.my.domain/auth/gitlab/callback
    #
    #
    # OPTIONAL CONFIGURATION
    #
    #
    # (Optional) BaseURL of the gitlab instance,
    # default = https://gitlab.com
    baseURL: https://my-gitlab-instance.com
    # (Optional) Optional groups whitelist, communicated through the "groups" scope.
    # If groups is omitted, all of the user's GitLab groups are returned.
    # If groups is provided, this acts as a whitelist - only the user's GitLab
    # groups that are in the configured groups below will go into the groups claim.
    # Conversely, if the user is not in any of the configured groups, the user will
    # not be authenticated.
    groups:
    - my-group
    # (Optional) Cluster Account Templates that will be automatically added for new users
    # logging in through this authentication
    clusterAccountTemplates:
      # The name of the cluster account template
    - name: my-cluster-account-template
      sync: true
    # (Optional) A mapping between groups and cluster account templates.
    # If the user has a certain group, the cluster account template
    # will be added during creation
    groupClusterAccountTemplates:
      # Name of the group from the token
      - group: my-group
        # Names of the cluster account templates to apply
        clusterAccountTemplates:
        - name: my-cluster-account-template
          sync: true
Authenticate via GitLab
After saving the new Loft configuration, Loft will restart itself and you should be able to log in via GitLab.
STEP 4Disable Username + Password Authentication (optional)
To disable password-based authentication, navigate to Admin > Config add these two lines to your config:
auth:
  oidc: ...             # This is your SSO configuration (make sure this is working!)
  password:
    disabled: true      # Disable password-based authentication
Choose DEX_HOSTNAME And Configure DNS
Loft uses the CNCF project dex for single sign-on.
The easiest case is this one:
$LOFT_HOSTNAME = loft.mycompany.tld(where Loft is running)$DEX_HOSTNAME = dex.mycompany.tld(where dex should be running)
Create Dex Config For LDAP
Create the file dex-config.yaml with the following dex configuration:
ingress:
  enabled: true
  hosts:
  - dex.yourcompany.tld                                   # Use $DEX_HOSTNAME
config:
  issuer: https://dex.yourcompany.tld                     # "https://" + $DEX_HOSTNAME
  connectors:
  - type: ldap
    id: ldap
    name: LDAP
    config:
      host: myldap.company.tld:636                        # Your LDAP server hostname:port
      # insecureNoSSL: true                               # Not recommended but required if not using TLS (port 389)
      # insecureSkipVerify: true                          # Not recommended but required for self-signed certificates
      # rootCAData: ( base64 encoded PEM file )
      # startTLS: true                                    # Use ldap:// instead of ldaps:// protocol

      # The DN and password for an application service account. The connector uses
      # these credentials to search for users and groups. Not required if the LDAP
      # server provides access for anonymous auth.
      # Please note that if the bind password contains a `$`, it has to be saved in an
      # environment variable which should be given as the value to `bindPW`.
      bindDN: uid=serviceaccount,cn=users,dc=example,dc=com
      bindPW: password

      # User search maps a username and password entered by a user to a LDAP entry.
      userSearch:
        # BaseDN to start the search from. It will translate to the query
        # "(&(objectClass=person)(uid=<username>))".
        baseDN: cn=users,dc=example,dc=com
        # Optional filter to apply when searching the directory.
        filter: "(objectClass=person)"
        # username attribute used for comparing user entries. This will be translated
        # and combined with the other filter as "(<attr>=<username>)".
        username: uid
        # The following three fields are direct mappings of attributes on the user entry.
        # String representation of the user.
        idAttr: uid
        # Required. Attribute to map to Email.
        emailAttr: mail
        # Maps to display name of users. No default value.
        nameAttr: name

      # Group search queries for groups given a user entry.
      groupSearch:
        # BaseDN to start the search from. It will translate to the query
        # "(&(objectClass=group)(member=<user uid>))".
        baseDN: cn=groups,dc=freeipa,dc=example,dc=com
        # Optional filter to apply when searching the directory.
        filter: "(objectClass=group)"
        # Represents group name.
        nameAttr: name
        # Following list contains field pairs that are used to match a user to a group. It adds an additional
        # requirement to the filter that an attribute in the group must match the user's
        # attribute value.
        userMatchers:
        - userAttr: uid
          groupAttr: member
  staticClients:
  - name: Loft
    id: loft                                              # Define a $DEX_CLIENT_ID
    secret: XXXXXXXXXXXXXX                                # Define a $DEX_CLIENT_SECRET (can be any secret key)
    redirectURIs:
    - 'https://loft.mycompany.tld/auth/oidc/callback'     # Loft URL + /auth/oidc/callback
  oauth2:
    skipApprovalScreen: true
  web:
    http: 0.0.0.0:5556
  storage:
    type: kubernetes
    config:
      inCluster: true
For details about configuring dex for LDAP, take a look at the dex documentation for LDAP.
STEP 3Deploy Dex via Helm
After creating the file dex-config.yaml, you can now install dex via helm:
helm install dex dex --repo https://wiremind.github.com/wiremind-helm-charts \
  --create-namespace --namespace dex \
  -f dex-config.yaml \
  --wait
Configure Loft To Use Dex For Authentication
To tell Loft to use dex for SSO, navigate to Admin > Config in Loft and adjust your config as shown below:
auth:
  oidc:
    issuerUrl: https://dex.mycompany.tld  # Use $DEX_HOSTNAME (see above)
    clientId: ""                          # Use $DEX_CLIENT_ID (see above)
    clientSecret: ""                      # Use $DEX_CLIENT_SECRET (see above)
    type: "github"                        # Optional: SSO Login Button Icon ("", github, gitlab, microsoft, google)
    usernameClaim: "email"                # Optional: Which part of the dex token to use as Loft username (default: email)
    usernamePrefix: ""                    # Optional: Add prefix to usernameClaim for Loft username
    groupsClaim: "groups"                 # Optional: Add Kubernetes groups for this user
    groupsPrefix: "loft-"                 # Optional: Prefix for Kubernetes groups
    caFile: ""                            # Optional: Path to a CA cert of dex within the Loft container (default: '')
Authenticate via Dex + LDAP
After saving the new Loft configuration, Loft will restart itself and you should be able to log in via LDAP and dex.
STEP 6Disable Username + Password Authentication (optional)
To disable password-based authentication, navigate to Admin > Config add these two lines to your config:
auth:
  oidc: ...             # This is your SSO configuration (make sure this is working!)
  password:
    disabled: true      # Disable password-based authentication
Create A New App In Okta
The first step is to create a new Okta App for Loft.
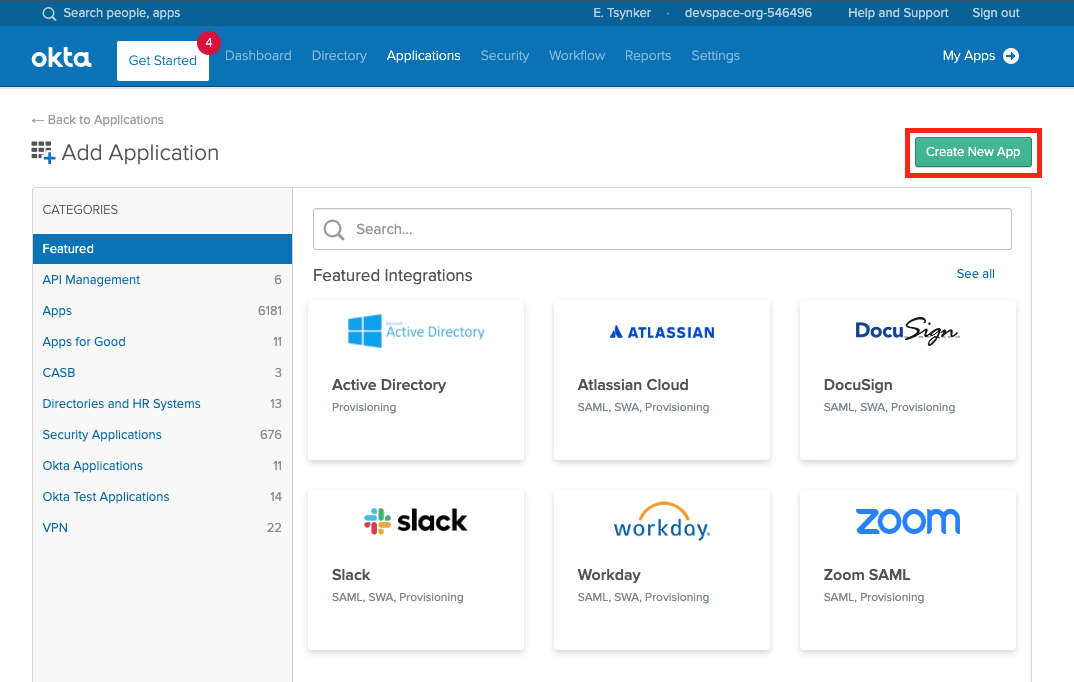
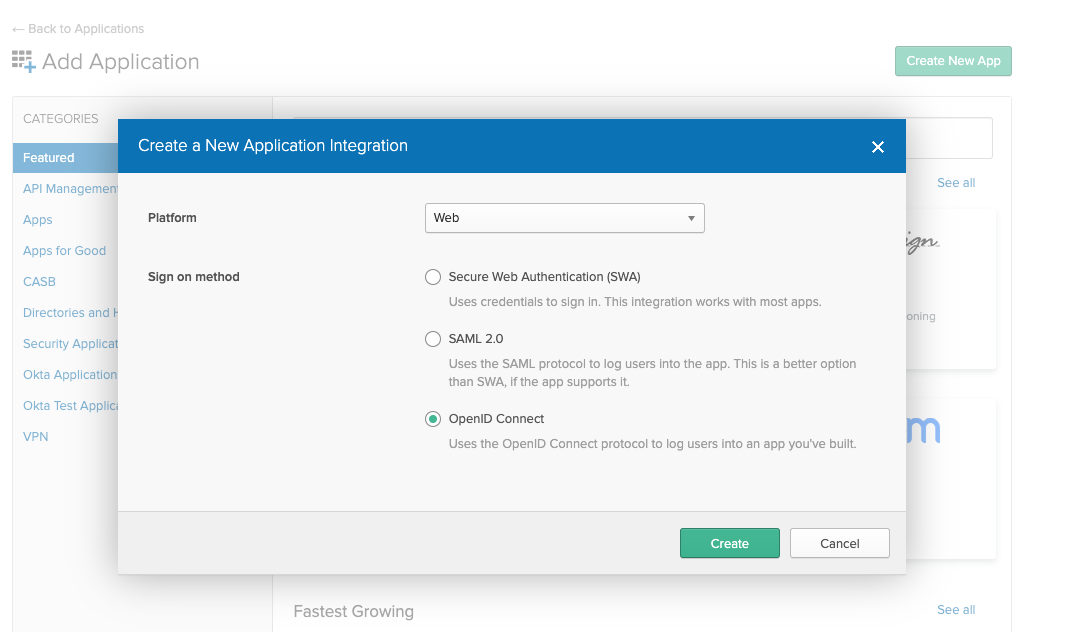
Next select "Web" App and make sure OpenID Connect is the single sign on method.
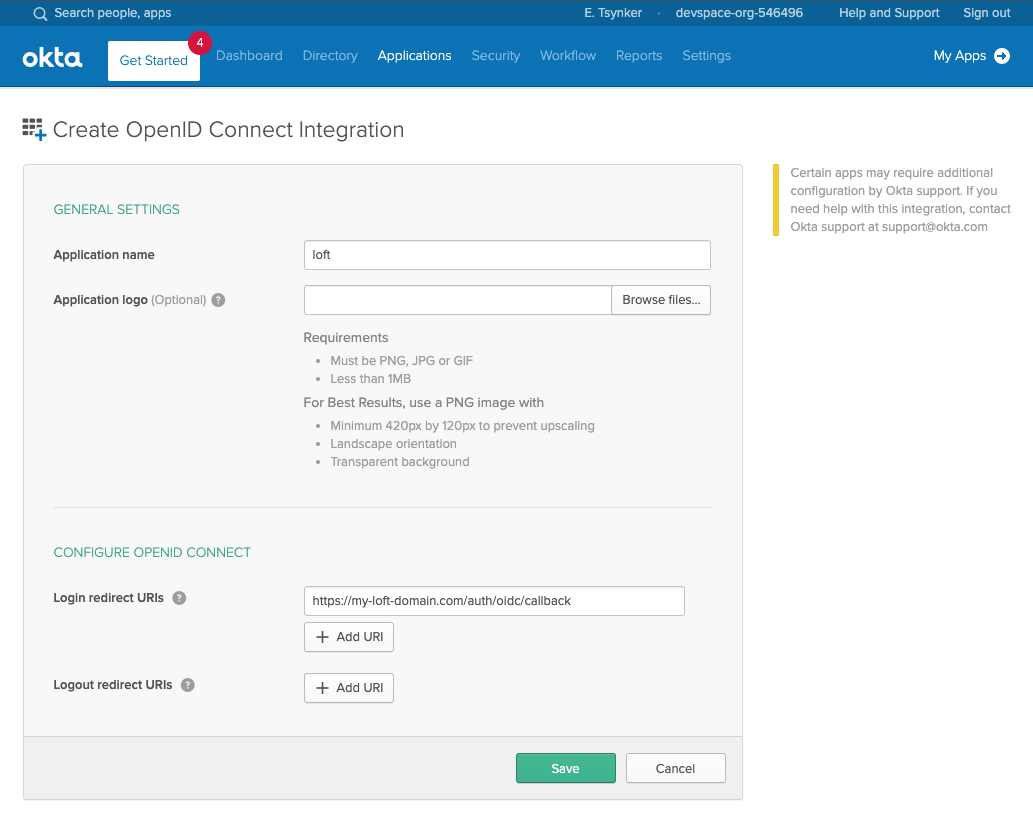
In the next screen make sure the login redirect URIs contain your Loft instance domain:
# Exchange the ${my-loft-domain.com} with your Loft domain
https://${my-loft-domain.com}/auth/oidc/callback
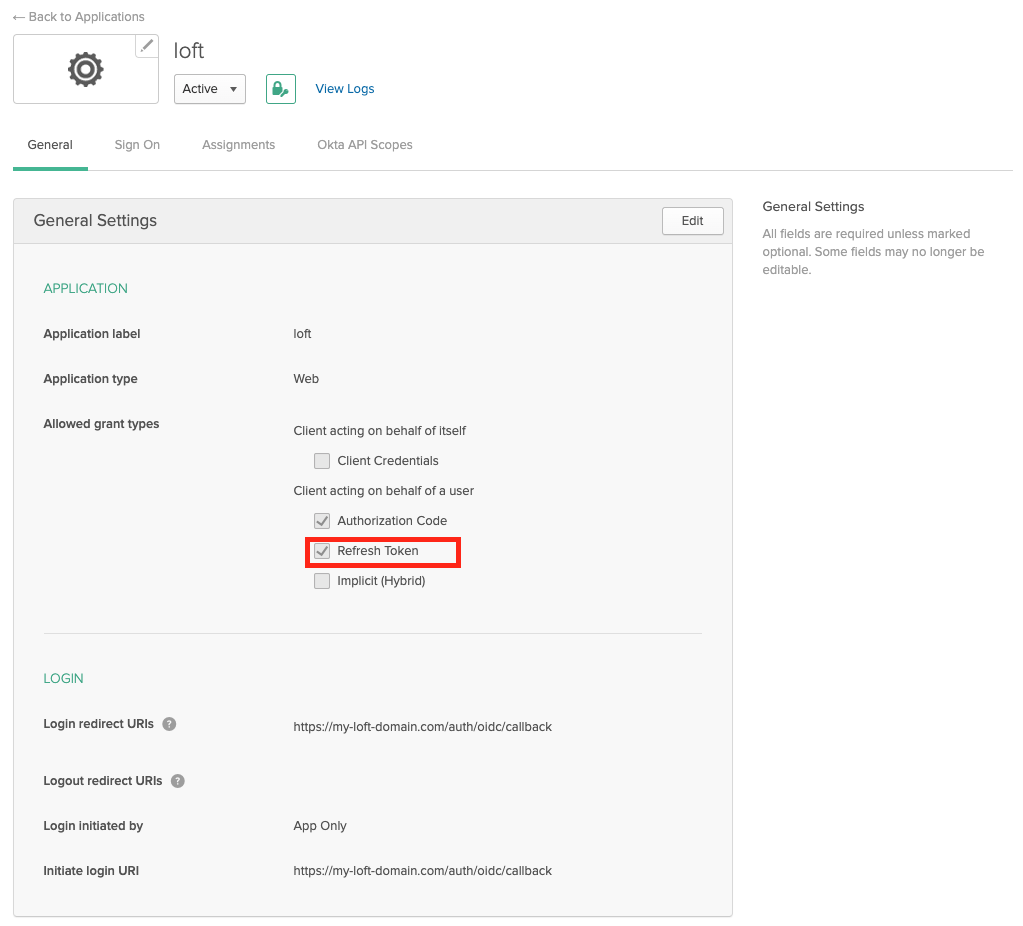
Enable Refresh Tokens
After creating an Okta app for Loft, ensure that "Refresh Token" is checked under "Allowed grant types" - otherwise your users will have to re-login everytime after a session expires.
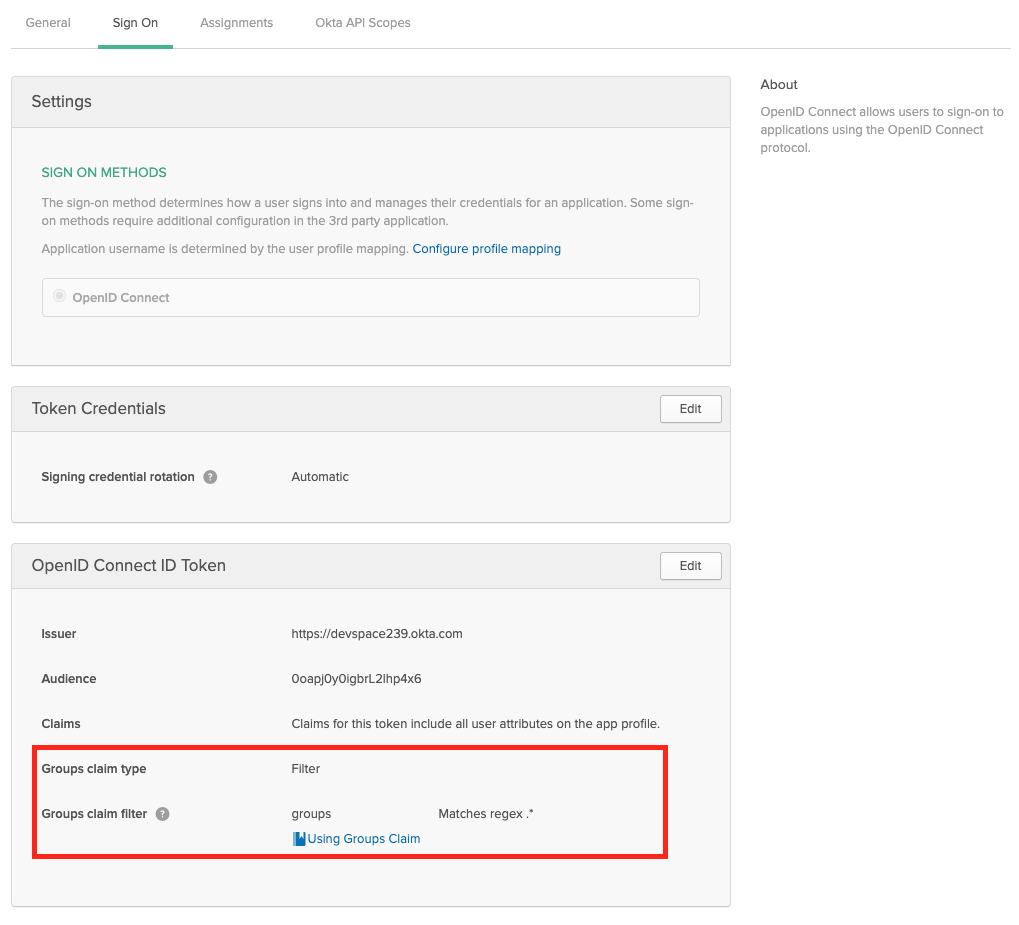
Enable Group Claims
If you want to propagate the users groups to Loft, then make sure the Group Filters in Okta are set accordingly. If you want to propagate all groups, add a RegEx filter with '.*'
Configure Loft To Use Okta
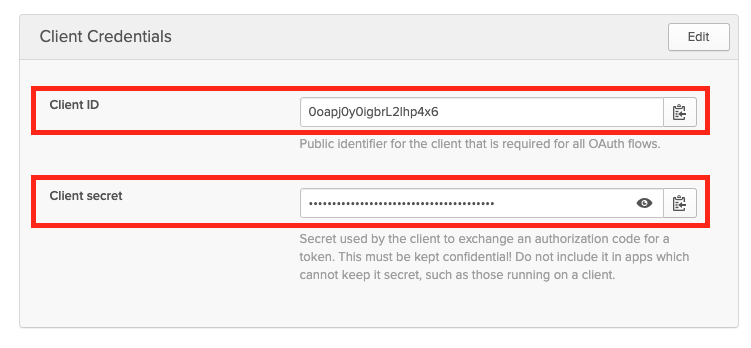
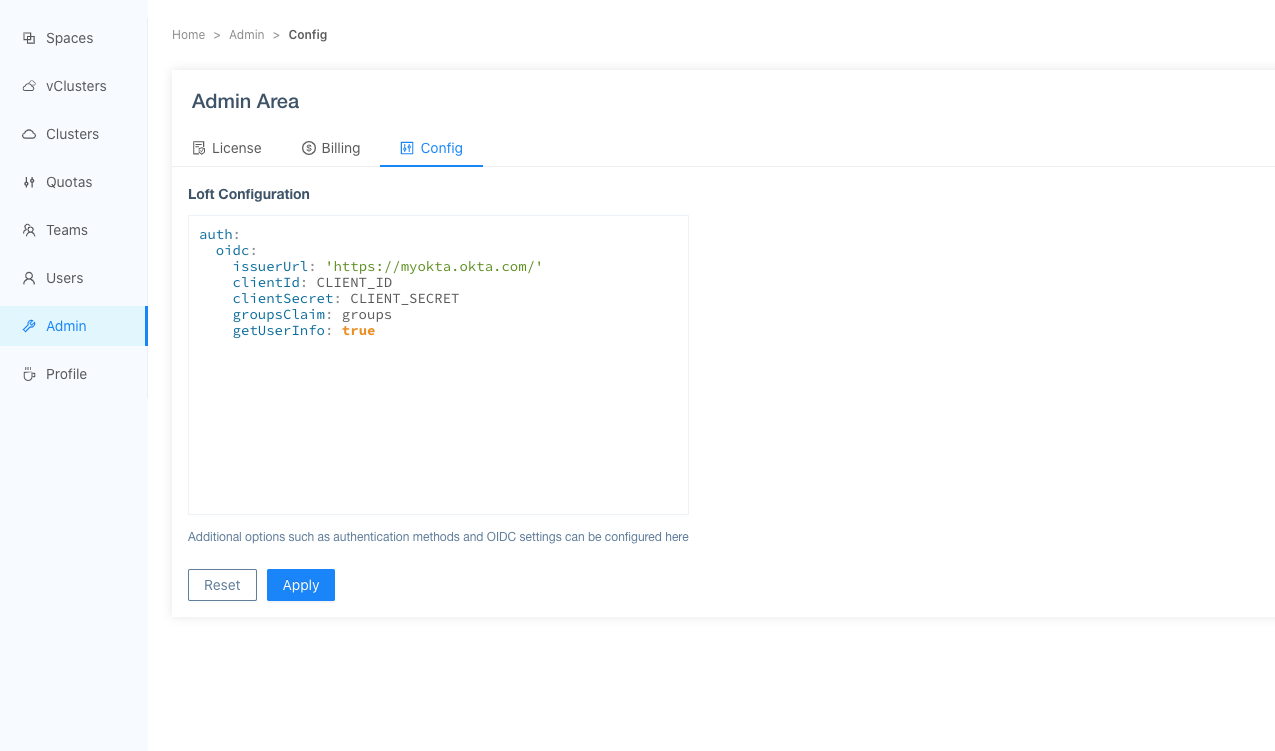
After configuring Okta for Loft, navigate to Admin > Config in Loft and enter the following configuration:
auth:
  oidc:
    issuerUrl: 'https://${MY-OKTA-SUBDOMAIN}.okta.com'
    clientId: CLIENT_ID
    clientSecret: CLIENT_SECRET
    groupsClaim: groups
    # This is needed because okta uses thin id tokens
    # that do not contain the groups directly
    getUserInfo: true
Add Users via Okta Assigments
Please make also sure that you have assigned the correct Users and Groups that you would like to access Loft in Okta.
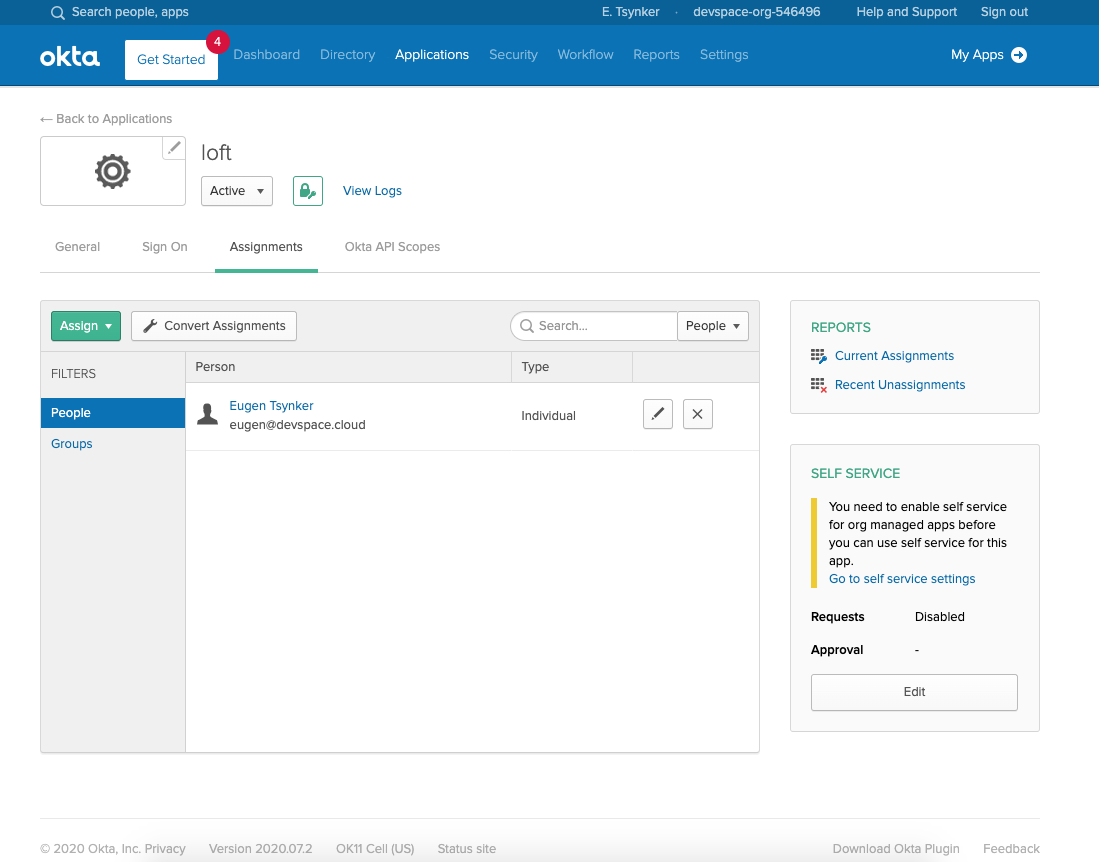
After users or their groups are assigned to Loft, they will be able to log in via Okta:

Disable Username + Password Authentication (optional)
To disable password-based authentication, navigate to Admin > Config add these two lines to your config:
auth:
  oidc: ...             # This is your SSO configuration (make sure this is working!)
  password:
    disabled: true      # Disable password-based authentication
The SAML 2.0 connector in dex does not support refresh tokens "since the SAML 2.0 protocol doesn't provide a way to requery a provider without interaction" (see dex documentation for SAML 2.0).
Choose DEX_HOSTNAME And Configure DNS
Loft uses the CNCF project dex for single sign-on.
The easiest case is this one:
$LOFT_HOSTNAME = loft.mycompany.tld(where Loft is running)$DEX_HOSTNAME = dex.mycompany.tld(where dex should be running)
Create Dex Config For SAML 2.0
Create the file dex-config.yaml with the following dex configuration:
ingress:
  enabled: true
  hosts:
  - dex.yourcompany.tld                                     # Use $DEX_HOSTNAME
config:
  issuer: https://dex.yourcompany.tld                       # "https://" + $DEX_HOSTNAME
  connectors:
  - type: saml
    id: saml
    name: SAML
    config:
      ssoURL: https://saml.example.com/sso                  # Your SSO POST URL
      # caData: ( base64 encoded PEM file )                 # CA to use when validating the signature of the SAML response.
      # insecureSkipSignatureValidation: true               # Not recommended (testing only)
      redirectURI: https://dex.yourcompany.tld/callback     # Use https:// + $DEX_HOSTNAME + /callback
      # entityIssuer: https://dex.yourcompany.tld/callback  # Optional: Use https:// + $DEX_HOSTNAME + /callback

      # Name of attributes in the returned assertions to map to ID token claims.
      usernameAttr: name
      emailAttr: email
      groupsAttr: groups # optional

      # List of groups to filter access based on membership
      # allowedGroups
      #   - Admins

      # Optional: Manually specify dex's Issuer value.
      #
      # When provided dex will include this as the Issuer value during AuthnRequest.
      # It will also override the redirectURI as the required audience when evaluating
      # AudienceRestriction elements in the response.

      # Optional: Issuer value expected in the SAML response.
      # ssoIssuer: https://saml.example.com/sso

      # Optional: Delimiter for splitting groups returned as a single string.
      #
      # By default, multiple groups are assumed to be represented as multiple
      # attributes with the same name.
      #
      # If "groupsDelim" is provided groups are assumed to be represented as a
      # single attribute and the delimiter is used to split the attribute's value
      # into multiple groups.
      groupsDelim: ", "

      # Optional: Requested format of the NameID.
      #
      # The NameID value is is mapped to the user ID of the user. This can be an
      # abbreviated form of the full URI with just the last component. For example,
      # if this value is set to "emailAddress" the format will resolve to:
      #
      #     urn:oasis:names:tc:SAML:1.1:nameid-format:emailAddress
      #
      # If no value is specified, this value defaults to:
      #
      #     urn:oasis:names:tc:SAML:2.0:nameid-format:persistent
      #
      nameIDPolicyFormat: persistent
  staticClients:
  - name: Loft
    id: loft                                              # Define a $DEX_CLIENT_ID
    secret: XXXXXXXXXXXXXX                                # Define a $DEX_CLIENT_SECRET (can be any secret key)
    redirectURIs:
    - 'https://loft.mycompany.tld/auth/oidc/callback'     # Loft URL + /auth/oidc/callback
  oauth2:
    skipApprovalScreen: true
  web:
    http: 0.0.0.0:5556
  storage:
    type: kubernetes
    config:
      inCluster: true
For details about configuring dex for SAML 2.0, take a look at the dex documentation for SAML 2.0.
STEP 3Deploy Dex via Helm
After creating the file dex-config.yaml, you can now install dex via helm:
helm install dex dex --repo https://wiremind.github.com/wiremind-helm-charts \
  --create-namespace --namespace dex \
  -f dex-config.yaml \
  --wait
Configure Loft To Use Dex For Authentication
To tell Loft to use dex for SSO, navigate to Admin > Config in Loft and adjust your config as shown below:
auth:
  oidc:
    issuerUrl: https://dex.mycompany.tld  # Use $DEX_HOSTNAME (see above)
    clientId: ""                          # Use $DEX_CLIENT_ID (see above)
    clientSecret: ""                      # Use $DEX_CLIENT_SECRET (see above)
    type: "github"                        # Optional: SSO Login Button Icon ("", github, gitlab, microsoft, google)
    usernameClaim: "email"                # Optional: Which part of the dex token to use as Loft username (default: email)
    usernamePrefix: ""                    # Optional: Add prefix to usernameClaim for Loft username
    groupsClaim: "groups"                 # Optional: Add Kubernetes groups for this user
    groupsPrefix: "loft-"                 # Optional: Prefix for Kubernetes groups
    caFile: ""                            # Optional: Path to a CA cert of dex within the Loft container (default: '')
Authenticate via Dex + SAML 2.0
After saving the new Loft configuration, Loft will restart itself and you should be able to log in via SAML 2.0 and dex.
STEP 6Disable Username + Password Authentication (optional)
To disable password-based authentication, navigate to Admin > Config add these two lines to your config:
auth:
  oidc: ...             # This is your SSO configuration (make sure this is working!)
  password:
    disabled: true      # Disable password-based authentication
Loft supports a variety of other auth providers. You can follow this generic guide to configure SSO for any of the auth providers, including:
- Microsoft
- OpenID Connect
- OpenShift
- AuthProxy
- Bitbucket Cloud
- Atlassian Crowd
- Gitea
Choose DEX_HOSTNAME And Configure DNS
Loft uses the CNCF project dex for single sign-on.
The easiest case is this one:
$LOFT_HOSTNAME = loft.mycompany.tld(where Loft is running)$DEX_HOSTNAME = dex.mycompany.tld(where dex should be running)
Create Dex Config For $OTHER_PROVIDER
Create the file dex-config.yaml with the following dex configuration:
ingress:
  enabled: true
  hosts:
  - dex.yourcompany.tld                                   # Use $DEX_HOSTNAME
config:
  issuer: https://dex.yourcompany.tld                     # "https://" + $DEX_HOSTNAME
  connectors:
  - {YOUR_CONNECTOR_CONFIG}                               # SEE LINKS BELOW! (do not remove the '-' and indent correctly)
  staticClients:
  - name: Loft
    id: loft                                              # Define a $DEX_CLIENT_ID
    secret: XXXXXXXXXXXXXX                                # Define a $DEX_CLIENT_SECRET (can be any secret key)
    redirectURIs:
    - 'https://loft.mycompany.tld/auth/oidc/callback'     # Loft URL + /auth/oidc/callback
  oauth2:
    skipApprovalScreen: true
  web:
    http: 0.0.0.0:5556
  storage:
    type: kubernetes
    config:
      inCluster: true
To fill the connectors section shown above, go to the appropriate docs page for the auth provider you want to use in combination with dex:
Deploy Dex via Helm
After creating the file dex-config.yaml, you can now install dex via helm:
helm install dex dex --repo https://wiremind.github.com/wiremind-helm-charts \
  --create-namespace --namespace dex \
  -f dex-config.yaml \
  --wait
Configure Loft To Use Dex For Authentication
To tell Loft to use dex for SSO, navigate to Admin > Config in Loft and adjust your config as shown below:
auth:
  oidc:
    issuerUrl: https://dex.mycompany.tld  # Use $DEX_HOSTNAME (see above)
    clientId: ""                          # Use $DEX_CLIENT_ID (see above)
    clientSecret: ""                      # Use $DEX_CLIENT_SECRET (see above)
    type: "github"                        # Optional: SSO Login Button Icon ("", github, gitlab, microsoft, google)
    usernameClaim: "email"                # Optional: Which part of the dex token to use as Loft username (default: email)
    usernamePrefix: ""                    # Optional: Add prefix to usernameClaim for Loft username
    groupsClaim: "groups"                 # Optional: Add Kubernetes groups for this user
    groupsPrefix: "loft-"                 # Optional: Prefix for Kubernetes groups
    caFile: ""                            # Optional: Path to a CA cert of dex within the Loft container (default: '')
Authenticate via Dex + $OTHER_PROVIDER
After saving the new Loft configuration, Loft will restart itself and you should be able to log in via $OTHER_PROVIDER and dex.
STEP 6Disable Username + Password Authentication (optional)
To disable password-based authentication, navigate to Admin > Config add these two lines to your config:
auth:
  oidc: ...             # This is your SSO configuration (make sure this is working!)
  password:
    disabled: true      # Disable password-based authentication
After adding new users, don't forget to send them the Loft Onboarding Guide For New Users.
