Loft Onboarding Guide
Welcome to Loft! One of your colleagues has probably sent you this link, so you can quickly get started using Loft. With Loft, you can create Kubernetes namespaces to test any applications you are working on, you can run ML/AI experiments or you can integrate Kubernetes very easily in CI/CD pipelines.
Install Loft CLI
Installing the Loft CLI lets you create spaces and retrieve kube-contexts for your spaces right from the terminal of your IDE which is often much faster than using the UI.
- Mac Terminal
- Linux Bash
- Windows Powershell
npm install -g loft.sh
yarn global add loft.sh
curl -L -o loft "https://github.com/loft-sh/loft/releases/latest/download/loft-darwin-amd64" && sudo install -c -m 0755 loft /usr/local/bin
curl -L -o loft "https://github.com/loft-sh/loft/releases/latest/download/loft-linux-amd64" && sudo install -c -m 0755 loft /usr/local/bin
md -Force "$Env:APPDATA\loft"; [System.Net.ServicePointManager]::SecurityProtocol = [System.Net.SecurityProtocolType]'Tls,Tls11,Tls12';
Invoke-WebRequest -URI "https://github.com/loft-sh/loft/releases/latest/download/loft-windows-amd64.exe" -o $Env:APPDATA\loft\loft.exe;
$env:Path += ";" + $Env:APPDATA + "\loft";
[Environment]::SetEnvironmentVariable("Path", $env:Path, [System.EnvironmentVariableTarget]::User);
Line 4 of this install script adds the install directory %APPDATA%\loft to the $PATH environment variable. This is only effective for the current powershell session, i.e. when opening a new terminal window, loft may not be found.
Make sure to add the folder %APPDATA%\loft to the PATH environment variable after installing Loft CLI via Powershell. Afterwards, a reboot might be necessary.
To confirm that Loft CLI is successfully installed, reboot and test via:
loft --version
Alternatively, you can simply download the binary for your platform from the GitHub Releases page and add this binary to your PATH.
Login
After installing the CLI, you must log in to Loft:
loft login https://my-loft.url.tld # Replace URL with your own
This command will generate an access key and securely store it on your computer, so the Loft CLI can authenticate when running any further commands.
Spaces / Namespaces
Spaces are Kubernetes namespaces that allow you to work with Kubernetes, e.g. deploy applications to see if they are working correctly, use in CI/CD pipelines, run ML/AI experiments, debug microservices etc.
You can create as many spaces as your admin has configured for you. You may create spaces in different Kubernetes clusters if your admin has granted you access to more than just one cluster.
Create Spaces
- UI
- CLI
- kubectl
Creating spaces in the UI is easy but to actually use the space, a cluster user needs a valid kube-context which most non-admin users do not have by default. To get a kube-context limited to a certain space, run the following command using the CLI:
loft use space [SPACE_NAME]
To provide access to a space/namespace, Loft creates a new RBAC role binding for the Loft user. This is done in a way that this user can only access objects within this and other namespaces the user has access to. Then, Loft generates a kube-context using an access key and adds it to the ~/.kube/config file on the user's computer.
To create a space using the Loft CLI, run:
loft create space [SPACE_NAME]
Creating a space with the CLI will automatically set up a kube-context for this space on your computer, so you can immediately run kubectl, helm or any other commands that may use this namespace.
To provide access to a space/namespace, Loft creates a new RBAC role binding for the Loft user. This is done in a way that this user can only access objects within this and other namespaces the user has access to. Then, Loft generates a kube-context using an access key and adds it to the ~/.kube/config file on the user's computer.
Create file space.yaml:
apiVersion: tenancy.kiosk.sh/v1alpha1
kind: Space
metadata:
  name: some-space-name
Create the space using kubectl:
kubectl apply -f space.yaml
Using kubectl to create spaces requires you to have a valid kube-context. This is mainly useful for GitOps based provisioning of spaces.
List Spaces
To get a list of your spaces, take a look in the UI or simply run:
loft list spaces
Switch Between Spaces
The CLI will automatically handle the kube-context (i.e. which Kubernetes cluster and namespace you are working with and how to authenticate).
To switch from one cluster to another cluster, run:
loft use space [SPACE_NAME]
Share Spaces
Sometimes it may be useful to give others access to one of your spaces. Since Loft's authorization system is based on Kubernetes RBAC, you can simply create a RoleBinding to give other users access. Allowing them to view and edit a namespace and/or resources within this namespace will enable them to see a corresponding space in the UI and also to run loft use space to configure a kube-context for accessing the space using kubectl, helm and other tools.
- UI
- kubectl
This will not clean up the local kube-context you may have for this space. Only when removing a space using the Loft CLI, the local kube-context will also be removed from your ~/.kube/config file.
Create file rolebinding.yaml:
apiVersion: rbac.authorization.k8s.io/v1
kind: RoleBinding
metadata:
  name: space-access-john
  namespace: ml-experiment-1
roleRef:
  apiGroup: rbac.authorization.k8s.io
  kind: ClusterRole
  name: admin
subjects:
- apiGroup: rbac.authorization.k8s.io
  kind: User
  name: john            # References the `spec.subject` defined in the User object
Create the RoleBinding using kubectl:
kubectl create -f rolebinding.yaml
This will not clean up the local kube-context you may have for this space. Only when removing a space using the Loft CLI, the local kube-context will also be removed from your ~/.kube/config file.
Delete Spaces
- UI
- CLI
- kubectl
This will not clean up the local kube-context you may have for this space. Only when removing a space using the Loft CLI, the local kube-context will also be removed from your ~/.kube/config file.
To delete a space using the Loft CLI, run:
loft delete space [SPACE_NAME]
Running this command will also remove the corresponding kube-context from the local ~/.kube/config file.
Delete a space using kubectl:
kubectl delete space [SPACE_NAME]
This will not clean up the local kube-context you may have for this space. Only when removing a space using the Loft CLI, the local kube-context will also be removed from your ~/.kube/config file.
Sleep Mode + Wakeup
Your admin may configure the sleep mode for you spaces. Sleeping spaces will not lose any configuration or persistent data but the running containers will be gracefully terminated.
As soon as you run any command within a sleeping space with any Kubernetes tool (e.g. kubectl get po, helm install, devspace dev) your space will automatically wake up and start your containers again.
You can also manually wake up spaces as shown below:
- UI
- CLI
- kubectl
Run this command to manually wake up a space:
loft wakeup [SPACE_NAME] # optional flag: --cluster=[CLUSTER_NAME]
Run any kubectl command to wake up a sleeping space:
loft use space [SPACE_NAME]
kubectl get po
Virtual Clusters
Create Virtual Cluster
- UI
- CLI
- kubectl
Run this command to create a virtual cluster:
loft create vcluster [VCLUSTER_NAME] # optional flag: --cluster=[CLUSTER_NAME]
Creating a virtual cluster using the CLI will automatically configure a kube-context on your local machine for this vcluster.
With the kube-context of the vcluster, you can run any kubectl command within the virtual cluster:
kubectl get namespaces
Create the file vcluster.yaml:
apiVersion: storage.loft.sh/v1
kind: VirtualCluster
metadata:
  name: [VCLUSTER_NAME]                     # REPLACE THIS
  namespace: [VCLUSTER_NAMESPACE]           # REPLACE THIS
spec:
  helmRelease:
    values: >-
      virtualCluster:
        image: rancher/k3s:v1.21.2-k3s1
        extraArgs:
          - --service-cidr=[VCLUSTER_SERVICE_CIDR] # REPLACE THIS
Create the virtual cluster using kubectl:
kubectl apply -f vcluster.yaml
Use Virtual Cluster
You can either use the Loft CLI to create a kube config automatically or you can create your own kube config with an Access Key.
- CLI
- Kube Config
Run this command to add a kube-context for the virtual cluster to your local kube-config file or to switch to an existing kube-context of a virtual cluster:
loft use vcluster                  # shows a list of all available vclusters
loft use vcluster [VCLUSTER_NAME]  # optional flags: --cluster=[CLUSTER_NAME] --space [VCLUSTER_NAMESPACE]
Then, run any kubectl command within the virtual cluster:
kubectl get namespaces
If you need to construct a kube config directly, you'll need to create an Access Key first. Then create a kubeconfig.yaml in the following format:
apiVersion: v1
kind: Config
clusters:
- cluster:
    # Optional if untrusted certificate
    # insecure-skip-tls-verify: true
    server: https://my-loft-domain.com/kubernetes/virtualcluster/$CLUSTER/$NAMESPACE/$VCLUSTER
  name: loft
contexts:
- context:
    cluster: loft
    user: loft
  name: loft
current-context: loft
users:
- name: loft
  user:
    token: $ACCESS_KEY
Replace the $ACCESS_KEY with your generated access key, $CLUSTER with the name of the connected kubernetes cluster the vcluster is running in, $NAMESPACE with the namespace the vcluster is running in and $VCLUSTER with the name of the vcluster.
Then run any command in the vcluster with:
kubectl --kubeconfig kubeconfig.yaml get ns
In order for a user to access a virtual cluster the user needs the RBAC permission get on the resource virtualclusters in the api group storage.loft.sh with api version v1 either in the namespace where the virtual cluster was created in or cluster wide
Delete Virtual Cluster
- CLI
- kubectl
Run this command to delete a virtual cluster:
loft delete vcluster [VCLUSTER_NAME] # optional flags: --cluster=[CLUSTER_NAME] --space [VCLUSTER_NAMESPACE]
Run this command to delete a virtual cluster using kubectl:
kubectl delete virtualcluster [VCLUSTER_NAME] --namespace [VCLUSTER_NAMESPACE]
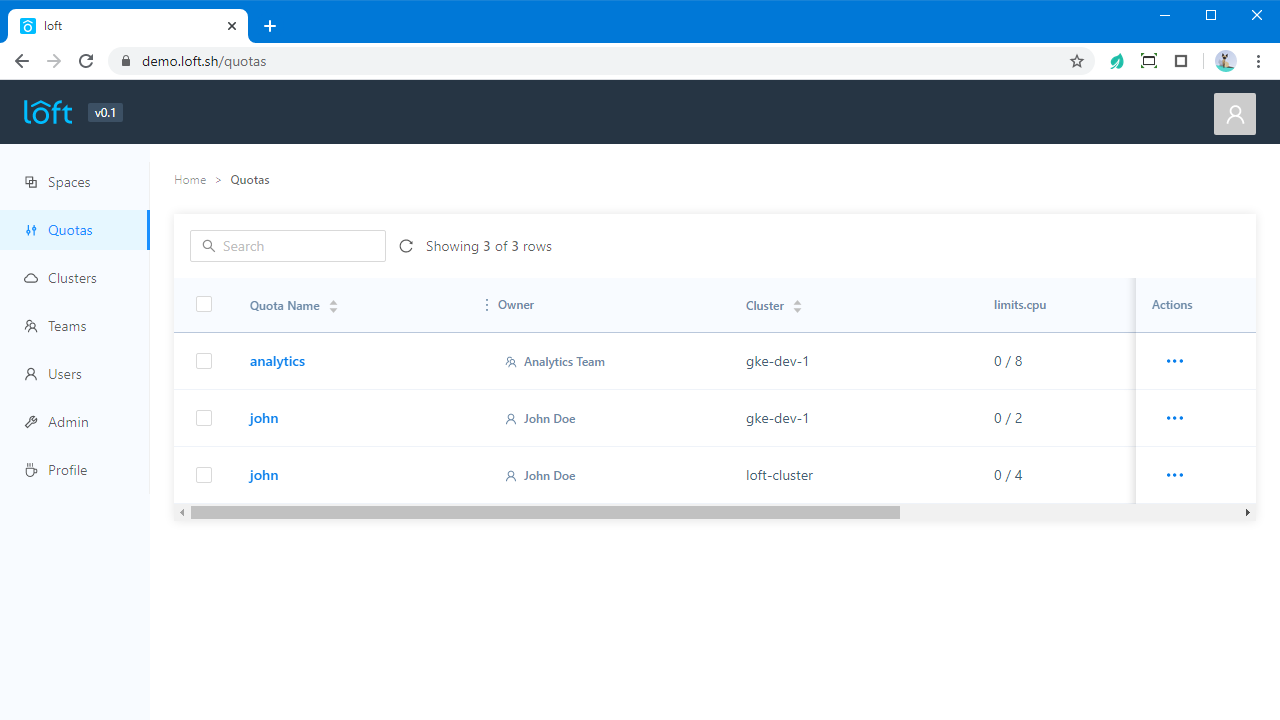
Quotas
In each cluster that you have access to, you have a cluster account. Each of these cluster accounts can have quotas which may limit how many Kubernetes resources (e.g. pods) you can create or how much computing power you can use.
You can view your quotas for all clusters as well as the current utilization in the Loft UI:
Access Keys
Access keys allow you to authenticate with Loft in non-interactive environments, e.g. from CI/CD pipelines.
Create Access Keys
Login with Access Keys
loft login https://my-loft.url.tld --access-key [ACCESS_KEY] # Replace URL with your own